This mission style bed was built for an innerspring mattress which can be bought from Ebay - look for the seller " mdsozark". She is a really nice lady who also makes nice custom slip covers for the mattresses. You may recognize that dog in the pic she uses for some of her ad's, it's my very own goofball. I gotta say that when I tell people that I bought an innerspring mattress for my dog, some roll their eyes and others laugh, but it was the best thing ever for my dog. It will also last a lifetime vs the crap foam pads that are sold for dogs which offer slim to no support - it was after the 2nd cheap foam mattress was worn thin that I realized that my dog needs better support, so I sought out a real mattress for her. The only downside is that there are not good quality bed frames available - so I built one...
The Plan - Build a Mission Style Pet Bed...

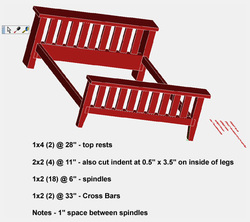
This was near the final design, created using ViaCAD 7. I was trying to decide if I should build it with 2x4 or 1x2 so the back shown in the pic is in 2x4 and the front is in 1x2. I decided to go with the 1x2 for the front and back, and that I think was a good choice since it sits in front of a window and does not really have a headboard. It would be built from poplar in small sizes (1x2, 1x4 and 2x2). Poplar was the choice because it would be stained dark and it was relatively free from knots. Poplar also looks pretty good when stained a dark color which is what I was gonna do anyway. I used Minwax PolyShades which was a very poor choice until I decided to spray it on, then it worked out OK.
The tools used were a cut off saw, a bandsaw (only used to angle the feet), a vibrating hand sander, a drill and a dowel pin guide, some clamps and tie down straps.
The tools used were a cut off saw, a bandsaw (only used to angle the feet), a vibrating hand sander, a drill and a dowel pin guide, some clamps and tie down straps.
Glue it up...

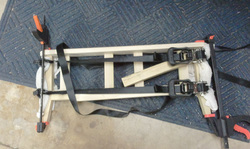
After the parts were cut and I put the down pins in, I glued up the sides. Here one side is partially glued up. It appears assembled but the top is not glued on, only set in place since I still need to add the spindles which each have a dowel at both ends. Getting the joints tight is really important and that is why I used so many clamps. The tie downs work well, but are hard to position and can cut into the wood if the edges are not padded well.
And glue some more...

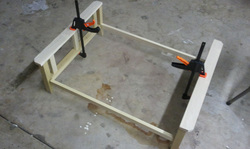
Once the sides were assembled the only things left are the spindles and the runners. I already glued the runners here, but the spindles and top rails were not yet glued.
Skipped a few steps, but this is how it turned out

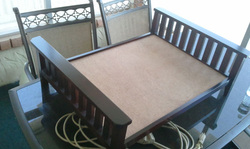
Here it is after several frustrating errors with the finish (I had to completely remove the first hand finished PolyShades since it turned out so bad). The base is just a 3/16" plywood which sets on top of some corner reinforcing pieces which are screwed in. It has been holding up well and fortunately my dog is not a chewer so it still looks new. I had to let it sit outside for about a week before I brought it in since the Polyshades had a strong residual odor, which did disappear.
