My Stoopid Stuff
  • Home
  • Projects
  • Blog
  • Lec'tronics
  • Links
  • CNC
  • Quick Recipes
  • 3D Printer Tips
  • Voron 2.4

Hawaiian Rice in the Instant Pot

2/19/2021

0 Comments

 
Picture
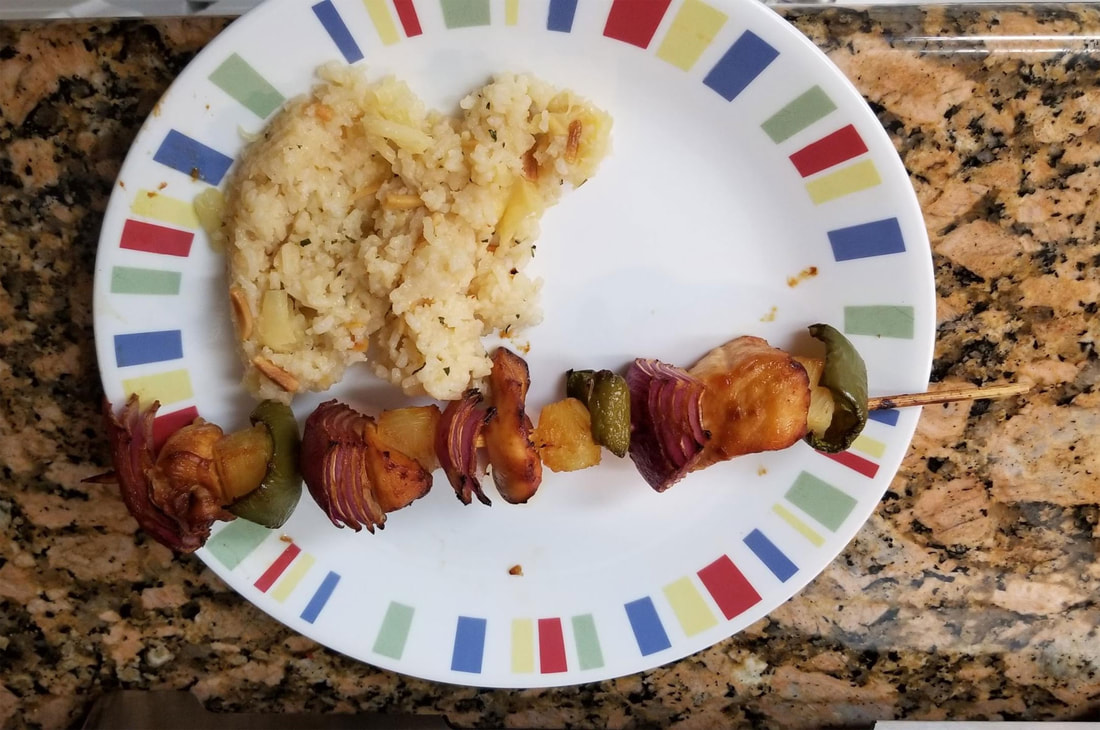
I made the Hawaiian Rice with some Hawaiian Chicken Kabobs (recipe for those is linked below).  The recipe here is just for the rice:

Ingredients:

  • About 1/3 of a 20oz can of Pineapple chunks (use the rest for kabobs)
  • 1 1/2 cups of the juice from the pineapple can (or just make the balance up with water)
  • 1 1/2 Tablespoon of Butter
  • 1 cup of Jasmine Rice
  • 1 packet of Savory Choice Chicken Broth Concentrate
  • 1 teaspoon minced Ginger
  • 1/2 to 1 teaspoon Huy Fong Foods Chili Garlic Sauce

These are optional:
  • A couple tablespoons of slivered almonds
  • a 1/2 teaspoon of oil (to roast the almonds a bit)
  • 1 Tablespoon of lime juice
  • 1 Teaspoon of cilantro (more or less if you don't like cilantro)

Instructions:

Add everything but the almonds, oil, lime juice and cilantro to the Instant Pot and cook it on the rice setting.

While the rice is cooking, put the almond slivers in a pan or dish (or foil even) with the oilve oil.  Make sure the oil coats the almonds and put them in the air fryer at 400°F for a few minutes.  I added them to the air fryer while the kabobs were also cooking and probably let them roast for about 4-5 minutes.  The should not get burned, but wanna toast them a bit.

When the rice is done in the Instant Pot, just add the lime juice, almonds and cilantro to taste, and fluff the rice, and that's it.

I made this with some Chicken Kabobs using this recipe (https://www.dinneratthezoo.com/hawaiian-chicken-kabobs/) but I substituted apple cider vinegar for the rice vinegar and added 1/2 to 1 teaspoon Huy Fong Foods Chili Garlic Sauce.  I also added the rest of the pineapple juice from the can to to the marinade, while reserving the rest for the rice. 

After they are skewered up with the pineapple chunks and veggies, I air fry 'em at 375°F for about 10m, and I check them around 6m in, to turn them.  If they look like they are not getting a bit of crispiness I will bump the temp up for the last couple minutes to 415°F.  They are done when they reach an internal temp of 165°F.  Depending on the size of the chicken cubes, cooking time may be longer. Just gotta keep an eye on them, turning them now and then, and checking the internal temp of the chicken which should be at least 165°F.


0 Comments

Air Fryer Salmon Cakes (Gluten Free)

2/18/2021

0 Comments

 
Picture

I made these tonight and they were pretty darn good.  I think the key is to hit the coated patties with some oil so they don't dry out in the air fryer, but when I made them previously I did not have an oil sprayer and they were still pretty good.

Ingredients:
  • 1 (14.75 ounce) can canned salmon, drained (I remove the bones and skin)
  • 1 egg
  • 1 chopped shallot or half a small or medium onion chopped up
  • 1 packet (half a box) of Aleia’s Coat & Crunch Extra Crispy (just dump it on a plate big enough to let you coat the patties)
  • 1 tablespoon olive oil (and a little more sprayed on if you have olive oil spritzer)
  • 1 teaspoon dry parsley
  • 1/4 teaspoon garlic powder (more or less if you like or don't like garlic)

How to make 'em:

1. Drain the salmon and dump it in a bowl and either mix it up as it, or remove the bones and skin and then break it up.

2. Add everything but the Aleia’s Coat & Crunch to the salmon in the bowl, and mix it up.  It helps to have gloves since this gets messy.

3. Form the patties and coat them in the Aleia’s Coat & Crunch, then set them on an oiled sheet or aluminum foil.  I put some foil in the air fry basket and coat it with oilve oil.

4. If you have an olive oil sprayer, hit the tops with enough oil so they are not dry.  If you don't have an oilve oil sprayer, then just keep an eye on them and be ready to turn them before they get too dry/burned.  I learned of this magical addition to my air fryer from Lana Under Pressure on Youtube.  She explains why it's so useful in that linked video and she also has an amazon link there if you want to support her channel (note that if you click the link here it will not have an affiliate association). 

5. Cook the patties at 400°F until browned and they are 145°F inside (took about 11-12 minutes for mine).  I got the cooking time and some other ideas for this recipe from here (https://www.eatingwell.com/recipe/270219/air-fryer-salmon-cakes/)

I got 5 decent sized patties from this recipe, and I serve them with some creamed peas and instant mashed potatoes.

For the creamed peas:
  • Drain 1 can of peas and put it in a microwave safe dish.
  • Add about 1/4  to 1/3 cup of milk to a mug, with 1 1/2 to 2 Tablespoons of butter and optionally a bit of salt (just a pinch, it is easy to add too much since there is salt in the butter normally).  You can add more milk later if you like them more soupy.  Also don't add to much salt (needs to be said since it's easy to do :D
  • Heat  the milk, butter in the mug, in the microwave, until the butter is melted. 
  • Then add a bit of corn starch to the milk and butter mix, just enough to thicken it slightly, and stir constantly while adding it.  It's best to add corn starch in very small amounts at a time so it can fully dissolve.  If you have problems you can try adding a couple tablespoons of water to a mug and mix the corn starch there first, and then add it to the milk.
  • Once it looks good, add the milk, butter, salt and corn starch mix to the peas, and then heat in the microwave until hot (takes about 3-4 minutes in mine).  It should be stirred up about every minute while it cooks or the corn starch may settle to the bottom.

This goes great with some Simple Truth Corn Bread Mix.

0 Comments

Simple Creamed Corn (using canned corn)

2/5/2021

0 Comments

 
Sorry no pics, it was gone too quick :D

This was adapted from a creamed corn recipe here, which is probably much better in every way, but I did not have the cream, and my corn was in a can.  In any case I would use the one linked if you have the stuff, but this should be OK in a pinch.

What you will need:
  •     1 1/2 tablespoons unsalted butter
  •     about 2-3 tablespoons of a medium onion, minced (it was about 1/2" of a sliced from the middle of a medium onion)
  •     1 cloves garlic, minced
  •     1 15 ounce can of corn, drained
  •     1/4 cup of milk (add some more at the end if needed)
  •     2 tablespons Parmesan cheese, freshly grated
  •     salt and pepper to taste

Just heat the butter over medium heat till it melts, then add the minced onion in, and cook till its soft.

Then dump the drained can of corn, milk and garlic in the pan, cook 5 minutes over medium heat, stirring often.  If it gets to dry, add a bit of milk back or reduce the heat to low.

Stir in the Parmesan cheese and then taste it to see if it needs salt and pepper, and that's it.  I think some chopped jalapenos , a half teaspoon of smoked paprika or red pepper flakes may be nice to try next time, to spice it up a bit, but it was good the way it is too.
0 Comments

Great tool for Air Fryers - The Air Fryer Calculator

2/4/2021

0 Comments

 
https://www.airfryercalculator.com/
www.airfryercalculator.com has been a great tool for using with the air fryer.  I heard of the site from a buddy who has an air fryer and it has given me a better understanding of how much quicker and hotter air frying is (also I tend to overcook things less often when I use the calculator).  It is not always perfect, but it is always very close and gives me a good idea of where I should start if I am going to air fry.
0 Comments

    Just some Stoopid Recipes

    Nothing fancy here :D  These are just some simple recipes I have made (and like).  I usually don't write them down and end up forgetting (and later rediscovering) them, so I'm sort'a doing this for me, but I hope somebody finds them useful too.  Everything here will be gluten free unless specified.

    Most recipes will be for an Instant Pot or Air Fryer (I have the Instant Omni Plus).

    Archives

    January 2023
    November 2021
    July 2021
    February 2021
    December 2020
    November 2020
    October 2020
    September 2020
    August 2020
    December 2018

    Categories

    All

    RSS Feed

Powered by Create your own unique website with customizable templates.