My Stoopid Stuff
  • Home
  • Projects
  • Blog
  • Lec'tronics
  • Links
  • CNC
  • Quick Recipes
  • 3D Printer Tips

Adjusting the X-Axis on the Ender 3

7/6/2018

13 Comments

 
Update - I found this video which describes a better way to adjust the X-Axis:
Although in the above video he did not adjust the outer wheels (which do not have eccentric nuts, it seemed like there was some small slop in them on mine which allowed me to push them a bit when tightening and it did seem to work for me in the end - though it may not be the easiest way - I would try the method from the video first next time by just adjusting the ilders.


And this is a great video on how to deal with a really out of alignment X-gantry (after seeing it, I would do this on my printer if I was building it again) - in fact just stop reading the stuff below and check out the video below:

Will leave the original post in case it may help - but please see the above videos (or at least the EdgeOfTech video) which are better and clearer guides:

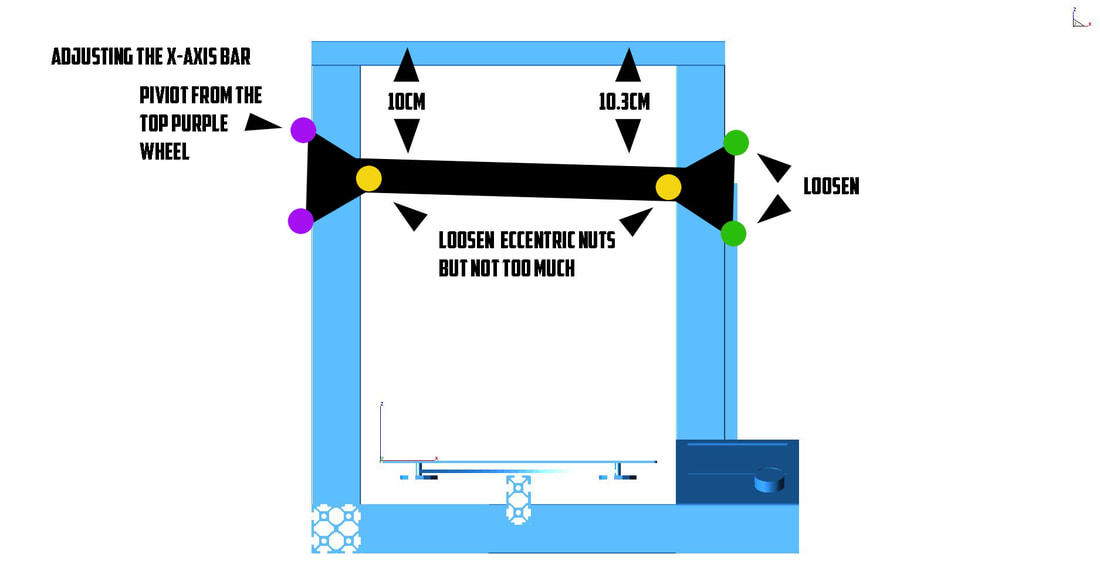
After getting the frame square, I noticed that the X-Axis 2020 extrusion was not parallel to the top 2020 extrusion on the frame.  When I measured it was about 3-4mm lower on the right side.  I just considered it to be an arm on a pivot point and adjusted it accordingly.  (update 6/16/2022) In the process below, the idea is to use the eccentric nuts, and also the bit of slop in the holes for the other wheels, to first bring the x-axis parallel with the top bar and then snug up the outside wheels first by pushing them in while tightening.  It can be a bit tricky to push the outside wheels in while tightening them, but if the slack can be removed from the non-adjustable wheels, the eccentric nuts will have more adjustment range, and won't need to push excessively from the inside of the frame to tighten all the wheels up (which would seem to also affect the geometry possibly).  Below is the process I used to fix that - from memory so I may have left something out, but this is the basic process:

1. Unplug the printer and then disconnected the Z-Axis stepper (this will keep any back EMF from damaging the board or stepper drivers).
2. Rotated the Z-Axis coupler until there was 10CM between X-Axis bar and top of the printer on the left side (didn't matter which side i set to 10CM, it is just for reference).
3. Noted the measurement on both the left and right side, measured from the 2020 extrusion on the X-Axis bar to the 2020 extrusion on the top frame (not between mounting brackets).
4. Write the measurements down and noted which way the X-Axis bar is tilted.  In my case the right side is sagging (low).
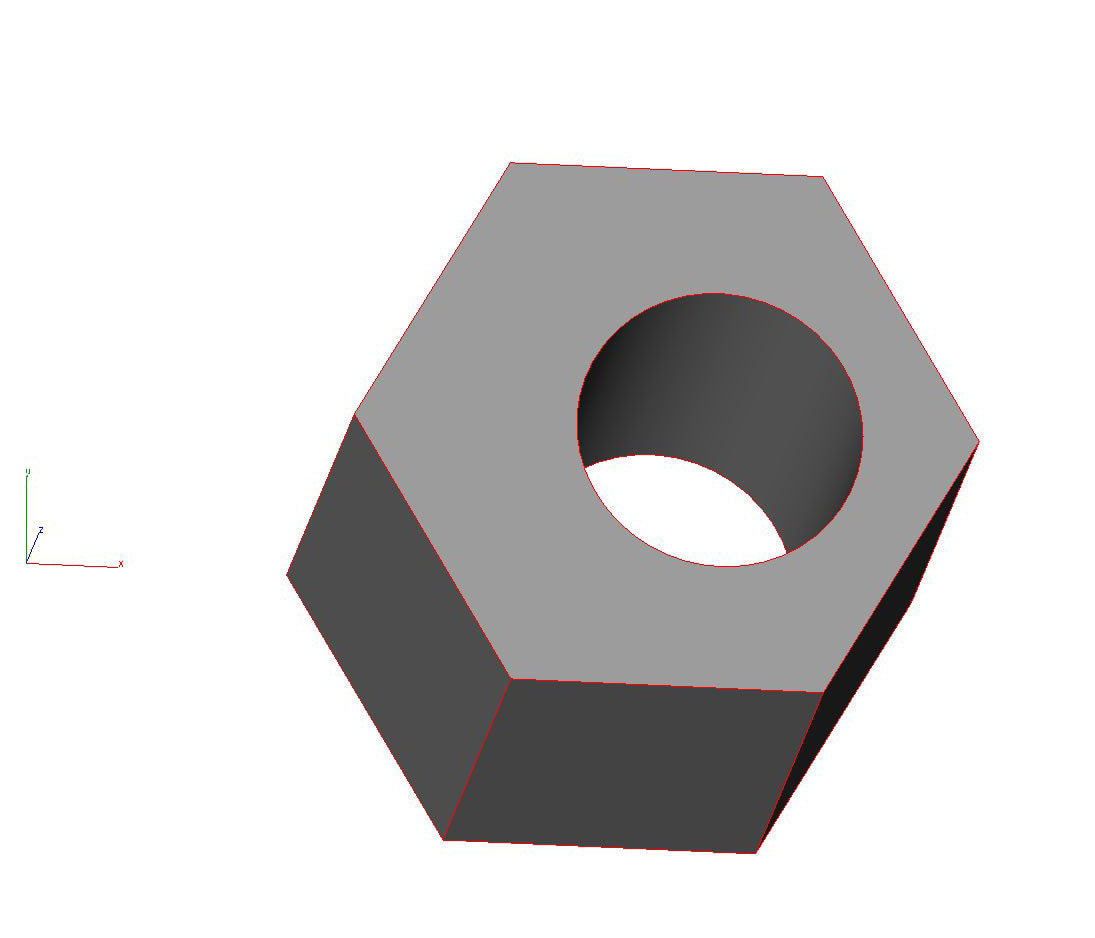
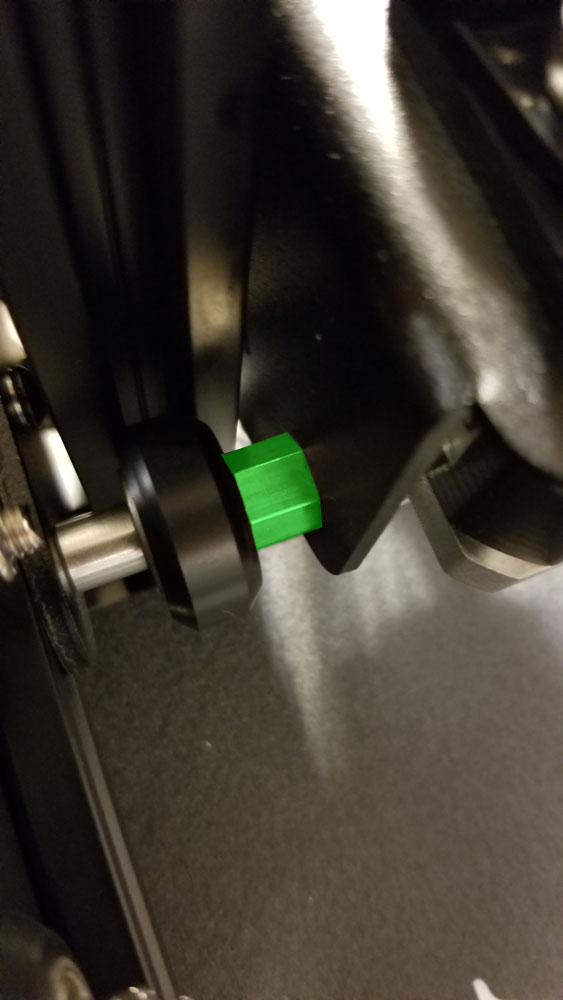
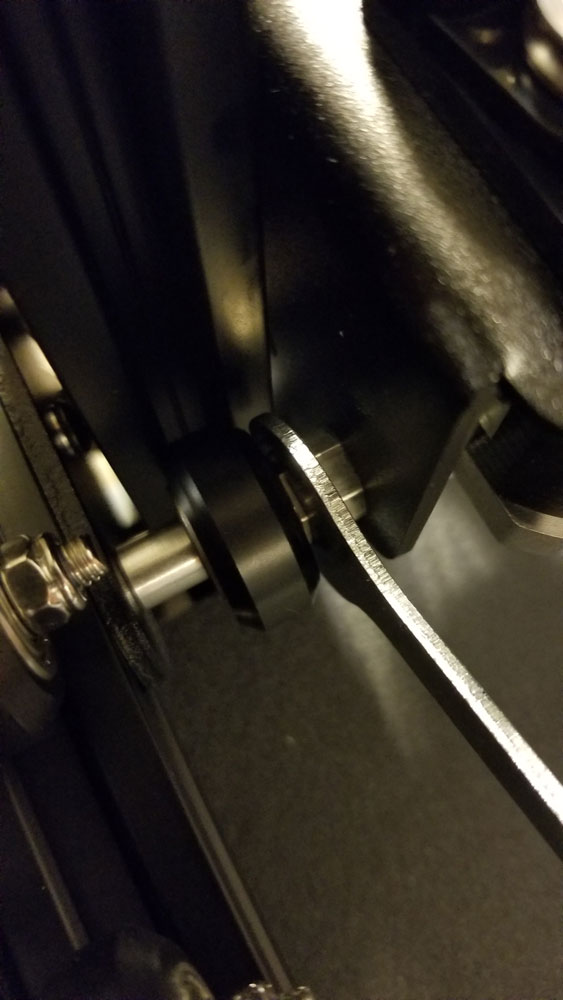
5. Loosened the yellow wheels by turning the eccentric nuts, only loosened them enough so they turned freely.  The eccentric nuts can be turned either way, so just need to adjust a bit and feel if the wheels are getting lose or tight, it should not take more than 1/2 turn to see some change.  See pics below for more info on the eccentric nuts.
6. Loosened the wheels in green in the pic below, and if I could not then adjust the X-Axis bar, I would have loosened the bottom purple wheel also (but I did not need to).
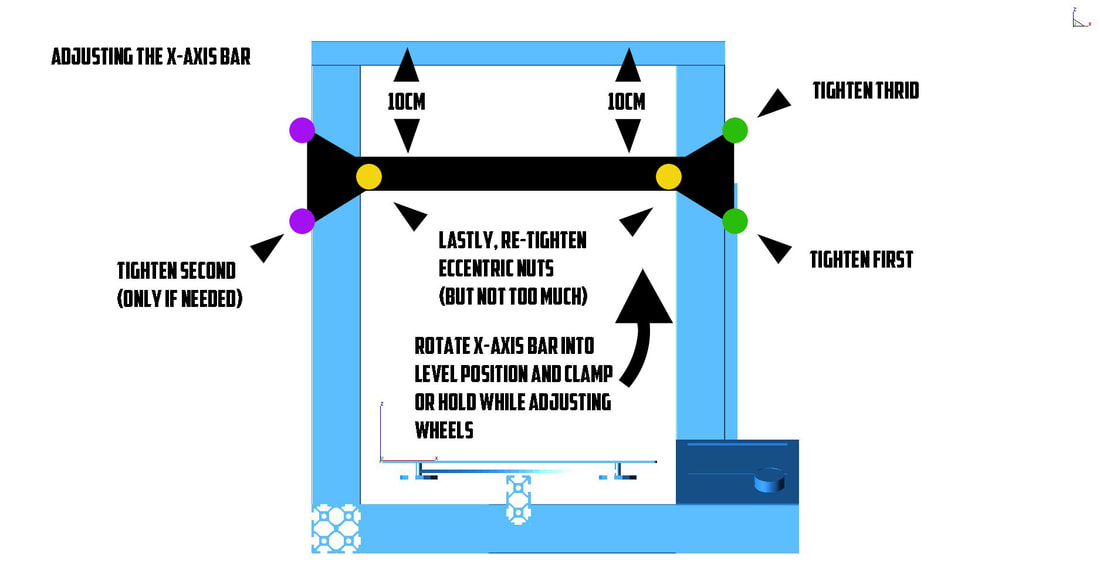
7. lifted the right side of the X-Axis bar so it was level, if possible clamp it here or just hold it - both sides should now measure the same 10CM distance from the top 2020 extrusion (X-Axis bar is now parallel to the top 2020 extrusion).
8. Tighten the bottom green wheel on the right side, then the bottom purple wheel on the left side (if loosened), and then the top green wheel on the right side.  These outside wheels need to be pushed snug to the frame while tightening since there is just a bit of slack in the mounting holes that will allow that.  It may be necessary to "split the difference" when taking up this slack between the left and right side outside wheels.
9. Re-adjust the yellow eccentric wheels to snug them down, I adjusted them so I could turn them with my fingers but not easily.
10. Verify all wheels are tightened and I was able to turn them using my fingers (but again they were not easily turned).
11. Re-measure the parallelness of the X-Axis bar and the top 2020 extrusion by repeating #2, then make any adjustments again.
12. Once done, re-connect the Z-Axis stepper and verify that all the steppers and end stops remain connected.

Picture
Picture
A note on the eccentric nuts. they can be loosened without loosening the locknut, they should turn a bit with the included wrench. The eccentric nuts have a hole that is not centered, so when they are rotated, they move the bolt that goes through them, this enabled the adjustment of the wheels in or out by turning the eccentric nuts.
Picture
Picture
Picture
13 Comments
Darren Currie
12/27/2019 05:18:33 pm

Thanks for posting this. I got my Ender 3 Pro for Christmas and did the test dog print successfully*, but decided to check my square and sure enough...20cm on the left and 20.2 on the right. I followed your instructions and got it square. thanks a bunch!
* the included PLA sample is not enough to print the entire dog! I had some spare PLA lying around and finished the print, but the top of the dog's head is clear :-)

Reply
MIke link
12/27/2019 06:08:27 pm

Thanks for posting, it's good to hear that the info helped. The Ender3 is a very good value and should be a great printer once tuned up. I think they are only getting better too, but the frames on these printers still need a once over like you did, which I think will save some headaches later. If you run into problems with clogs down the road, Maker Steve has some great videos on the ender3 on YT (https://www.youtube.com/channel/UCwPheBnhHkTYdSqnUF_F4ww). Good luck and have a great new year!

Reply
Brad White
1/5/2020 07:29:05 pm

Thank you, I'm new to 3D printing and setup my Ender 3 myself. After several successful projects I started to get a little more picky about my bed being perfectly level. I also realized that a level bed means nothing if the X axis isn't level as well. I just finished following your video and can know put a very sensitive level on the top extruded bar, the X axis bar, and the bed and they are all exactly the same (level that is). Thanks again for taking your time to show us newbies what we need to know.

Reply
Mike link
1/6/2020 06:06:15 am

Hi Brad, thanks for letting me know this post was helpful.
The good news is that once leveled, I have not had to re-level the x-axis gantry since doing this, and with the touch probe, I can't recall the last time I had to touch the bed leveling screws.

The video which you mentioned (I think it was Edge of Tech) was linked to, but is not mine. I wish I had that guy's hair though :D I sometimes will link to videos which I find really helpful since they make things much clearer than any post I could make. The Ender3 forum on thingiverse is a great resource too. Good luck!

Reply
Luke Tucker
3/17/2020 12:41:08 am

Thanks for this, im in so many groups and not one person has told me to make sure the eccentric nuts are tight when leveling the X axis, im going to do that now

Reply
Mike link
7/8/2020 11:41:06 am

No problem, hope it helps.

Reply
Triple
7/8/2020 03:04:30 am

Many thanks for this guide. Saved a lot of frustration, disappointment in what is otherwise a well built printer.

Reply
Mike link
7/8/2020 12:24:27 pm

Glad it helped. I think that getting the gantry adjusted as well as tightening the eccentric nuts on the other axis will go a long way to solving many problems people have with the Ender3, which is a really excellent printer for the money, despite the problems I had with mine. Good luck with your printer!

Reply
Andrew
3/5/2021 02:20:41 am

I have been trying to work out why the RHS of my prints was so rough compared to the LHS. I worked on leveling the bed for hours and I was about to give up when I found your post. It all makes sense now. The X gantry isnt level ! Thank you so much for your post. This has fixed my problem and I am happy again. Andrew

Reply
Mike link
3/8/2021 04:50:07 am

Awesome! It's good to know that the post was helpful, and Happy printing!

Reply
Ben
6/14/2022 05:05:32 pm

My prints always “drift” on the y axis. So I end up with a big slanted mess. The belts are snug. Any suggestions?

Reply
Mike
6/16/2022 05:05:46 pm

Hi, if the belt is tight and you are getting what looks like missed steps in the x, it sounds like the gear on the x may be slipping or the belt may be loose. To fix that, loosen the belt and then remove the cover over the X stepper. Then check the gear on X stepper, it will probably have two grub screws, one should be on the flat and both should be tight. I posted some pics of these gears under the "X,Y,Z Axis Mechanical" section here http://www.mystoopidstuff.com/3d-printer-tips.html. It's a good idea to check the Y as well if you find the gear was loose.

If it's not the gear, you can check the opposite end idler pulley and make sure it rolls freely when the belt is loose.

Good luck!

Reply
White Cannon link
1/17/2023 04:53:31 am

Thank you for the wonderful content

Reply


Leave a Reply.

    Picture

    Stoopid Me

    Welcome to my Stoopid corner of teh Internet.  It's mostly gonna be 3D printing stuff, but I also post some recipes, projects, and the occasional rant here as well.  More Stoopid stuff is updated regularly.

    I recently joined the Amazon Associate program, so some of the links on this site are Amazon affiliate links. This means that, at zero cost to you, I will earn an affiliate commission if you click through the link and finalize a purchase.  This will help to support this site, and pay for more Stoopid Stuff.

    Archives

    March 2023
    February 2023
    January 2023
    November 2022
    October 2022
    September 2022
    August 2022
    July 2022
    April 2022
    February 2022
    January 2022
    December 2021
    November 2021
    October 2021
    September 2021
    August 2021
    July 2021
    June 2021
    May 2021
    April 2021
    March 2021
    February 2021
    January 2021
    December 2020
    November 2020
    October 2020
    September 2020
    August 2020
    July 2020
    June 2020
    May 2020
    April 2020
    March 2020
    February 2020
    January 2020
    December 2019
    November 2019
    October 2019
    September 2019
    August 2019
    July 2019
    June 2019
    May 2019
    April 2019
    March 2019
    February 2019
    January 2019
    December 2018
    November 2018
    October 2018
    September 2018
    August 2018
    July 2018
    June 2018
    May 2018
    April 2018
    March 2018
    February 2018
    November 2017
    September 2017
    August 2017
    June 2017
    December 2016
    October 2016
    September 2016
    July 2016
    March 2016
    February 2016
    September 2015
    August 2015
    June 2015
    May 2015
    April 2015
    March 2015
    February 2015
    January 2015
    December 2014
    November 2014
    October 2014
    September 2014
    July 2014
    June 2014
    May 2014
    April 2014
    March 2014
    February 2014
    November 2013
    August 2013
    July 2013
    June 2013
    May 2013
    April 2013
    March 2013
    January 2013
    December 2012
    November 2012
    October 2012
    September 2012
    August 2012

    Categories

    All

    RSS Feed

      Contact Form (Name is optional)

    Submit
Powered by Create your own unique website with customizable templates.