My Stoopid Stuff
  • Home
  • Projects
  • Blog
  • Lec'tronics
  • Links
  • CNC
  • Quick Recipes
  • 3D Printer Tips

The Curse of FDM printing...Well One of Them at Least

1/22/2022

0 Comments

 
Picture
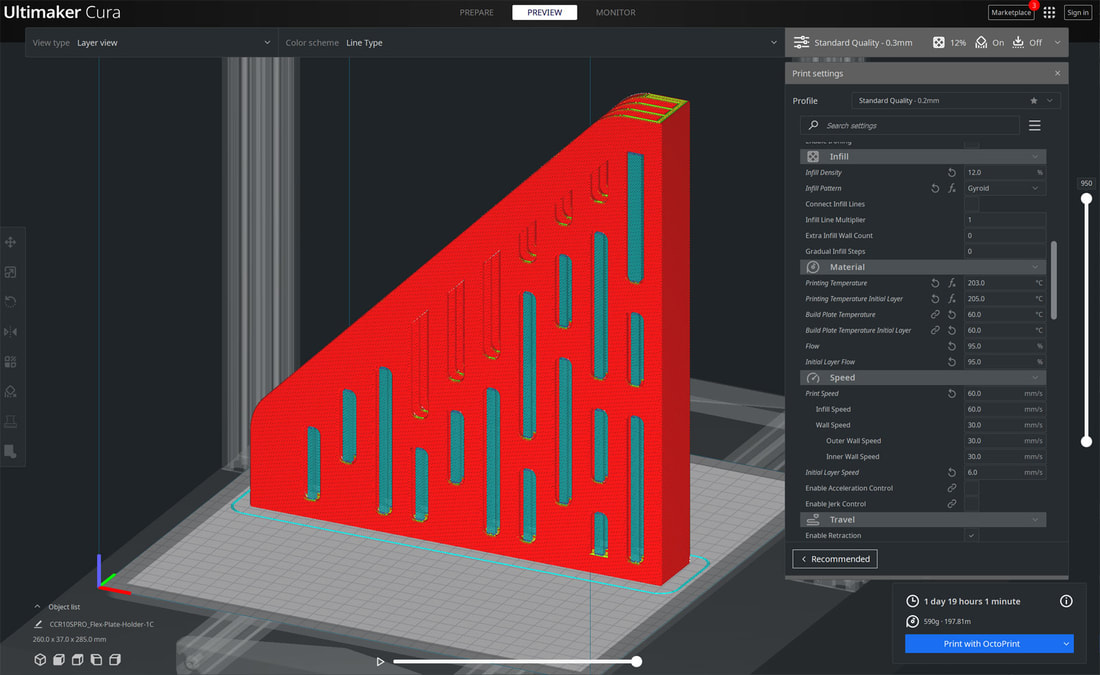
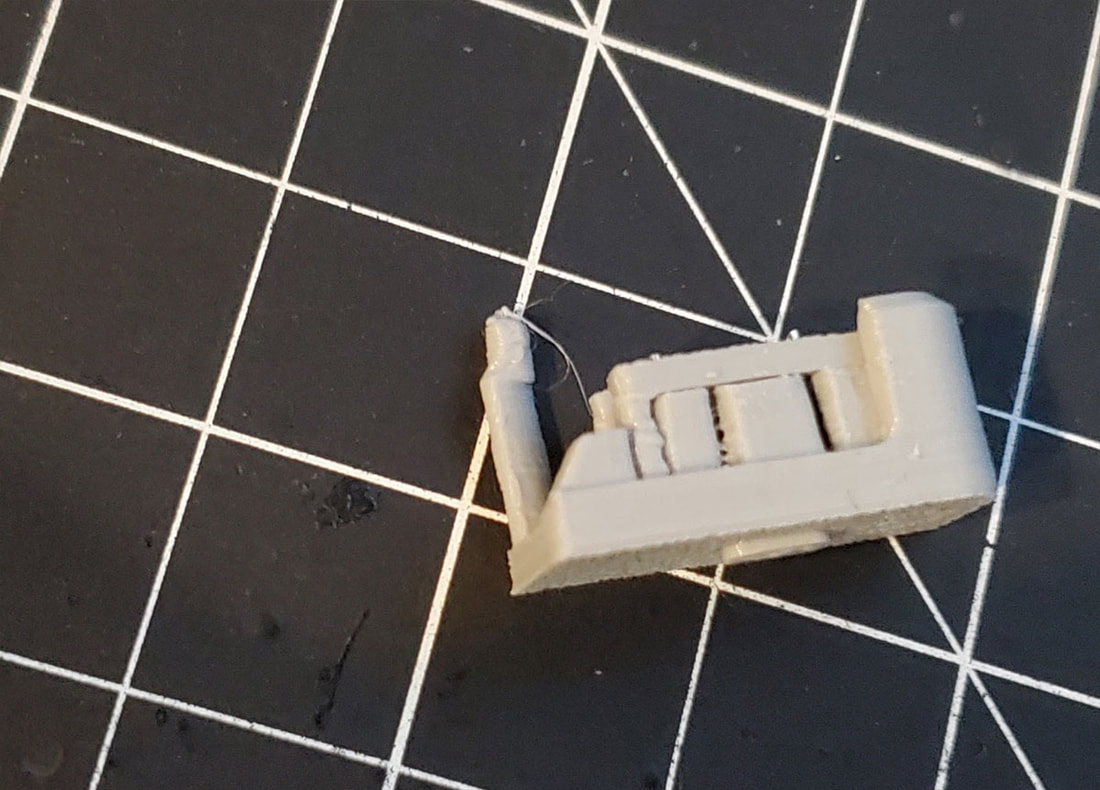
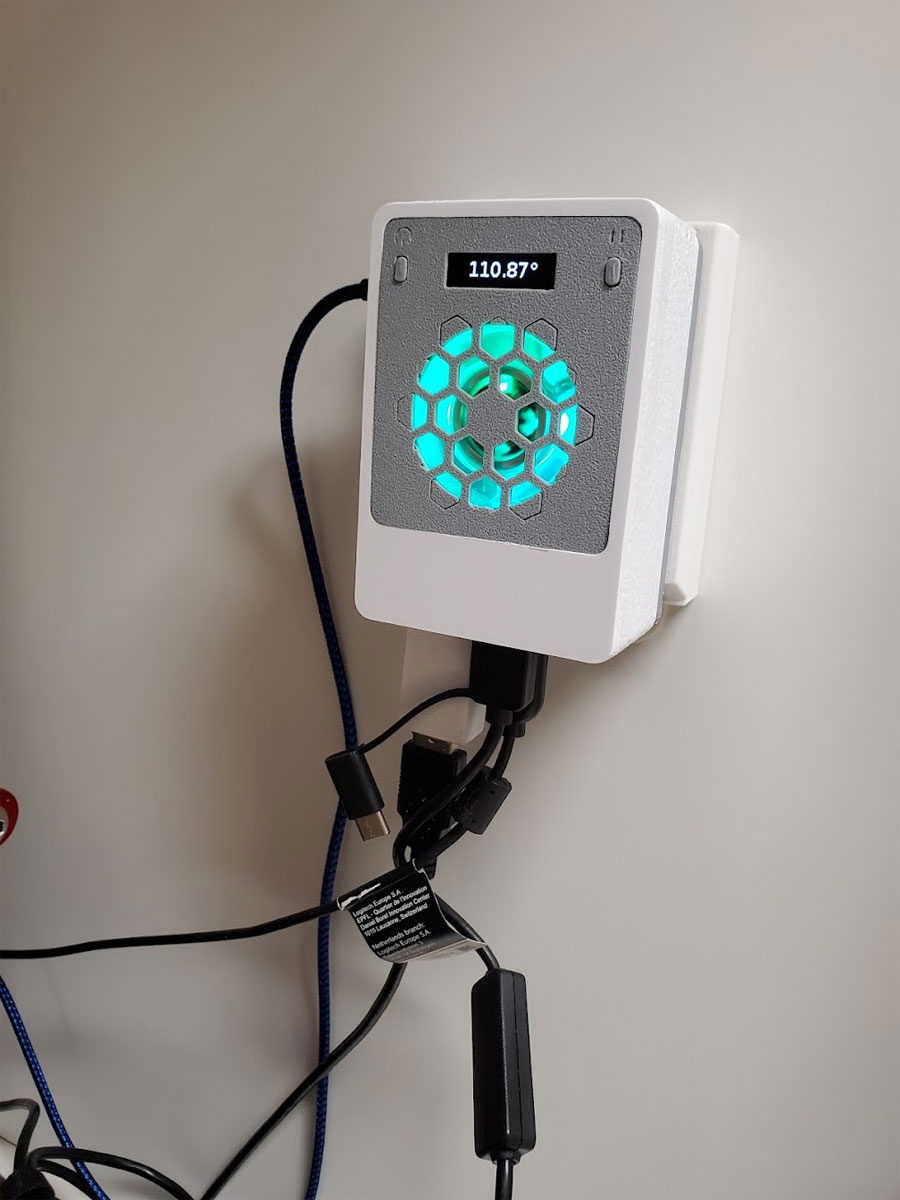
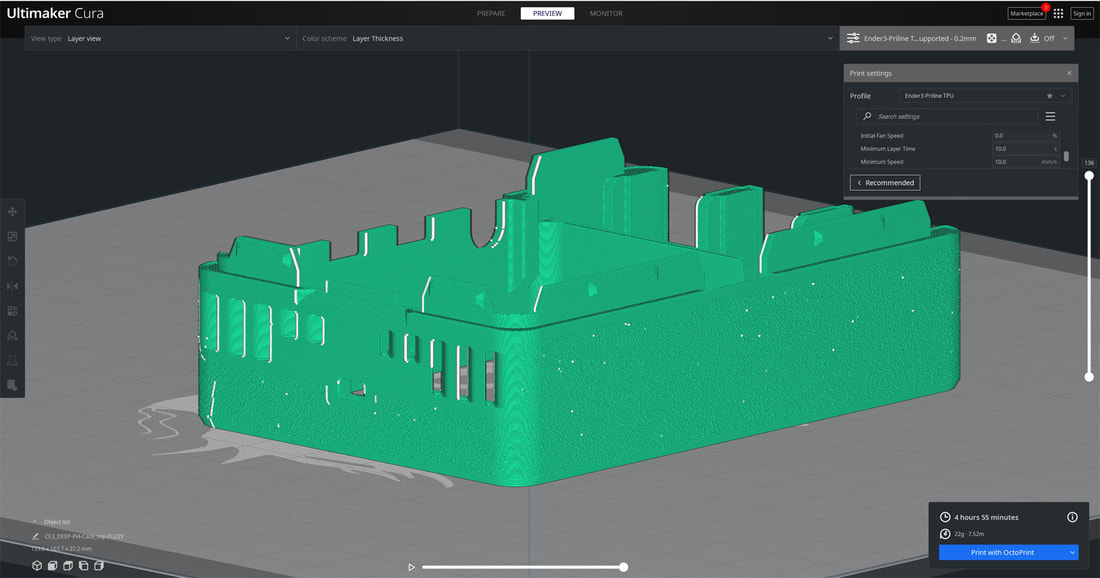
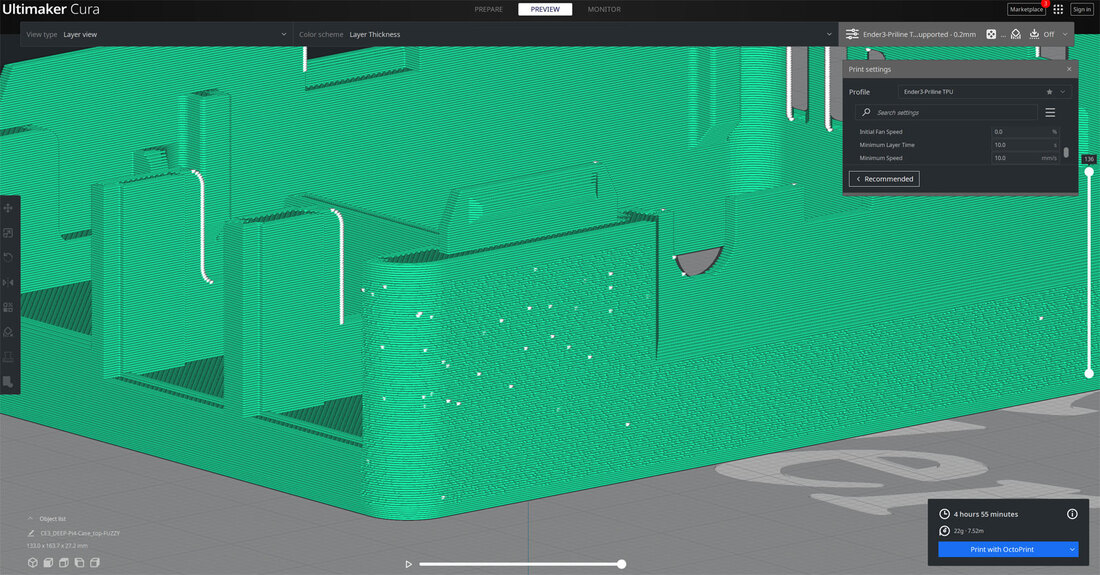
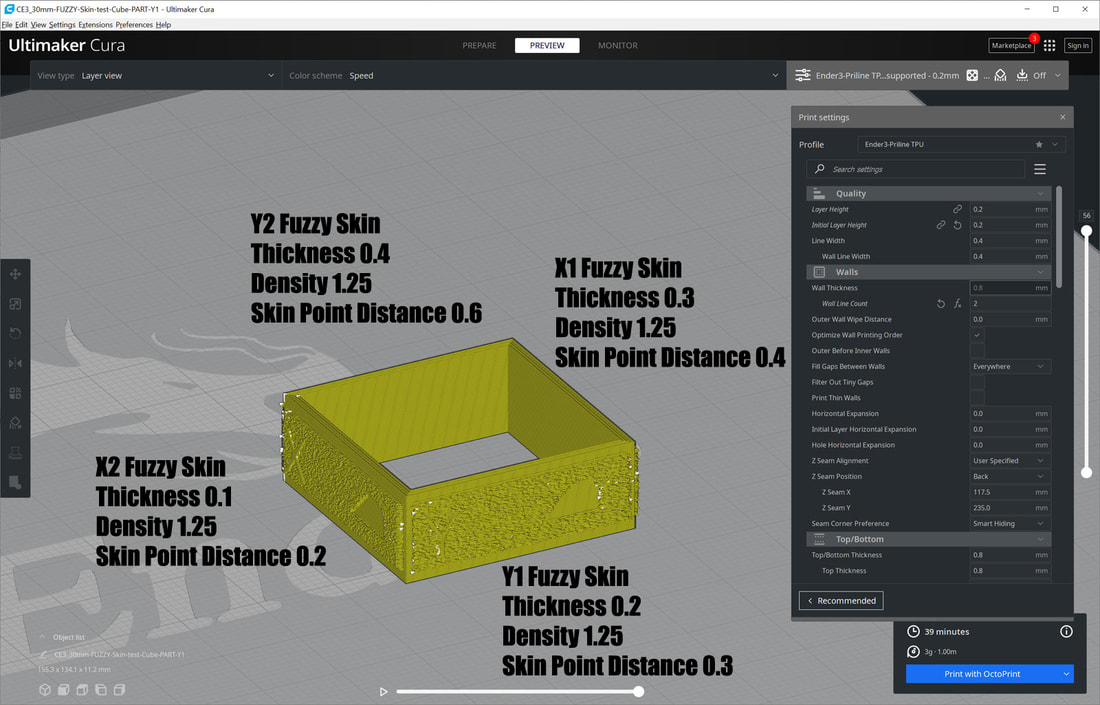
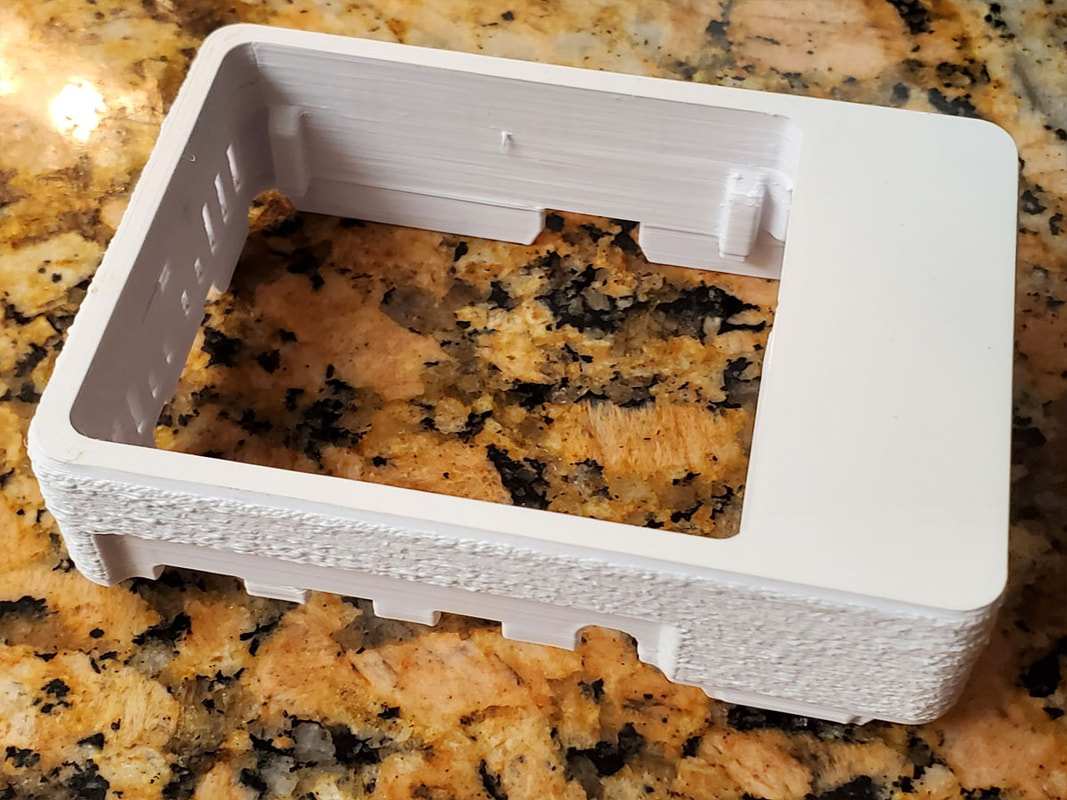
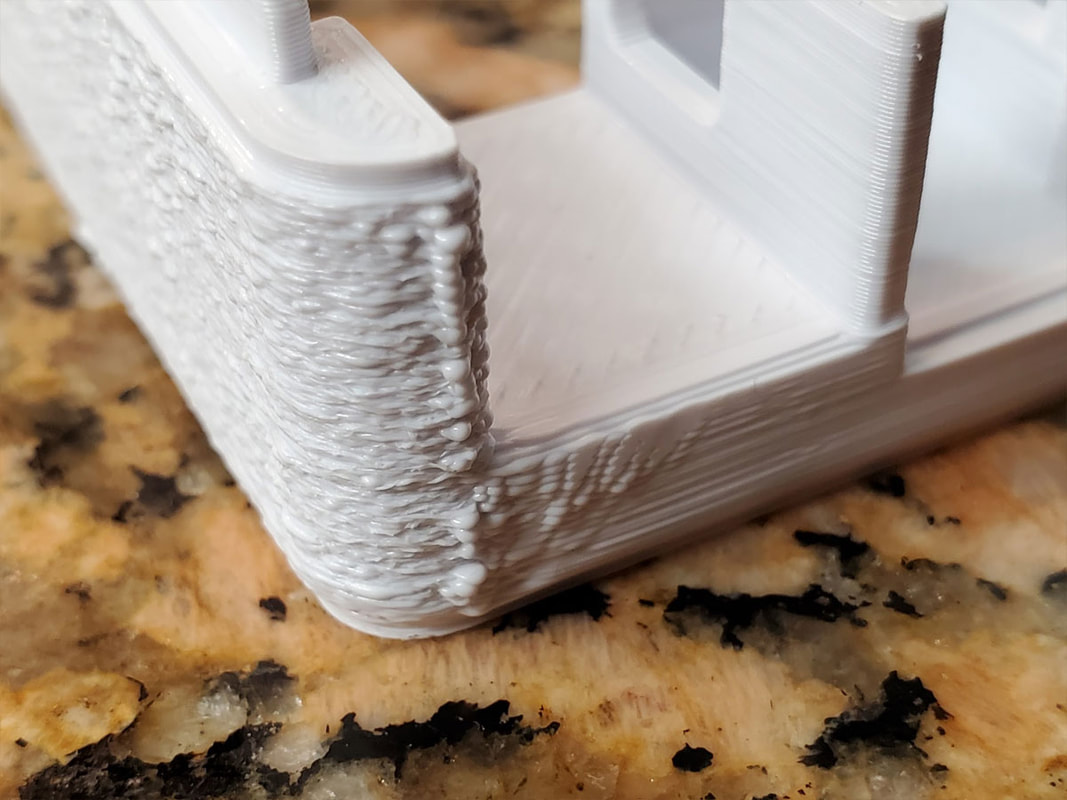
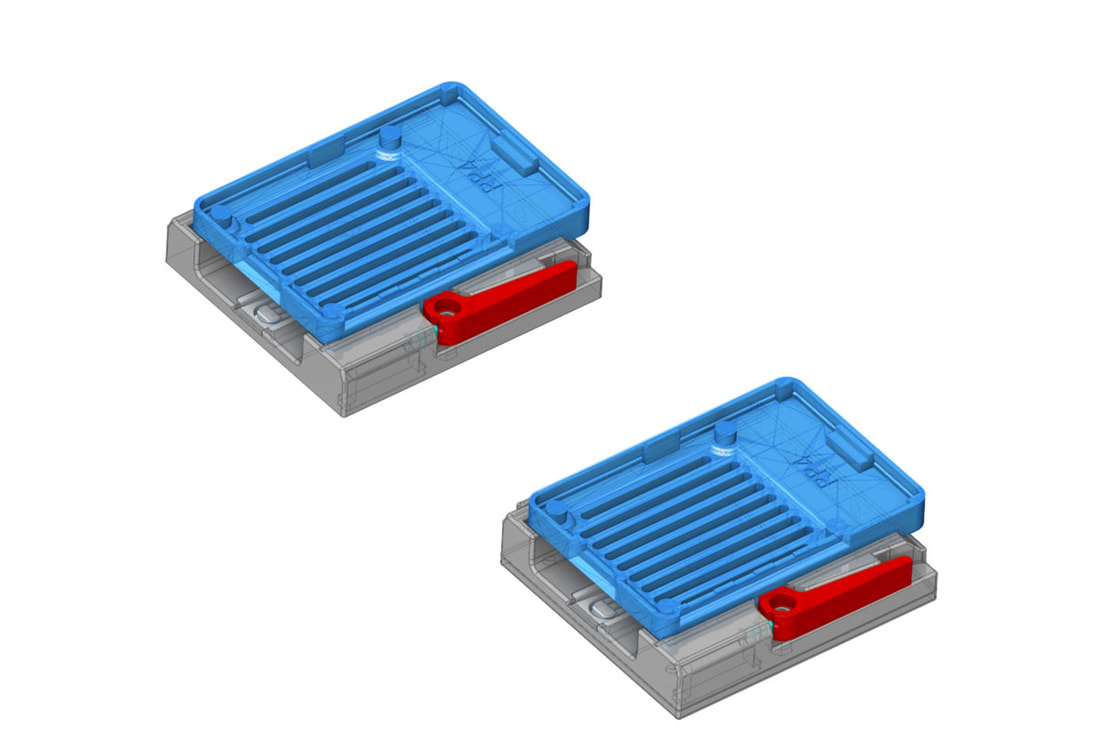
I need some way to store my growing collection of flex steel build plates for my CR10S Pro, so I designed the thing above.  It looked cool I thought, and should store several plates safely.  I even thought that maybe with the 0.6mm nozzle I could get it down to a reasonable amount of time (I told myself).  Well I probably knew I was lying to myself if I thought this print could go under a day, but I rolled the dice, and Cura popped up a day, 19 hours and 1 minute to print that beauty.  It will also take half a kilo of material, so I'm gonna pass. 

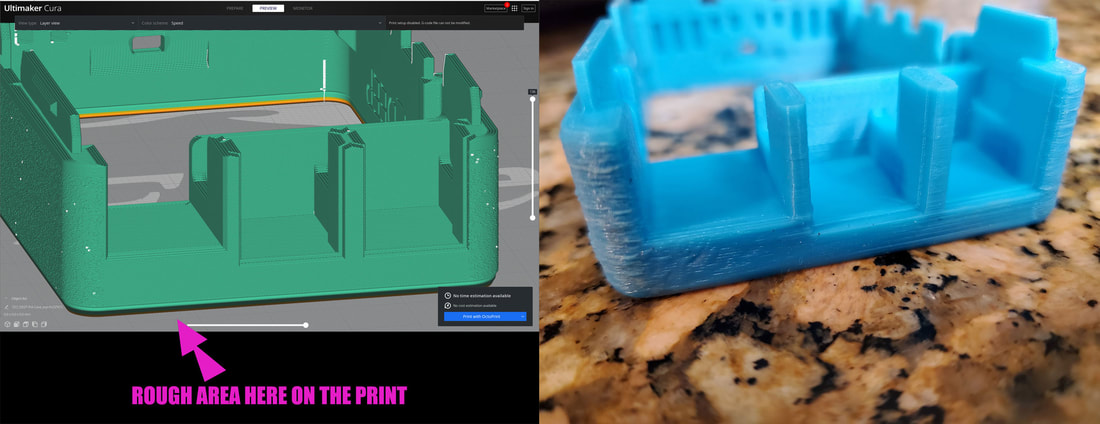
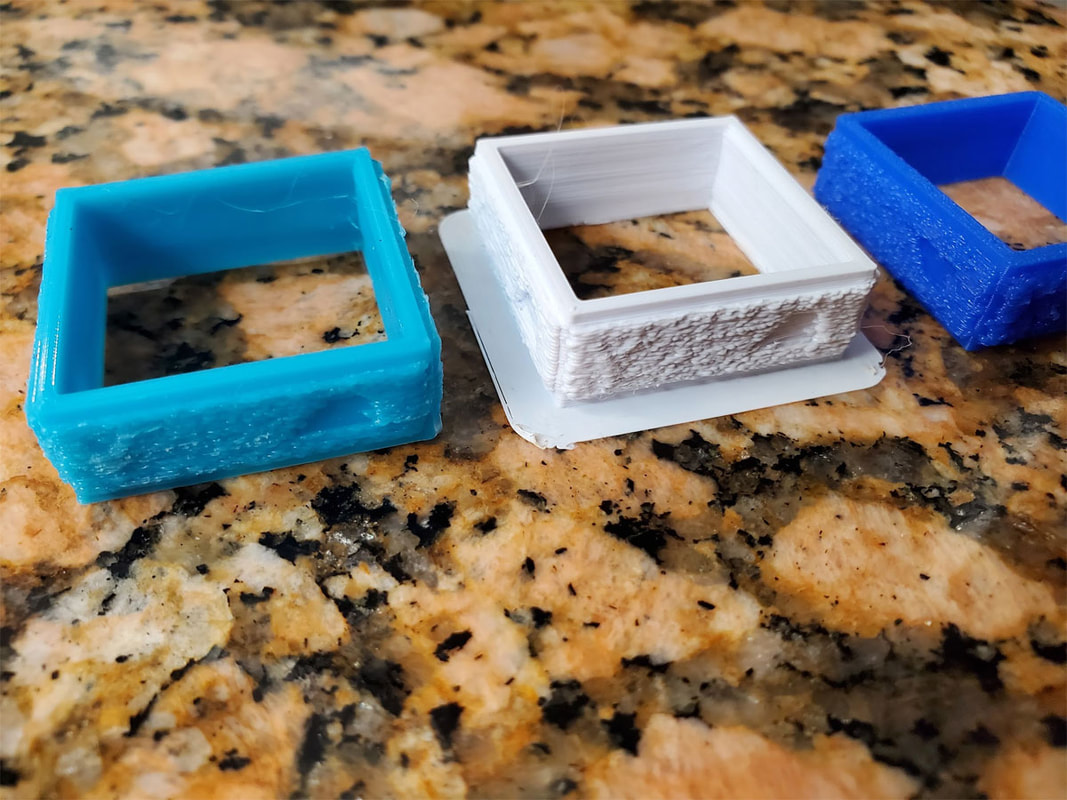
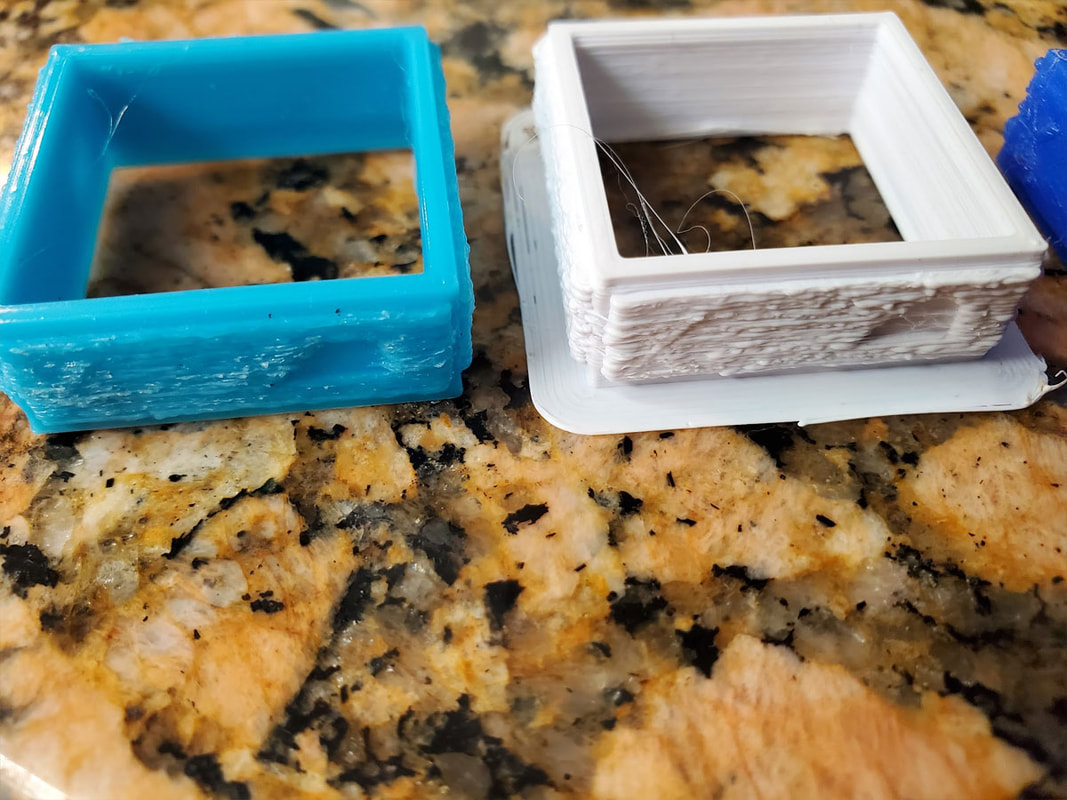
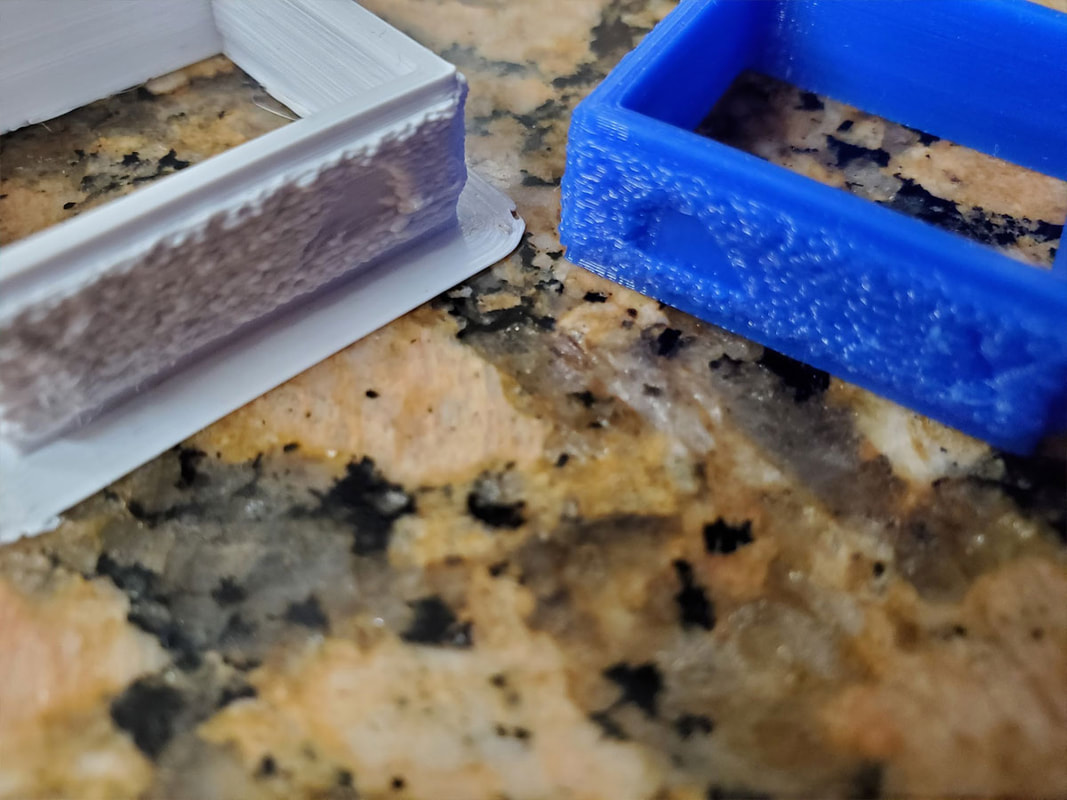
But this experience did give me some ideas on a more modular approach to this problem, which would take a more reasonable amount of time to print (each part).  Hopefully I can get rid of all the supports too and give it a nice surface finish.  So it's back to the drawing board, since I'm not into multi-day (or even full day) prints for various reasons.
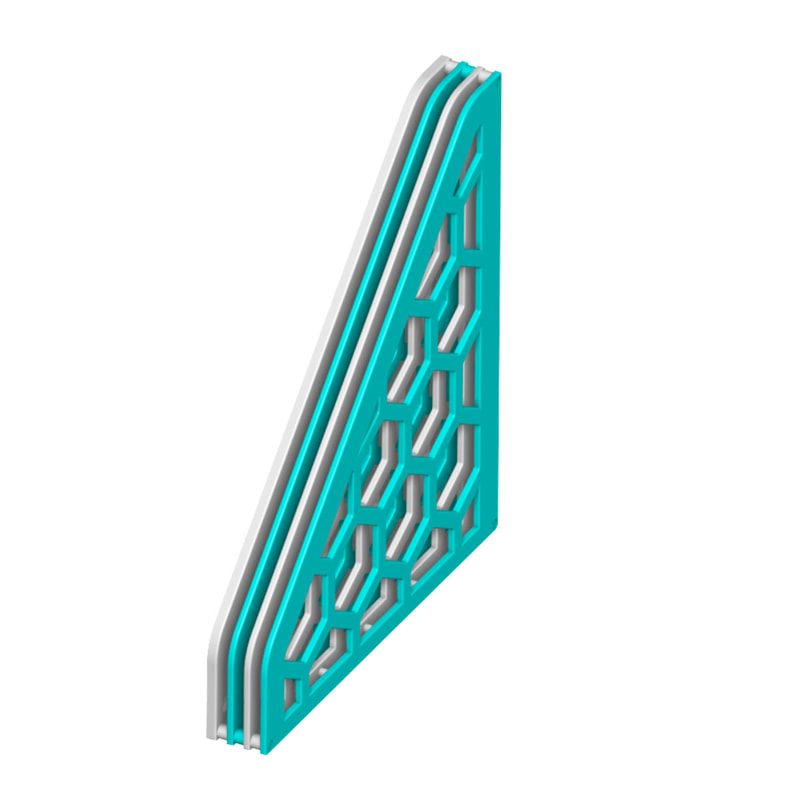
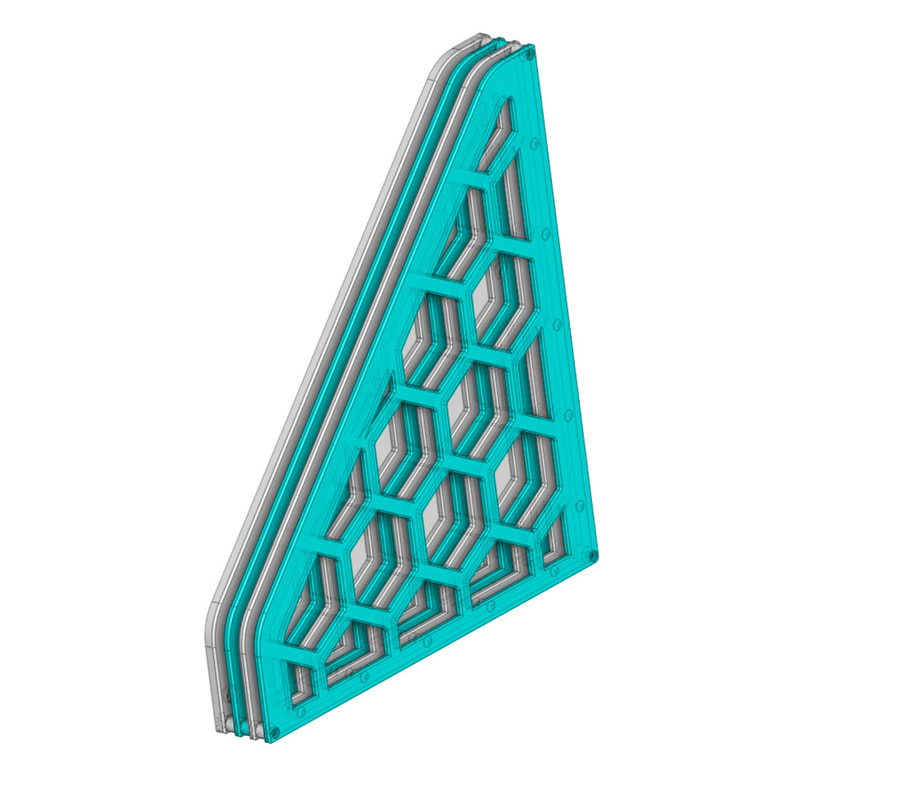
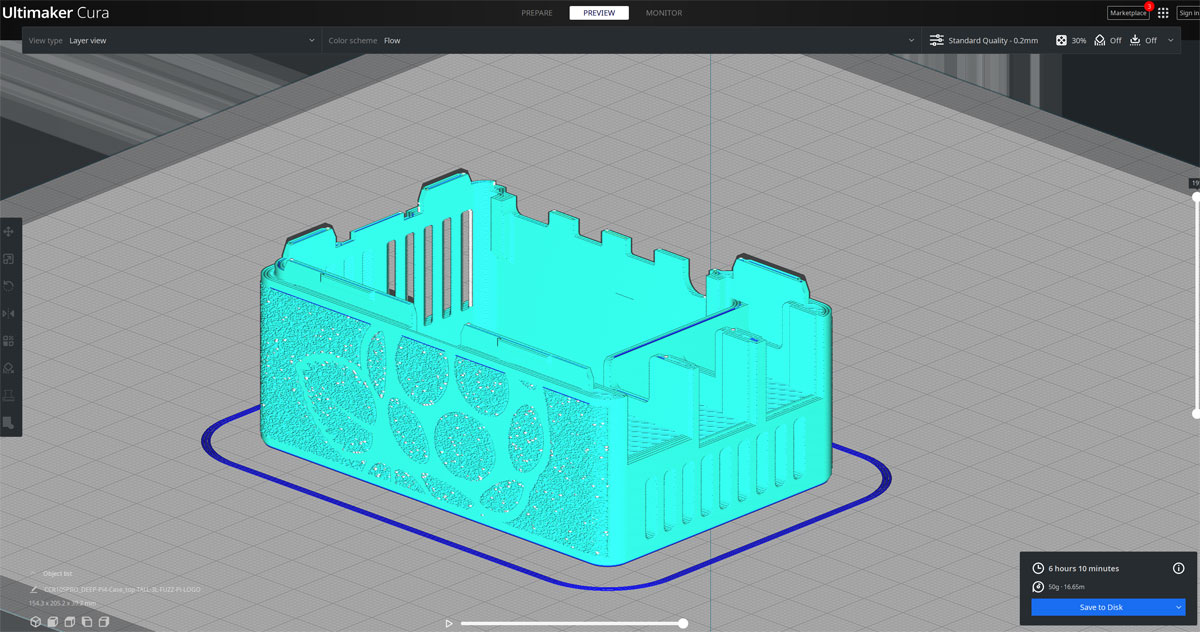
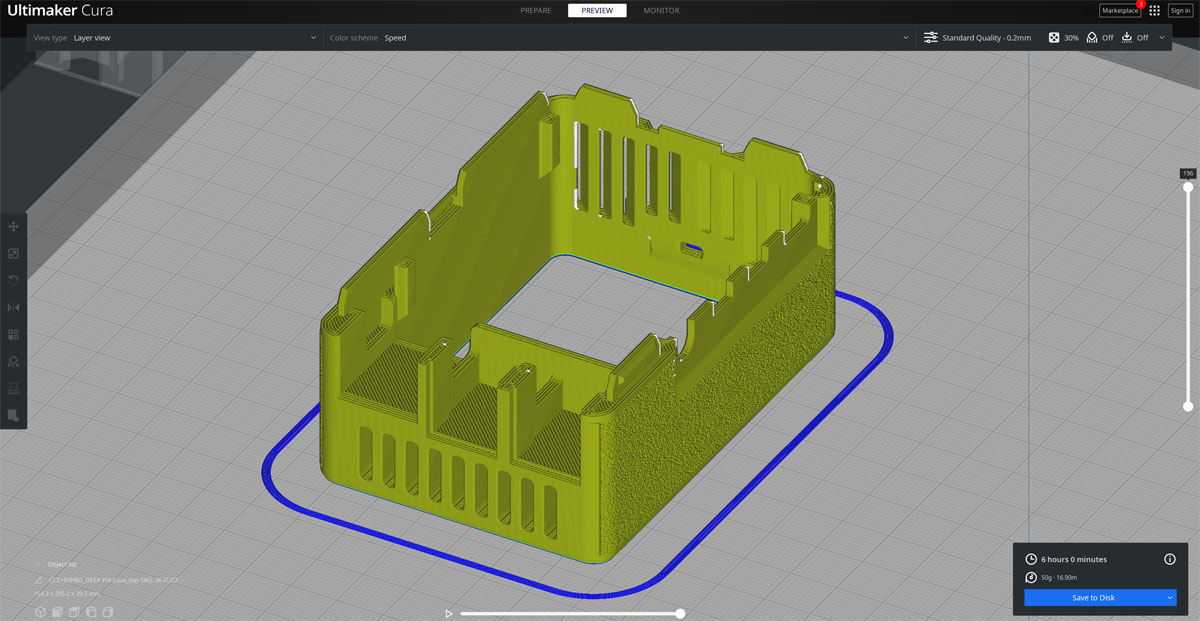
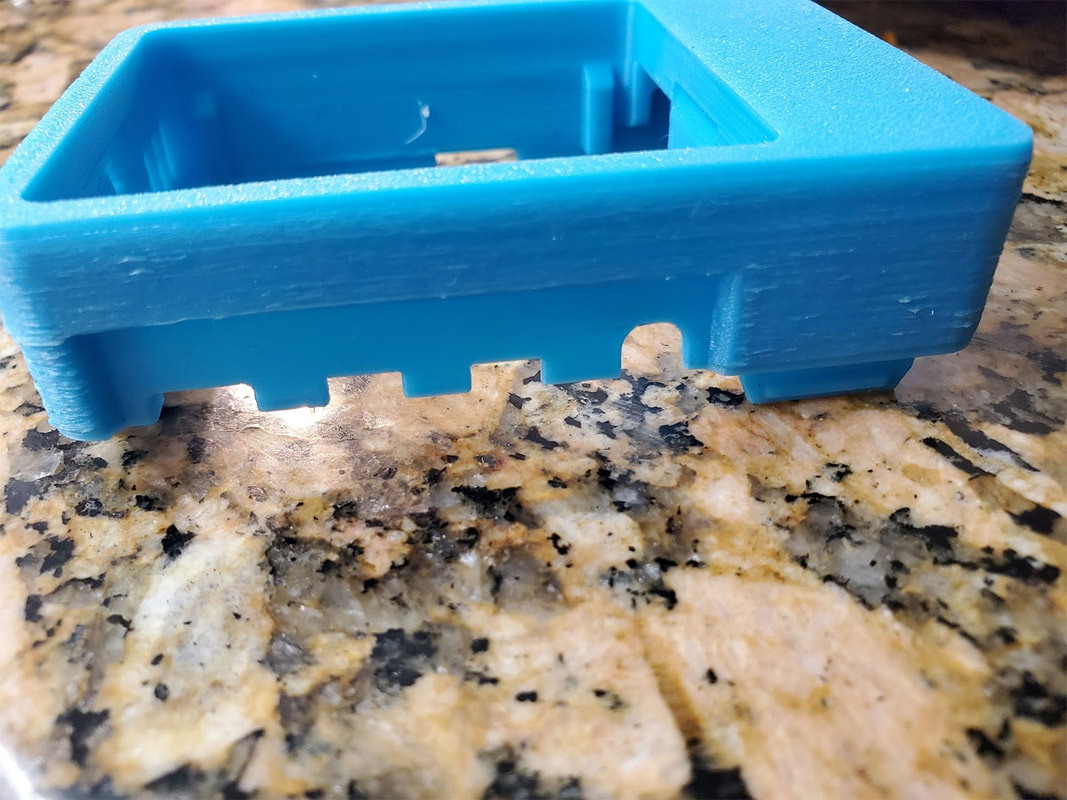
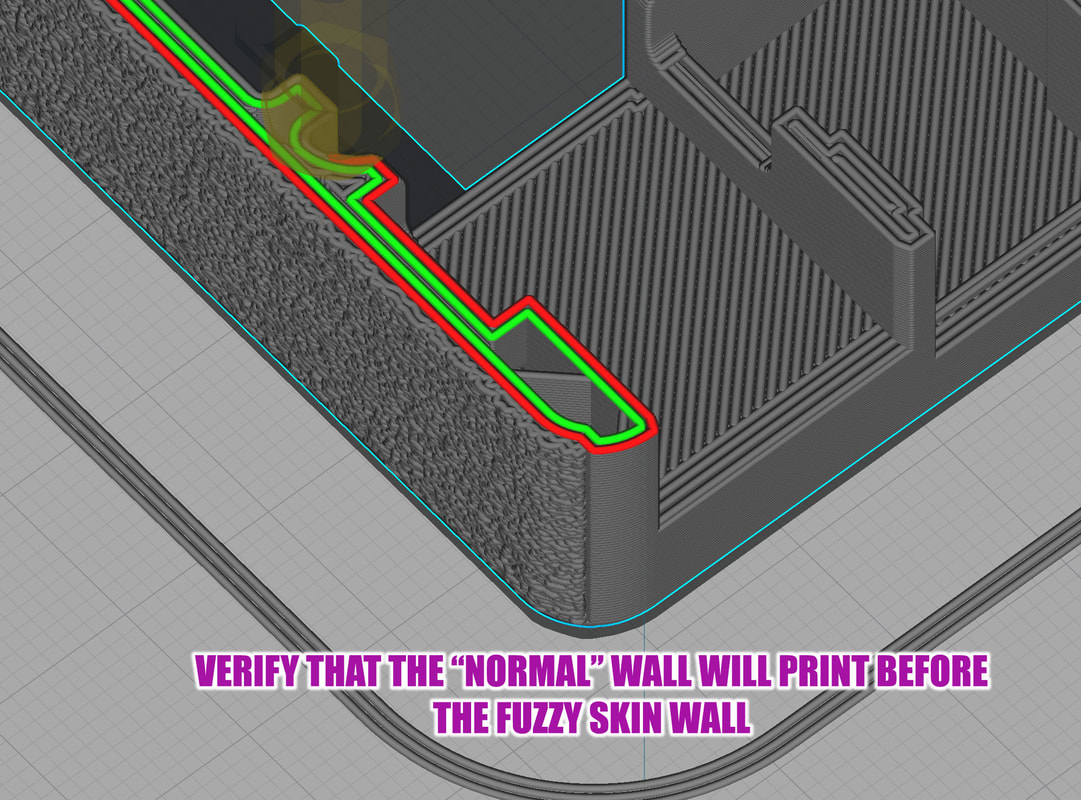
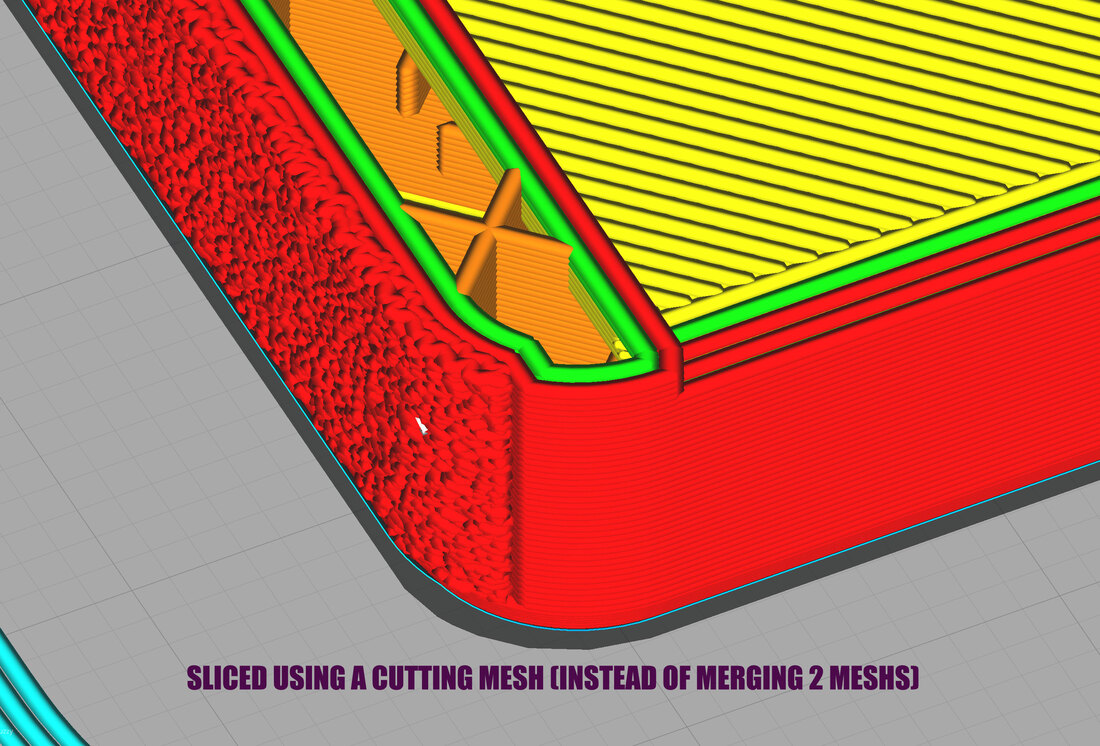
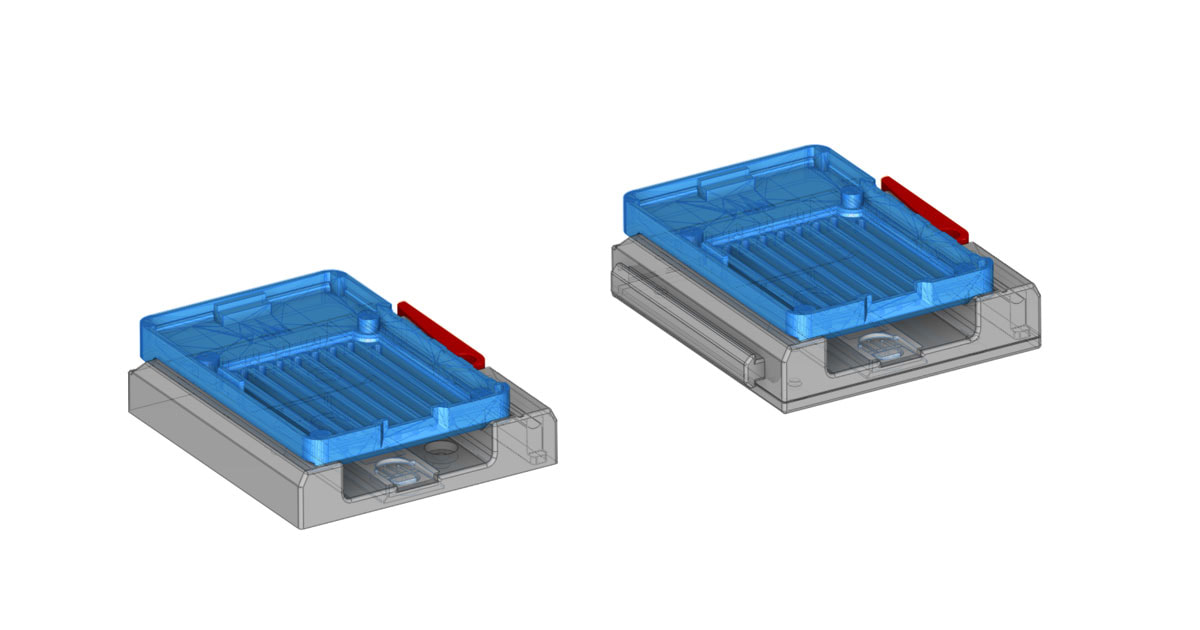
Update - I couldn't leave this alone and re-designed it from the ground up.  I'm thinking I may be able to cut down on the print time further, but the longest plate in this model (the base which has a lot of solid areas) will take about 12 hours, while the leaves are about 6 hours each.  I think it can probably be cut down further since I can boot the speed since it is flat. 

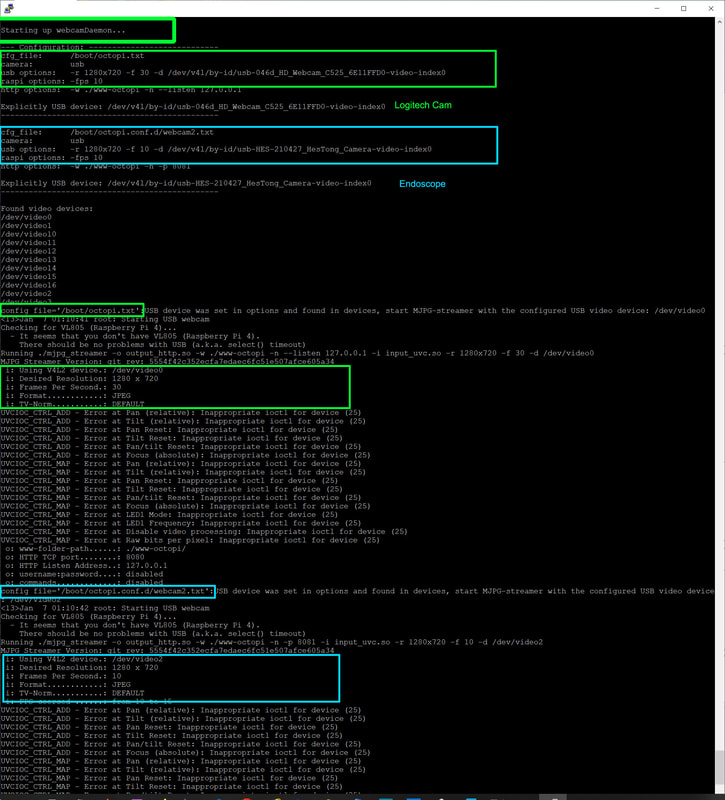
I'm still not sure though if I will tackle this print since it will take several days and I already have things going on, but will add this to the list.  I need to get a safe storage solution for my build plates though...
Picture
Picture
0 Comments

Shutdown Button

1/22/2022

0 Comments

 
Picture
I saw that PrusaPrinters has a contest going to design a button.  I was looking through the rules and then this just popped into my head, and I already had the shutdown symbol ready to go from work on the Pi button module (several posts down).  This is a two part print, some glue may help hold the inserts.  I have no idea how well it will do in the laundry though:D

You can find it here:
https://www.prusaprinters.org/prints/122790-shutdown-button
Picture
Picture
Edit - well I guess it was not as unique an idea as I had thought.  I found a couple of other entries that beat me to it :D  And one of those entries points out that this is the "Standby Button" not a power or "Shutdown" button.  Oh well, this is my stoopidstuff anyway, so I'm leaving it as the "Shutdown" button (and yes I feel horrible about that :D).


0 Comments

Fuzzy Skin Test Cube V2

1/20/2022

0 Comments

 
Picture
This is just a quick test cube that I'm hoping will be my go-to for checking how Cura's Fuzzy Skin feature looks with different materials and settings.  It uses Cura's "Cutting Mesh" feature to define the areas where fuzzy skin gets applied.  I plan to make a write up of how to use it once I make sure it works the way I want it to (testing the test cube now :D).
Picture
Picture
Picture
0 Comments

Gonna See If Buttons Can Be Fit on Sneaks Pi4 Case (Top Module Insert) - Update (Its Posted to PrusaPrinters)

1/13/2022

0 Comments

 
Update 9/2/2022: I had to disable the script which shows the IP and other info, due to python taking up almost 100% of the CPU.  I don't know why that is, and am pretty sure it's something I messed up, but I decided that for now I will just use it without the display.  The buttons however still work since they operate independent of the LCD script.

I'd like to have a shutdown switch on my Pi's, and maybe one more switch could be handy for some other future use like pausing a print using an Octoprint plugin.  Since I am gonna standardize the Pi mounts (they will all use my latching mount) and cases for my various Pi's (the cases will be Sneak's Modular Snap Together Raspberry Pi Cases), I decided to see if a switch or two would fit in the OLED+Fan cover module.  I'm not sure if this will work, and the parts are really small so it may not be practical, but I'm trying it anyway.  I have a bunch of mini tactile switches from an assortment I bought some time ago to fix something, and they have been handy a few times since.  The downside is they are weird little switches and not easy to get, they are also tiny.  I originally thought I would try a 6x6mm tactile switch but found it was way too tight a fit.  So I found a smaller 6x3.5x5mm switch that looks like a better fit.  So I modeled the switch, and a clip to hold it, as well as a button to use since the button on the switch is way too small to be useful by itself.  I'm planning to print some test models to verify the button clip will work, and will update this post with how it works out. 
Update 1/15/2022 - It looks like the button module will work.  I still need to test some tweaks to the design to help things fit better but I'm pretty happy with the prototype module.  I had to rotate it 180° due to interference between the switches and the dupont connectors for the pins being used for the OLED and switches.  I also had a dead OLED display (but fortunately bought two and the other worked).  I would also highly recommend using ribbon cable for wiring the OLED and buttons since it is very tight.  I also connected all the grounds at the OLED so I could run one ground back to the connector (and have 2 fewer wires to run). 

The switches control shutdown (left) and pause (right).  The shutdown uses GPIO27 and the pause uses GPIO17.

To enable the shutdown button I used this guide:
https://raspberrypi.stackexchange.com/questions/77905/raspberry-pi-3-model-b-dtoverlay-gpio-shutdown

and just added this line to /boot/config.txt:

dtoverlay=gpio-shutdown,gpio_pin=27

To enable the pause, I used the Physical Button plugin for Octoprint. 

The OLED was set up using Sneaks Guide which is linked from his post on Prusa here. 

Once the fixes are made and tested, I will post this as a remix on Prusa.
Update 1/16/2022 - Really liking the new case, it looks very cool with the LED fan and OLED display.  But there is a part of me that is bugged by the wires that were not really crammed in the case, but I feel I could have done a better job.  I was also thinking that due to one of the buttons being on top of the IO header, I could possibly get the module flipped the "right" way if I could make the case taller.  The problem was how tall?  That turned out to be 12mm taller, to allow the top module with the buttons to sit over the IO header, with a Dupont connector on it.  This is only necessary due to the way I fit the buttons on the remixed module (on the sides of the display).  With the stock fan+OLED module there is no issue with the depth of the case. 

I did a hack of the case to stretch it out, and am printing a test model now.  I'm also testing a less aggressive fuzzy skin, and for fun I sliced up a fuzzy skin texture which has a Pi Logo inset (but I'm not printing that one at this time).

Picture
Picture
The button clips and some other things were tested and work well, I think this is almost ready to go, but I have yet to test print the whole thing.
Update 1/22/2022 - It's finished, I plan to post it this weekend, but here is how it goes together.

Update 2 - it's posted here:

https://www.prusaprinters.org/prints/122413-button-module-for-sneaks-modular-snap-together-ras
Update 2-3-2022 - I had made a small test model to make it simpler to check if a particular button will fit, but unfortunately PrusaPrinters is down for maintenance right now.  I also found a minor interference with one side of the button clips which I corrected but have yet to upload.  I believe he interference is less than 0.4mm and did not cause a problem when I assembled mine.  It was just a fillet that cut the corner of the clip and probably has no effect on function.  Still the models will be updated tomorrow when I can try uploading again.
0 Comments

Fuzzy Skin in Selected Areas

1/8/2022

0 Comments

 
I recently saw a post on Reddit where /u/ncarson9 make a card deck with fuzzy skin, but inset a logo into it which was printed normally.  The effect was really cool and they also posted their settings which I'm gonna try and use for a custom fuzzy skin texture on Sneaks new Pi4 Case.  This required a bit of modeling to get a shell which the fuzzy skin is applied to, and then merged with the original case top model, so it's not a simple process unfortunately.  I have not printed it yet but the preview looks promising.

I'm planning to use the same settings as provided in the linked Reddit thread by /u/ncarson9 @ Reddit:

Fuzzy Skin
Thickness 0.1    
Density 1.25    
Skin Point Distance 0.2   
Layer Height 0.2mm

Additionally, I set the z-seam location to "Random" on the inset part for the fuzzy skin texture.  The rest of the model was printed normally and I left the z-seam to "user specified" which was placed on the back with sharpest corner set.


Picture
Picture
Update 1/9/2022 - The print did not turn out as well as I had hoped, but it did sort'a work.  It had some areas that appeared to be fuzzy skin which were printed where it should have been printed normally.  Other areas had an exaggerated fuzzy skin compared to later printed areas (which is why I suspect the filament may be wet)  I downloaded the gcode and previewed it in Cura and it looked OK, so I don't know what occurred there.  I'm gonna try again though, and have run the PLA through the dehydrator just in case it's wet, and also will slow the print down to 20mm/s (it was printed at 36mm/s).  It may also be related to jerk possibly but I am not sure I will change that setting yet.
Update 1/10/2022 - My 2nd attempt at this was less of a failure (I think the PLA was a bit wet the first time).  However the effect I ended up with does not look great.  It may be the PLA, or it may be that I need to use more aggressive settings for fuzzy skin, or some problem with my printer (Ender3 with Titan Areo and custom cooler parts).

There was also the same problem of a rough texture in an are that should have been sliced normally (see below).  I'm not gonna give up on this idea though, since it could be really handy on some prints, but I think I should not have jumped in and tried it on a model I actually need to get done.  I'm gonna keep testing but will try it on some test models (like a simple cube with different fuzzy skin settings on each side).  I know that people get some really great results with fuzzy skin, so this is either a problem with my printer, filament or settings. 

I'm gonna try testing fuzzy skin settings further on my CR10S Pro next time, with a different filament (but it is tied up with lithophane projects for a while).  I think I will just print one more case top without any fuzzy skin to make sure the rough area I saw on two fuzzy skin tests is not going to show up regardless (in case it has to do with cooling or something).  That's it for now though.
Picture
Picture
Picture
Picture
Well I lied, that's not it for now.  I couldn't just let this be, so I made a 30x30x10mm test cube to try four different settings of fuzzy skin (one per wall).  I'm also running a different PLA to see if that will help with the result.  These are all using the same "density" value but I may change that next.
Picture
Update 1/13/2022 - The test cube was helpful to sort out the best looking settings which are very close to the ones from Reddit (and these are probably gonna be specific to the material and maybe the printer).  I'm using these currently:

Fuzzy Skin
Thickness 0.2    
Density 1.5    
Skin Point Distance 0.3  
Layer Height 0.2mm    


But I'm still not happy with the prints using the fuzzy skin.  I noticed again after three tests of the top of the case, that the fuzzy skin runs over the edge on the front left side (nearest the ports).  Whether this has to do with orientation or not, I see a bit of it on all the sides.  There is also some blobbing at the corners, which could be flow or retraction related.  It's not bad looking overall though, and I think it may work if I can somehow get the settings pinned down.
One To try something else, I decided to change the overlay model I'm using to apply the fuzzy skin texture. I have raised it 0.1mm off the surface of the rest of the model, in case the issue was with the slicer deciding which skin to print (fuzzy or normal), and I have also changed the slicer settings to reduce jerk and acceleration (Jerk = 4.0 and acceleration = 300mm^2/s).  I'm also using the latest version of Cura (4.13.0) which was just released (however I did not see anything about improvements to fuzzy skin so it may not matter).  That case top (4th) is on the printer now, and if it does not make a difference, I may put the idea of using fuzzy skin aside for a while, until I have more time to work on it. 

Update 1/13/2022 (#2) - Well it did the same thing on the left front of the case as is shown in the above pics, overran the area where fuzzy skin should have been applied.  I have tried two printers, Cura 4.12.1 and 4.13.1, and have changed the model, calibrated flow, and tried various settings including speed, acceleration and jerk with no effect, so I think I'm calling it quits for now on this particular way to use Fuzzy Skin.  It's probably some ringing which I don't normally see but the fuzzy skin is bringing out, so I will need to look into that before I continue with this idea.

Update 1/14/2022 - Well I couldn't leave this alone, its just too cool a feature not to try one more thing.  I re-read the thread on reddit since the results in that post are really good.  I noticed this time that a "cutting mesh" was used.  I have been trying to simply overlay one mesh on the model and have not tried the cutting mesh (have never used it).  I just re-sliced using the cutting mesh and it looks a bit different so I think this one may be a winner.  From the pic below, it looks like the fuzzy skin is almost being treated like another part with a separate wall being printed for the normal areas, that should eliminate the possibility of ringing where the fuzzy skin interfaces with an area or normal skin.  I'm running one more test print and will know in 6 hours lol.

Update 1/15/2022 - the first test using the cutting mesh was not great since I forgot to revert some settings, but I re-printed it using my normal settings and it looks better.  It's still something I need to experiment with, but so far these settings seem like a decent start to use with the "Cutting Mesh".  The cutting mesh is the part used to intersect the model, in areas where other settings (like fuzzy skin) can be applied.

CUTTING MESH settings for fuzzy skin:

Optimize Wall Printing Order (YES)
Z-Seam Alignment (Random)
Flow (decreased by 1%)
Print Speed (same)
Fuzzy Skin (YES)
Fuzzy Skin Outside Only (YES)
Fuzzy Skin Thickness (0.2mm)
Fuzzy Skin Density (1.5)
Fuzzy Skin Point Distance (0.3mm)

This leaves a bumpy fuzzy skin texture which is what I was going for, but I did end up knocking it down a bit with some sandpaper since fuzzy skin also can leave some rough spots which feel uncomfortable when handing the printed model.  A light sanding knocks those down and makes it look a bit better too I think.

Something I noticed when previewing the slicer was that at one point the fuzzy skin was printing before the normal skin areas of the model, but after some change (I think it may have been adding "Optomize Wall Printing Order (YES)" to the cutting mesh, it sliced with the normal wall printed first, and then the fuzzy skin.  I think printing the normal wall first is best since it will avoid dragging excess material deposited from the fuzzy skin across the normal areas.

Update 2/11/2022 - I found a major problem with my BMG extruder (a grub screw was missing from one gear), so some of this testing is suspect and I plan to try again soon, but the problem is at least fixed now.
0 Comments

The NozzCam is Working!  (edited - files are removed pending redesign)

1/7/2022

0 Comments

 
UPDATE 9/17/2022:  I removed the files from thingiverse, and plan to re-work the design since I noticed that my camera has rotated during printing.  I do not recommend using the design since the camera could slip in the mount which could pose a risk if it got too close to the nozzle somehow.  I will update this post when the new design is ready, I am gonna try and use this camera but it is on the way from China so I won't know if the focal length will work or not (if not I plan to try adding a lens).  

I had to make some changes to the design to lower the camera, since it was not catching the action too well where it was before.  My wring is still a mess but I'm working on some cable management.  

It's not much to look at now, but you should see it in action :D  It looks like the endoscope camera will work pretty well (UPDATE 2/5/2022  - it worked well for a month but then died, and has since been replaced with the same model.  I will update if the 2nd one also has any problems).  I have it set up with the MultiCam Plugin for Octopring (which allows toggling between cameras using the buttons on the "control" tab within Octoprint):
Picture
This is not really a guide, but just some observations on how to get this working (multiple cameras in Octoprint).

To do this, several things were required.  First a working Octoprint install on a Rpi (4 is preferred due to the load from the extra cameras).  Also a good power supply or a powered USB hub that is compatible with the Pi.  An SSH terminal app on a PC such as Putty (https://www.microsoft.com/en-us/p/putty-unofficial/9n8pdn6ks0f8?activetab=pivot:overviewtab)

I first had to get the mpeg stream to work from the new endoscope camera, and to do that I follwed this guide:

https://community.octoprint.org/t/setting-up-multiple-webcams-in-octopi-the-right-way/32669

Some basics on this process first though.  To access the pi, the Putty program will be used, just open it and put the IP of the Pi in (leave the port as 22 - which is for ssh).  Then log into the pi with username "pi" and the default password is "Raspberry" but please change it to something else using the "passwd" command (follow the prompts and don't loose the password).  Note that the password here will not be the same as the one used for Octoprint, they are different so changing one does not affect the other.

Next, I just followed the guide linked above, but as usual I ran into a problem (s).  When I set up the files /boot/octopi.txt and /boot/octopi.conf.d/webcam2.txt for the webcams, I made some typo's and failed to close some quotes or left double quotes.  That jammed everything up so if you find things don't work, look over those really closely.  I included screencaps of the working files below for reference (these were after fixing the typos):

Picture
Picture
This is covered in the guide, but if you need to see if your USB camera is detected you can use "lsusb", and you can find the "long name" of the USB cameras using "ls  /dev/v4l/by-id/".  Below are screencaps of what mine look like (you can see I have a Logitech C525 and the Endoscope is the "Sunplus" device:
Picture

If there are problems with things not working, checking in the webcamd log can point the way to what happened (more is a command to show file's contents on the command line):

 more /var/log/webcamd.log

Note that this log will keep growing every time the webcamd process is started so you need to go to the bottom to find the logs since the last re-start of the process.  They will start with "Starting up webcamDaemon..." and end with "Goodbye...".

As an example, I had some syntax errors (missing ") in my config files.  Look for things like this in the /var/log/webcamd.log (don't forget to scroll down to the bottom for the latest logs):
Picture

Additionally, if you see no syntax errors and it looks like it is not using your desired resolution but 640x480 instead, you can run this to see if the resolution is supported:

v4l2-ctl --list-formats-ext

If you make changes to the config files, then you need to restart the webcamd service every time (using "sudo service webcamd restart"), for the changes to take effect.

When both cameras are working the /var/log/webcamd.log will look like this:
Picture

Note that the notice that ":USB device was set in options and found in devices, start MJPG-streamer with the configured USB video device: /dev/video2" was not a problem, the above was a working example for both cameras, and I was able to stream using the endoscope camera using "http://192.168.0.22:8081/?action=stream".

Now that was working, I thought I would be set and could just put "http://192.168.0.22:8081/?action=stream" in the URL field for the Multicam plugin and it would be smooth sailing... Haha, few things ever work like that for me.

Even so, I tried setting the second (endoscope) camera up with "http://192.168.0.22:8081/?action=stream" as the URL, and it failed, even though I can open http://192.168.0.22:8081/?action=stream  in a browser and see the stream.

I realized at that point that I needed to set up the Haproxy according to the last part of the guide here (https://community.octoprint.org/t/setting-up-multiple-webcams-in-octopi-the-right-way/32669), so that's what I did, and it now works as it should (I can use the Multicam plugin to toggle between the cameras).  Below is my current working Multicam config:
Picture

One thing to keep in mind is that the multicam plugin does not show multiple cameras on one screen within the Octoprint UI, it only provides buttons to toggle which camera is used.  It can therefore be handy to just open another browser and stream the other camera (using http://192.168.0.22:8081/?action=stream for example - with your Pi's IP). 

I also noticed a bonus - the Multicam plugin also added a button for each camera in Cura (I did not have to configure this):

Picture
This is about the coolest upgrade to my printer, aside from the touch probe.  It's amazing to see how the first layer goes down and be able to make adjustments to it on the fly.

(EDIT: Removed the link for the camera mount, I am gonna re-work the design since my camera has rotated during printing.  I do not recommend using the design since the camera could slip in the mount which could pose a risk if it got too close to the nozzle somehow.)

UPDATE 1/22/2022 - If you find that the buttons stop working, that is an issue with the plugin.  Somehow the URL for the first cam gets auto-changed so both cams use the same URL and the first one cannot be edited via the plugin interface since it is grayed out. 

There are two workarounds that I am aware of.  The first is mentioned here (https://github.com/mikedmor/OctoPrint_MultiCam/issues/8) and requires editing ~/.octoprint/config.yaml (it will be under the "plugins" > "multicam" section).  Just change the "URL" to the correct one. 

The second one is a bit clumsy but easier.  Just add another cam with the correct URL.  It will leave the first one there but at least you can toggle cameras. 


0 Comments

Working on an Endoscope Camera Mount for the Hydra Remix

1/6/2022

0 Comments

 
Picture
The Hydra Remix I made for my CR10S Pro has been working great, I should have done this earlier, but I could have done without the unrelated bed warping.  I'm still needing to work on wire management though and since I recently bought a USB endoscope camera, which is pretty much plug and play with the Raspberry Pi (I had to set camera=auto in Octoprint.txt), I decided to make a mount for it.  The camera quality is decent in testing, and the USB plug is a bit hard to get in and out, but it has a brightness control and should do the job.  This one has a rather stiff wire, which I'm not sure will be a positive or negative until I put it to use.

The mount I have designed will replace the fan guard / BL-Touch mount on my Hydra Remix.  The design will have a screw lock to secure the camera which is aimed at the nozzle on my MicroSwiss hot end.  I'm also trying to add some wire management to the remix (on the BMG mount).  Still a work in progress, but I will post it up if it works.
0 Comments

Working on a Remix of Sneaks' New Modular Snap Together Raspberry Pi Case and My Latching Base (Updated - POSTED)

1/1/2022

0 Comments

 
I saw Sneak's (@ Thingiverse) new modular Raspberry Pi case on Reddit a few days ago, and it looks great.  He posted it to Thingiverse here (those pictures are not renders by the way).  As soon as my printers are free from another project I plan to print one.  But in the meantime, since I have been using my Raspberry Pi Latching Base (which is also a remix using another great snap fit case from Malolo @ Thingiverse), I decided to make a latching base for Sneaks' case as well.  The model is done, but after finishing it, I thought that I may be able to make it compatible with my earlier latching base design for Malolo's case (which is 2mm narrower).  So I'm gonna try that and see how it looks before deciding which way to go with it.  I would really like to have a universal mount for all my Pi cases rather than one for each.  For now, here are some pics of the progress:
Picture
Picture
Update 1/6/2022 - Its tested and posted here:

www.thingiverse.com/thing:5188648

I couldn't decide earlier if I wanted to use a plain cover or the fan cover, but the LED fans won me over, so I have some 40x40x10 fans on order.  I will be printing the fan insert soon, and will post some updated pics.  I also did not like the way the overhangs turned out on the base so I will be printing that again (cooler and slower).
Picture
Picture
0 Comments
    Picture

    Stoopid Me

    Welcome to my Stoopid corner of teh Internet.  It's mostly gonna be 3D printing stuff, but I also post some recipes, projects, and the occasional rant here as well.  More Stoopid stuff is updated regularly.

    I recently joined the Amazon Associate program, so some of the links on this site are Amazon affiliate links. This means that, at zero cost to you, I will earn an affiliate commission if you click through the link and finalize a purchase.  This will help to support this site, and pay for more Stoopid Stuff.

    Archives

    March 2023
    February 2023
    January 2023
    November 2022
    October 2022
    September 2022
    August 2022
    July 2022
    April 2022
    February 2022
    January 2022
    December 2021
    November 2021
    October 2021
    September 2021
    August 2021
    July 2021
    June 2021
    May 2021
    April 2021
    March 2021
    February 2021
    January 2021
    December 2020
    November 2020
    October 2020
    September 2020
    August 2020
    July 2020
    June 2020
    May 2020
    April 2020
    March 2020
    February 2020
    January 2020
    December 2019
    November 2019
    October 2019
    September 2019
    August 2019
    July 2019
    June 2019
    May 2019
    April 2019
    March 2019
    February 2019
    January 2019
    December 2018
    November 2018
    October 2018
    September 2018
    August 2018
    July 2018
    June 2018
    May 2018
    April 2018
    March 2018
    February 2018
    November 2017
    September 2017
    August 2017
    June 2017
    December 2016
    October 2016
    September 2016
    July 2016
    March 2016
    February 2016
    September 2015
    August 2015
    June 2015
    May 2015
    April 2015
    March 2015
    February 2015
    January 2015
    December 2014
    November 2014
    October 2014
    September 2014
    July 2014
    June 2014
    May 2014
    April 2014
    March 2014
    February 2014
    November 2013
    August 2013
    July 2013
    June 2013
    May 2013
    April 2013
    March 2013
    January 2013
    December 2012
    November 2012
    October 2012
    September 2012
    August 2012

    Categories

    All

    RSS Feed

      Contact Form (Name is optional)

    Submit
Powered by Create your own unique website with customizable templates.