My Stoopid Stuff
  • Home
  • Projects
  • Blog
  • Lec'tronics
  • Links
  • CNC
  • Quick Recipes
  • 3D Printer Tips
  • Voron 2.4

The Fan Filter Stinks...

8/31/2023

0 Comments

 
Picture
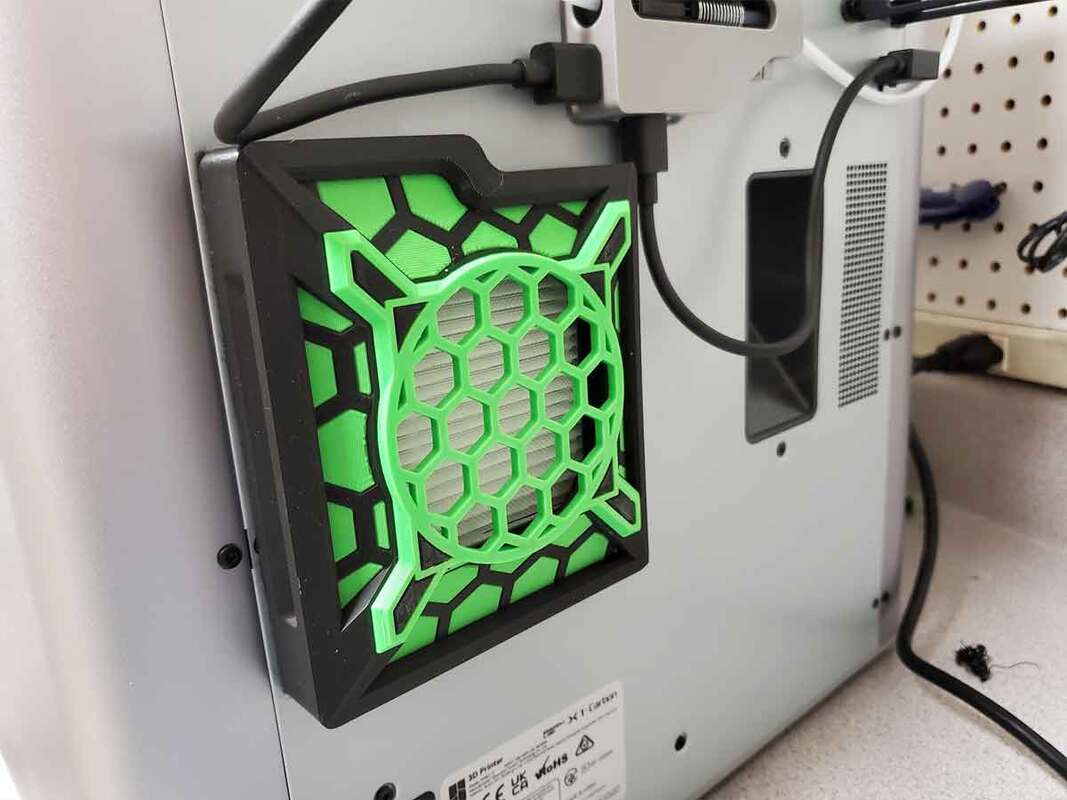
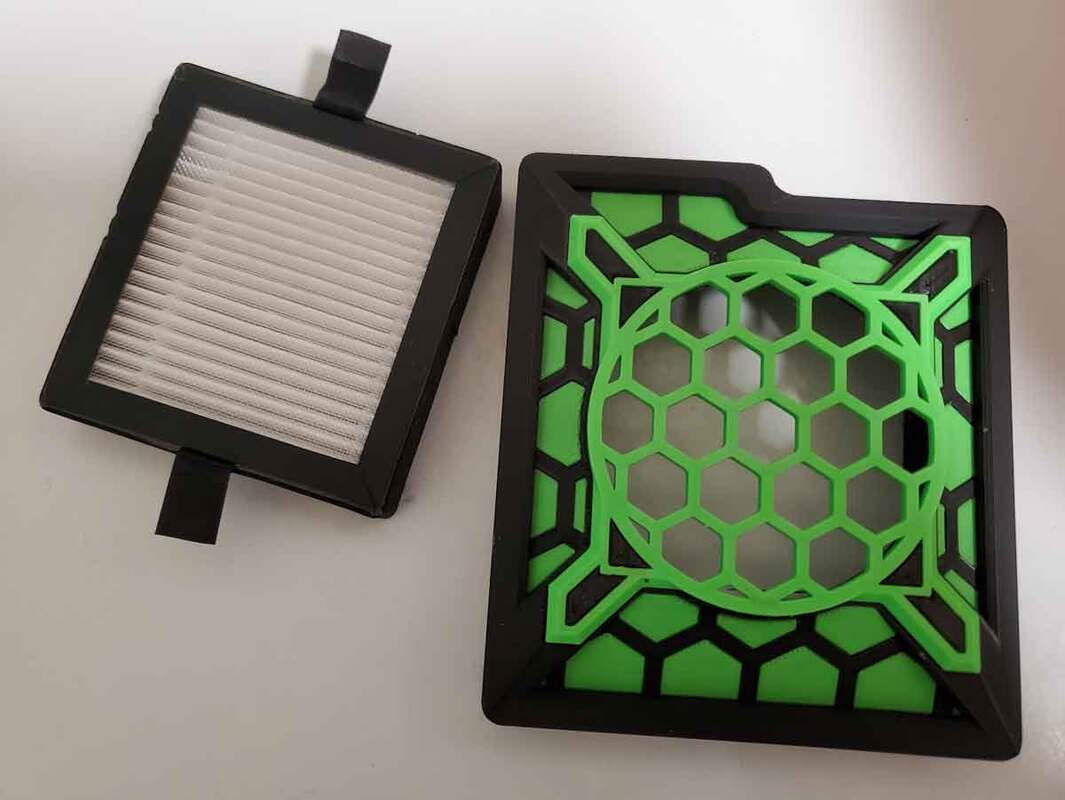
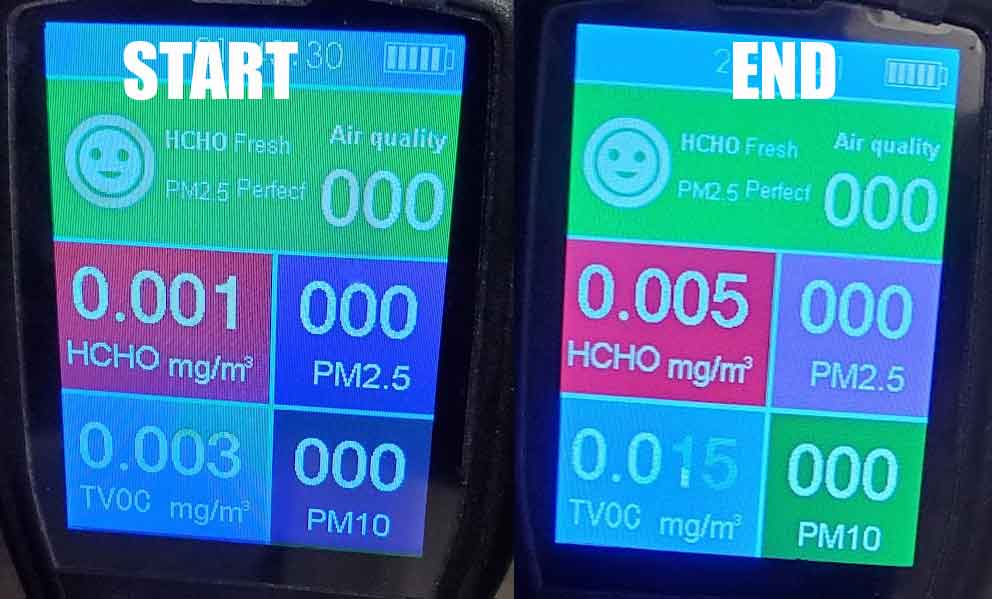
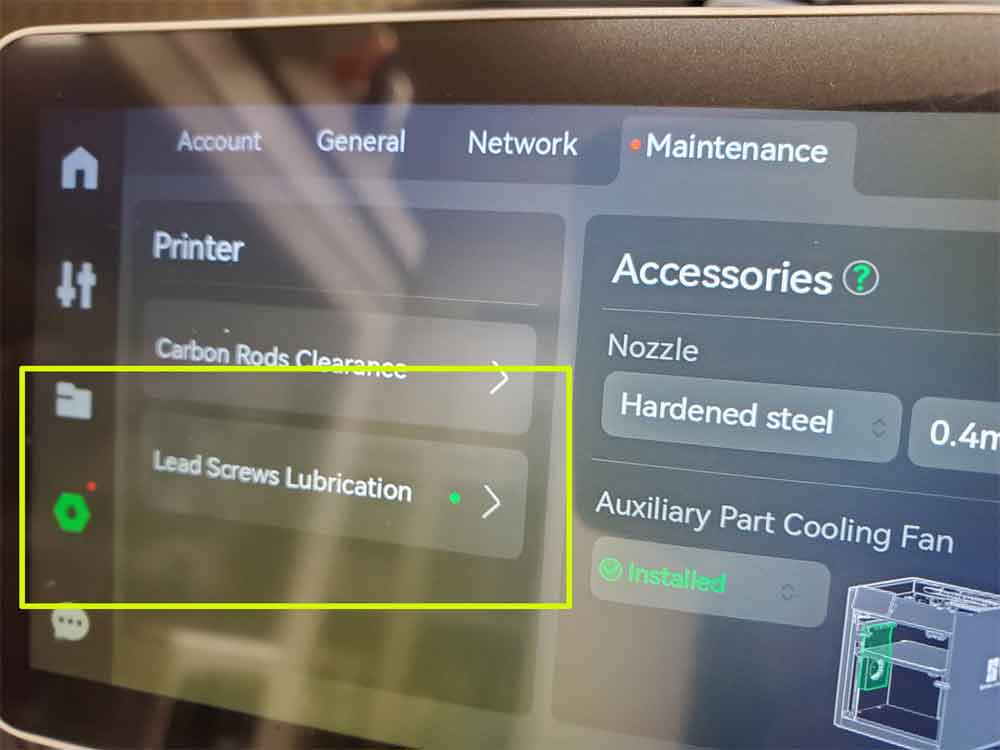
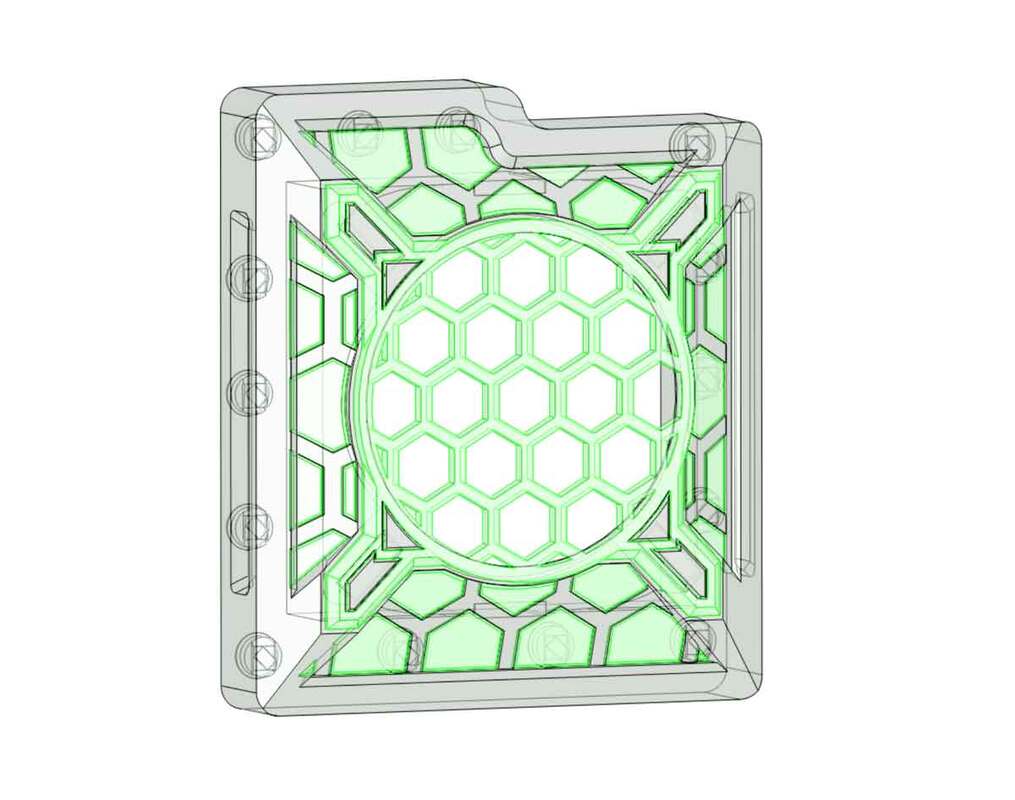
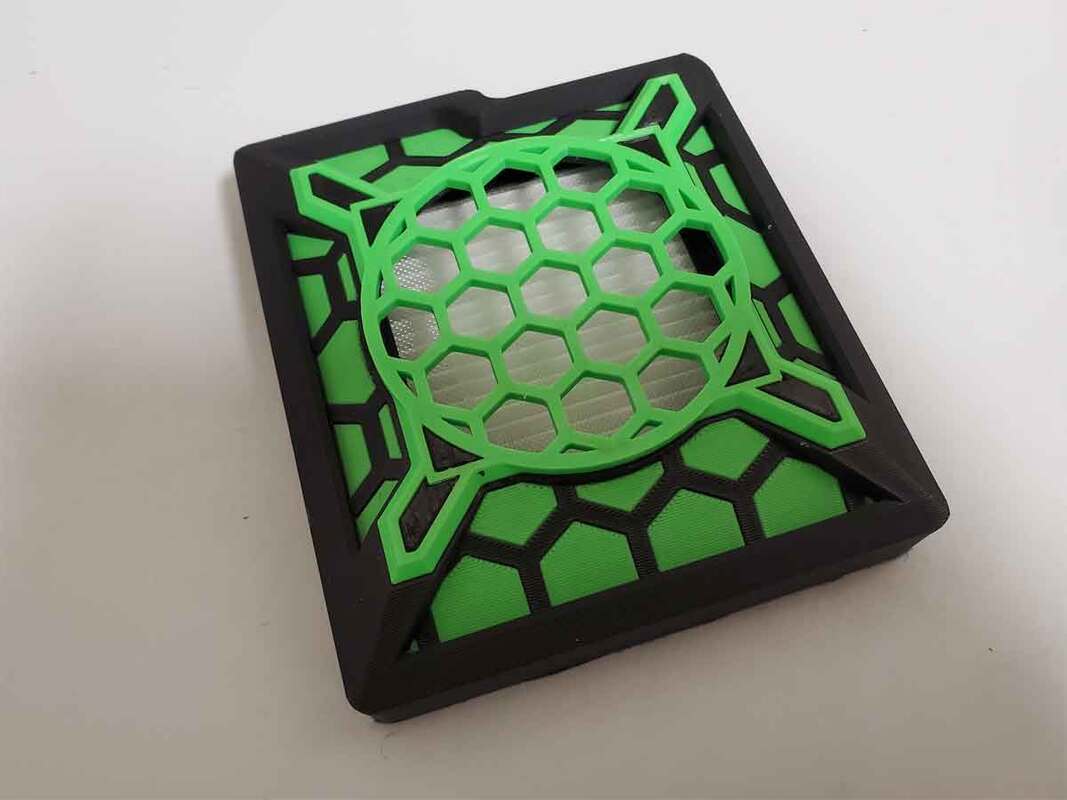
I ran some ABS using the fan filter, and I could smell the faint odor of ABS.  There was a small change in the cheap air quality meter I have as well (though I trust my nose more in this case). The chamber fan did not run during the print, which is normal, but I ran the fan on high for 5 minutes before opening the printer.  So I can't blame the filter for the smell which was present before running it.  I think the issue is just that the printer is not sealed up, so the smell just oozed out during the print.  I have some ideas on how to seal the doors better, but I'm waiting on parts.  Still, for ABS at least, I will need to wait until the duct system is ready since it needs some negative air pressure. 

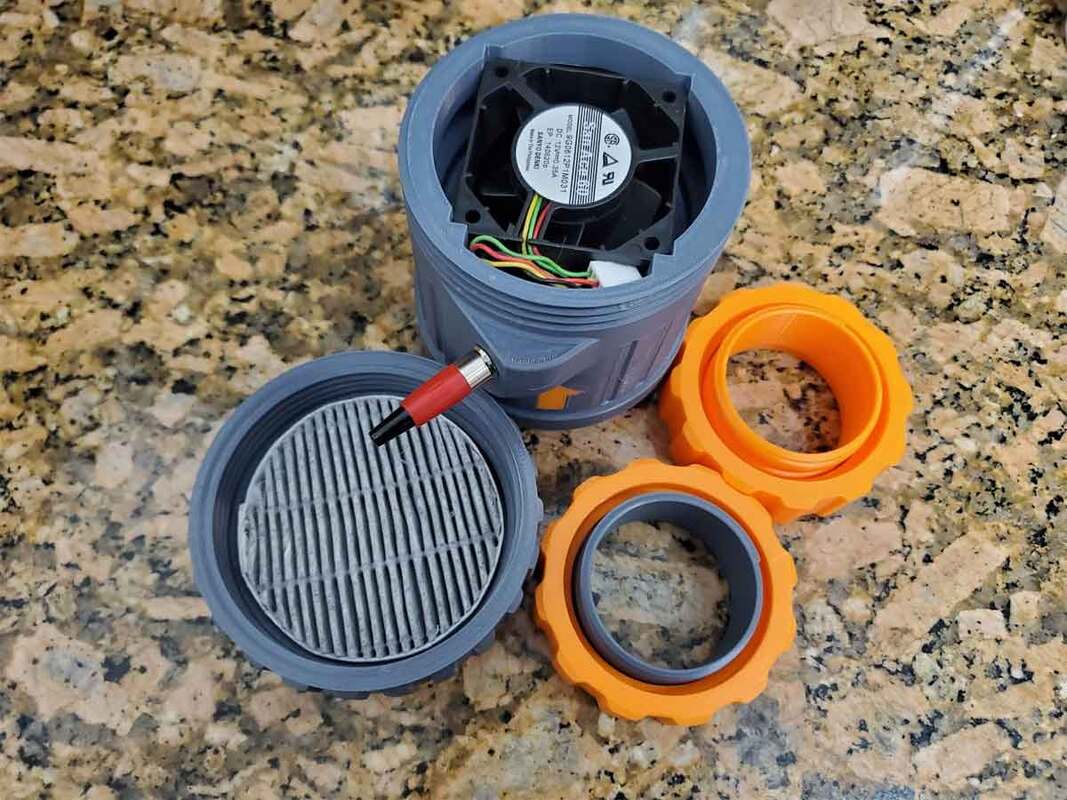
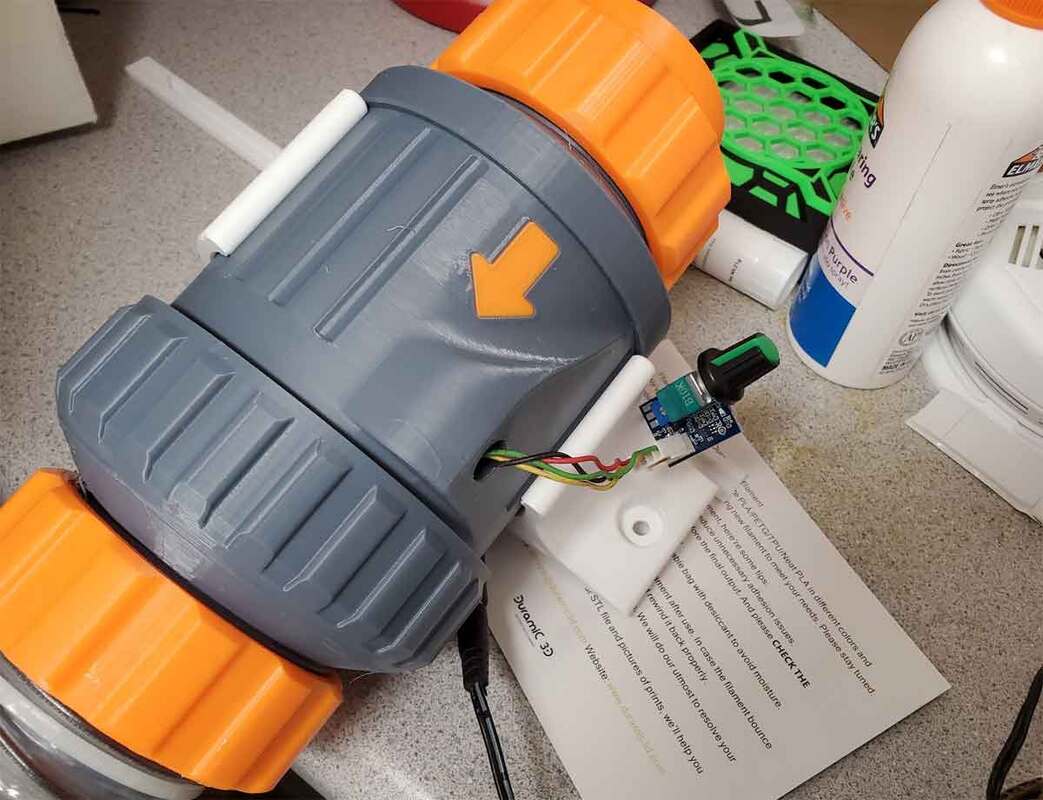
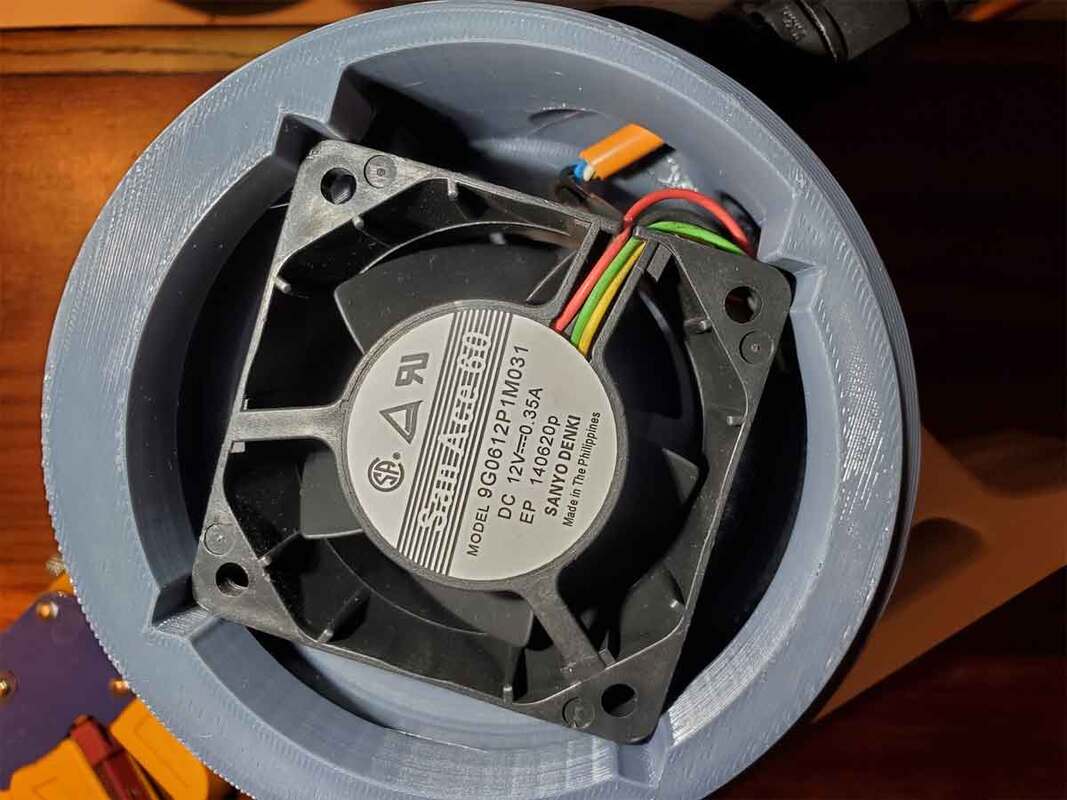
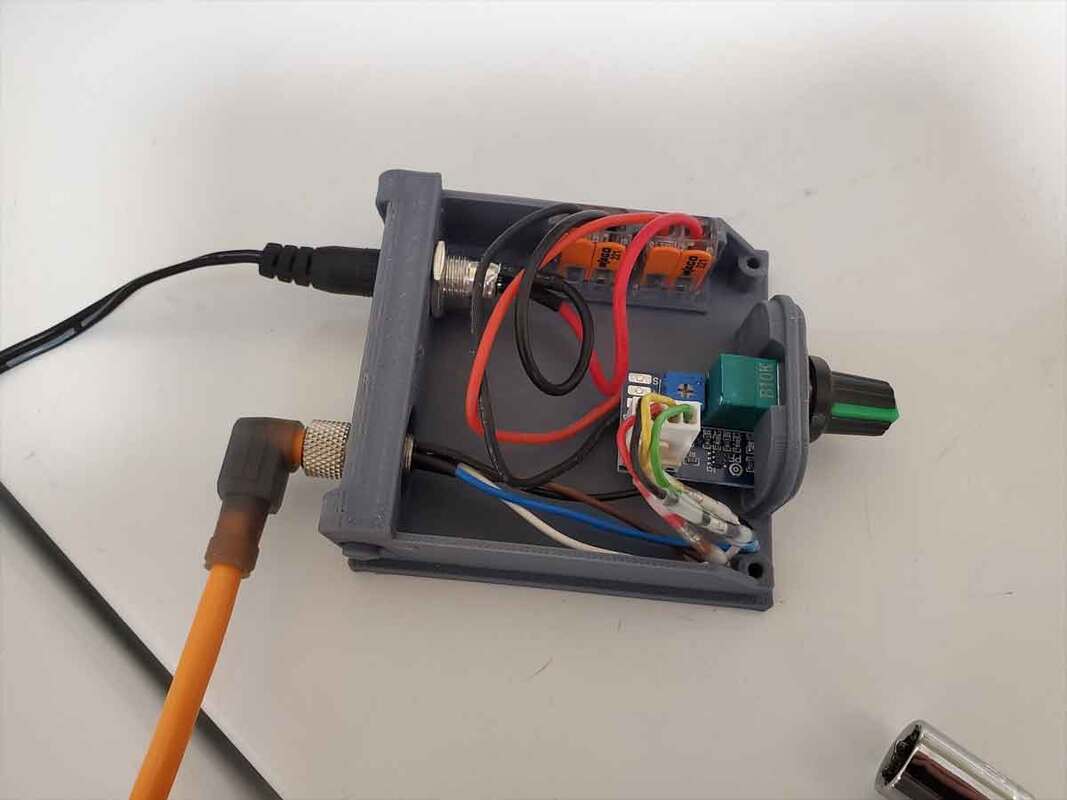
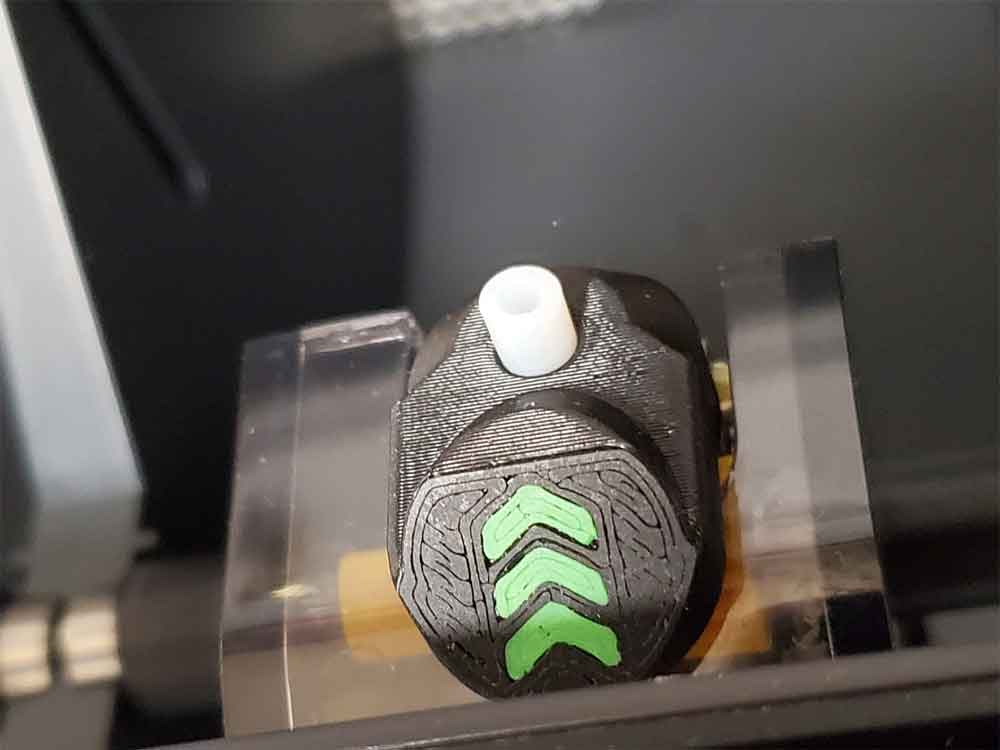
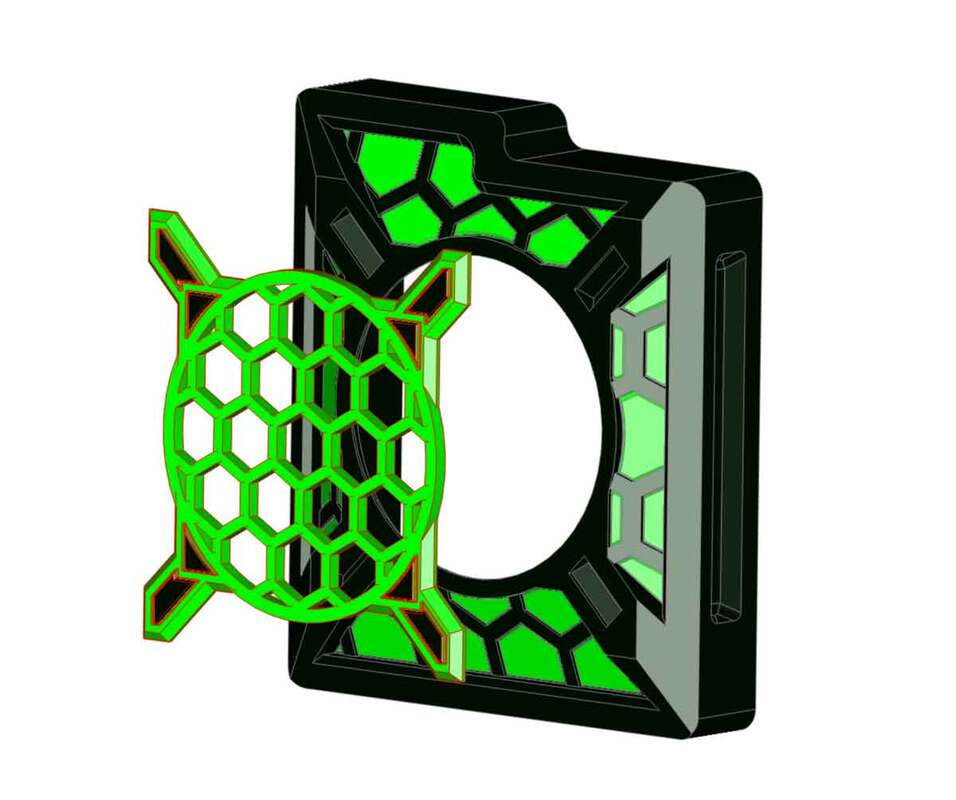
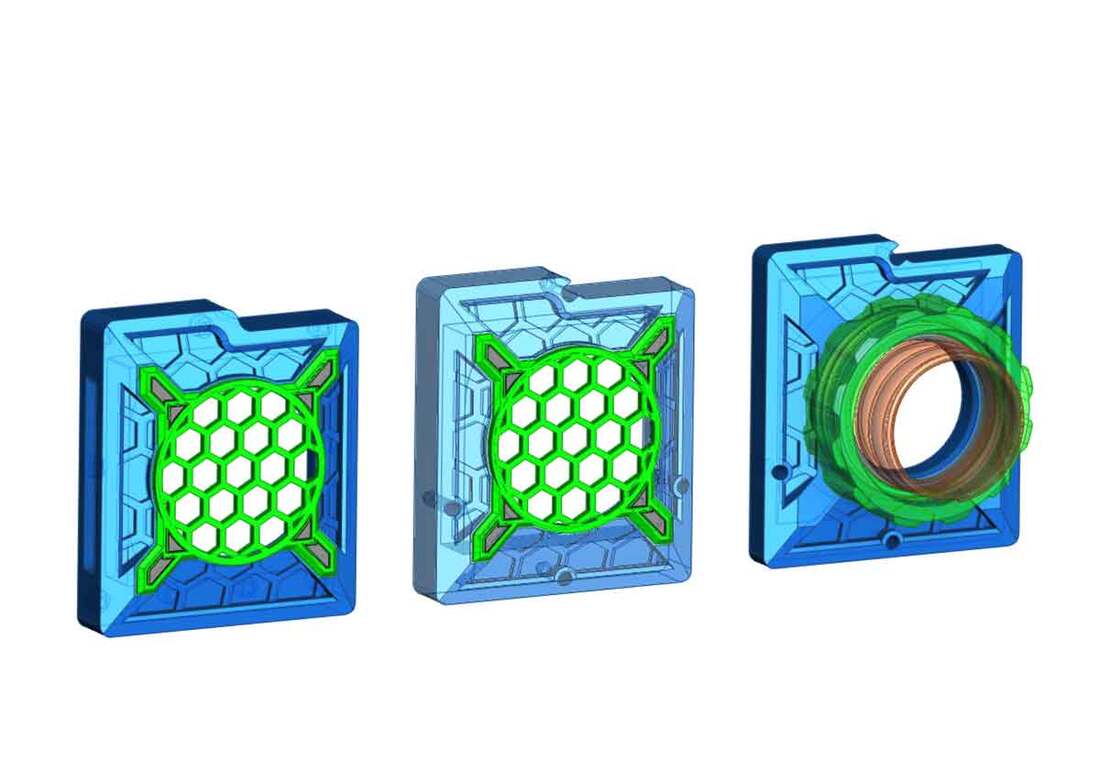
If the ABS smell is due to the leaky enclosure, why then does the fan stink?  I don't have evidence right now, but I can feel with the filter in place, that the chamber fan is too weak, and the flow is uneven through the vent on the back (seem to be more flow on the left side than the right side).  I need to see if I can find a filter that may work "better" with the stock chamber fan (will need to be thinner and probably less effective).  I think a robot vacuum filter may be an option, but for now this design is going back to the drawing board.  Still though, I'm planning on keeping the filter on the printer at least until I have something better, or I can get the vent ducting system built and installed.  I could probably just put the X1C in the ducted enclosure I built for the CR10S Pro, but I could just as easily run ABS on that machine, so it's not worth the trouble.

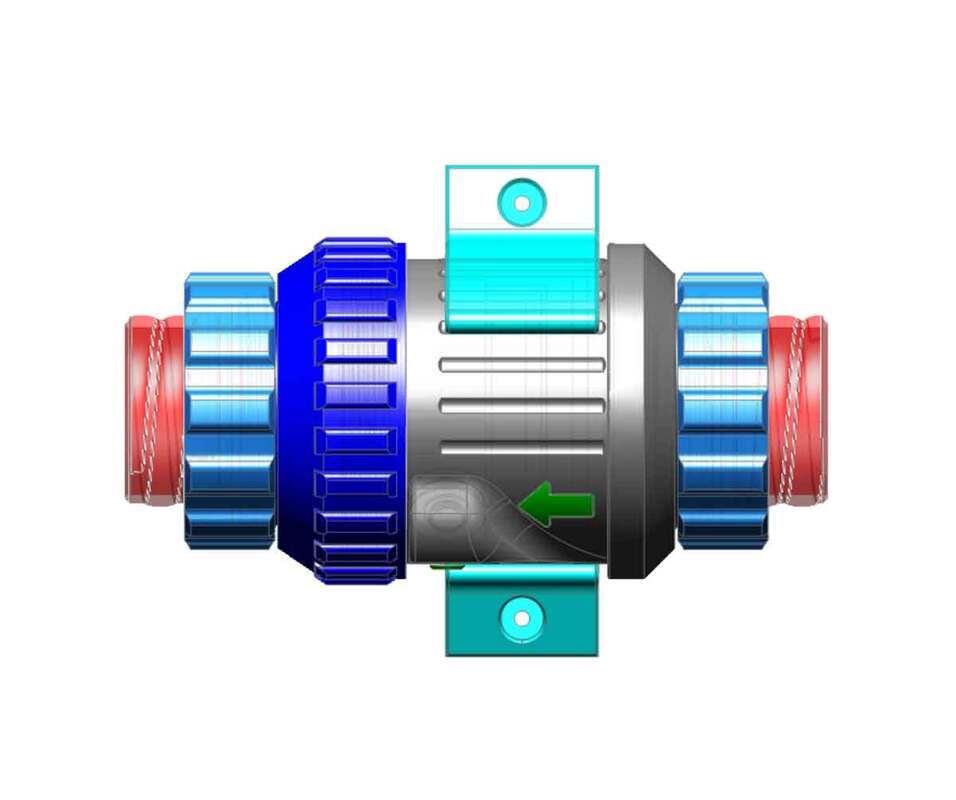
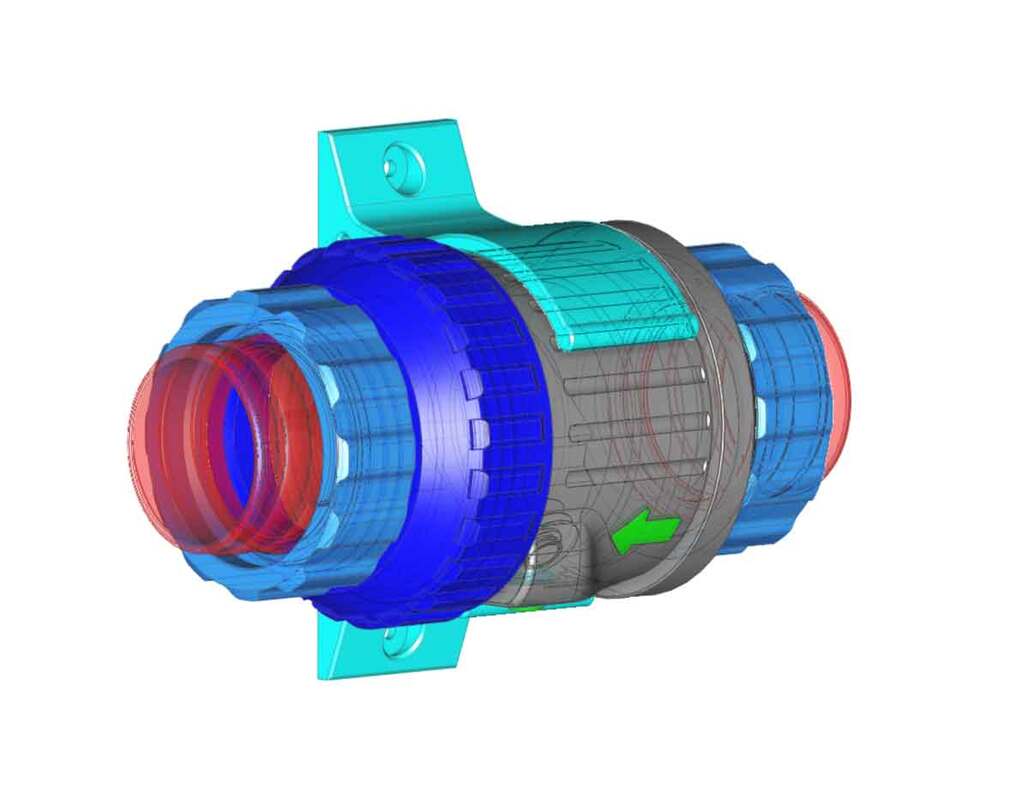
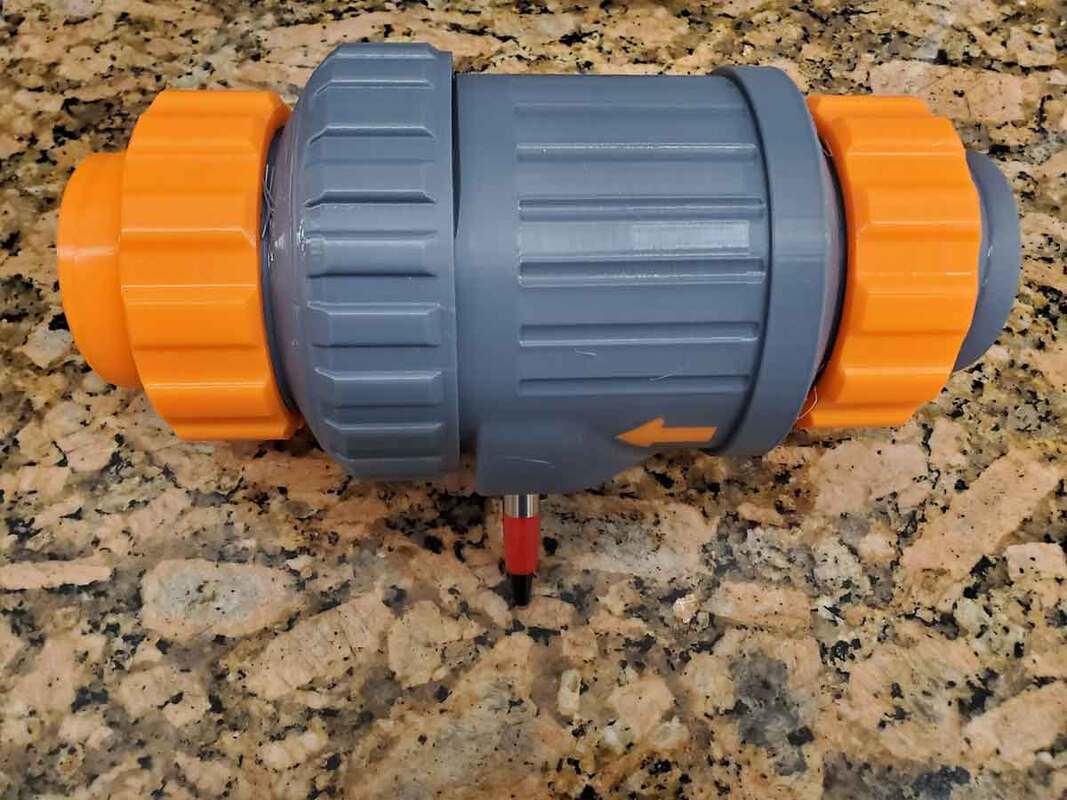
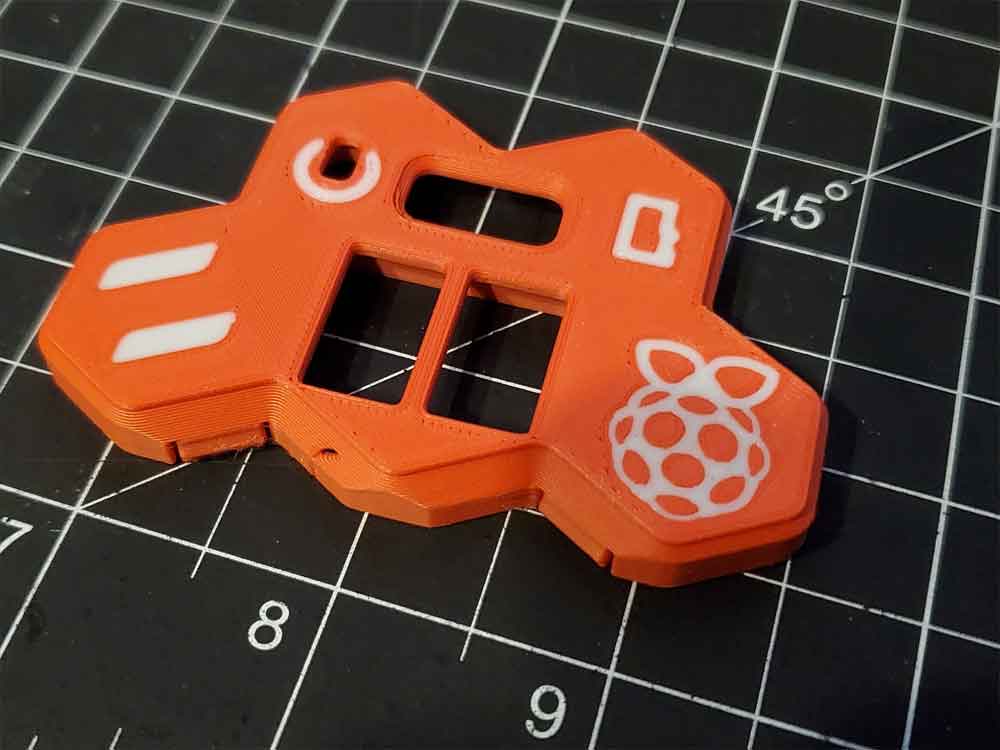
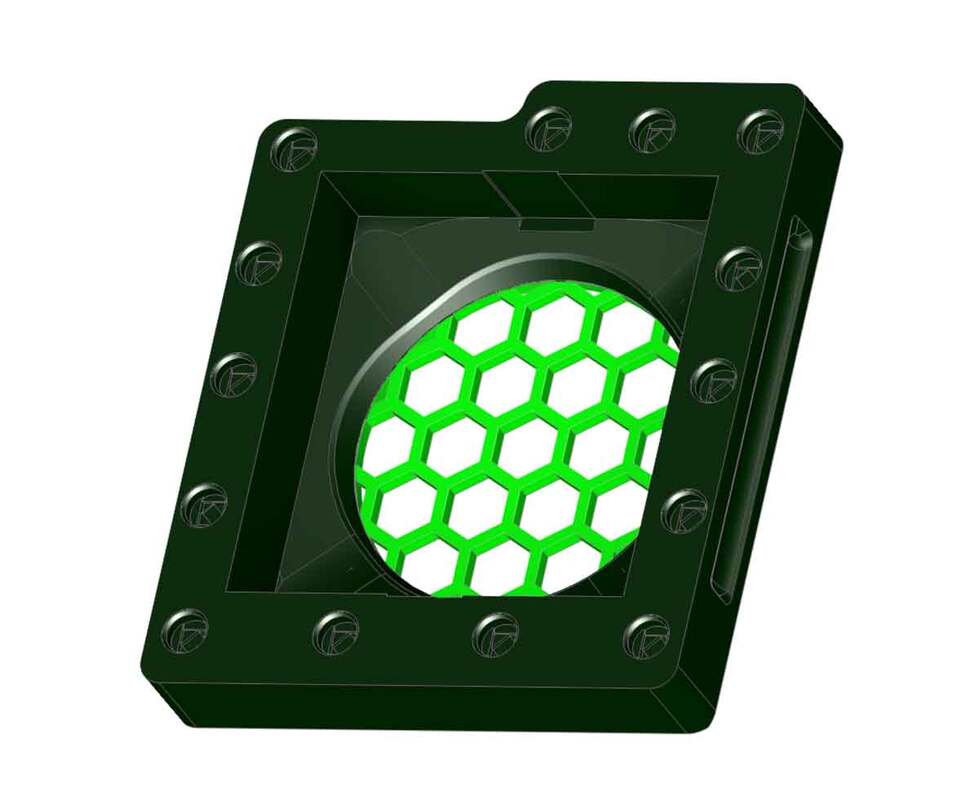
The X1C does print ABS decently though (without calibrating), and the enclosure definitely helps with the stink (though not enough).  The slightly uneven layer lines in the pic below does not show up when looking at the parts, which have an apparently good finish (just not as good looking under magnification).  That's not uncommon for 3D printed parts however, perfectly stacked lines is a sort of holy grail, and hard to expect without doing any calibration, aside from the out of the box stuff.  I'm fine with this for prototyping stuff.

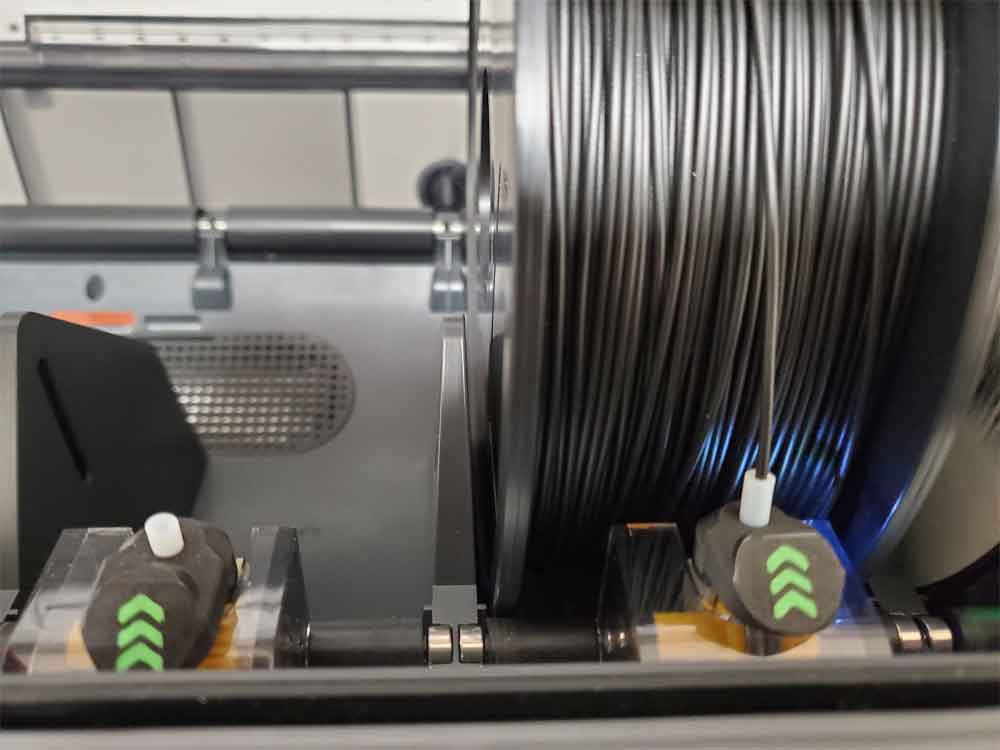
Edit: Maybe it could work for PLA, but no way will it be enough for ABS.  I ran some PLA with it and did feel a very slight airflow though it when I had the chamber fan on 100%, so some air (but very little) is moving through it.  I think it could be improved.

Edit 2: Nope, after running PLA for a few hours with the chamber fan at 80% the whole time, it still has a funky sweet smell of printing the stuff.  Gonna wait for the parts to make a duct system, and may stick the printer in my other enclosure in the meantime.
0 Comments

Working on a Rear Fan Filter and Duct for the Bambu X1C

8/30/2023

0 Comments

 
Filtering or ducting away the ultrafine particles and VOC's which can be created by 3D printers, is something that is not given much thought by most manufacturers.  Even today, most consumer 3D printers are not even enclosed, and those that are, do not do a great job of filtering (if they even include a filter).  As 3D printers become more common, the science will catch up.  But what is already out there, should give anyone with a 3D printer some pause to consider what the long term health consequences could be.  And also consider the simple things which may hopefully reduce the risks.  I don't know much about the science, and have a limited budget (so a $600-$1000 filtering system is not in the cards), but I think a little of something is better than a lot of nothing.  My little of something is currently a ducting system which runs the air from my enclosed printer, through a small HEPA filter, and then out through an unused doggie door.  It uses 2.5" flex hose, which is the smallest diameter I'd consider, and a rather powerful blower fan. 

For my new Bambu X1C, I've designed a small HEPA filter cover which is slapped on the back of the printer, and held on using a bunch of magnets.  I just installed it yesterday and have not tested it, but it looks cool at least.  This is going to be a temporary solution for my printer though, since I will eventually add a duct system similar to my current enclosure setup.

The plan for the next iteration will be to run a duct from the outlet on the back of the X1C, with a booster fan (6038 12V) inline, which will vent out a doggie door (through a printed cover).  The booster fan will use a 4 wire PWM fan, and I'm planning to design a remote PWM controller, with a potentiometer to control the speed.  I think the booster fan will be needed, since there is going to be several feet of hose, and the small fan on the back of the printer won't cut it.  I'm also considering a small circular filter in the booster fan housing, since I prefer to filter the air before sending it outside.  I'm still waiting on parts to finalize that design, but I was able to use some of the earlier models from my current setup, which helped speed things along a bit.  If the fan has enough power, then I think the newer design should be improved over what I'm using now, and more modular as well.

Below are some pics of the inline booster fan (with a filter), and the last pic is the coupler which will connect the hose to the printer.  Although they look complete, I need the parts to finalize the models.
Update 9/18/2023:  The parts for the booster fan are printed, so I just need to assemble it and then build the PWM controller housing (which will just be a PWM controller and DC input for the 12V the fans require).
Update 10/6/2023: The PWM controller design is completed, but needs to be printed and tested.  I'm also waiting on some four conductor wire to use between the fan and PWM controller.
Picture
Updated 10/9/2023: I finally got around to hooking up the 6038 fan and PWM controller (with 12V) and testing it through 6 feet of 2.5" hose.  It will definitely work without the filter, and with the filter the airflow is cut by probably half.  It is enough to get a good breeze at the end of the hose though (without the filter), and enough to easily cause a tissue held in front of the outlet of the hose with the filter to wave around.  It's not a torrent of airflow, but it will be enough to clear out the small X1C enclosure and create a negative pressure (as long as I can seal up the holes that can be sealed).  I think I will still use the filter to start with at least, since it should help cut down on the crap going into the air, even if outside.  The booster fan is also not as loud as I thought it would be, which was a surprise, but I think being fully enclosed helps with that.

I found that the design is mostly OK, however I may open up the holes for the hose collars just a bit, and remove the brass inserts for mounting the fan (since it should be a one time deal, there is no reason to use inserts really).

I'm printing the PWM enclosure now, and may post that as a separate design once I complete it.  For the final wiring configuration, I decided to go with some M8 aircraft style connectors on the booster fan end, and a M12 cable gland on the PWM controller end.  I want to be able to completely remove the hoses and cables from the booster fan module, so having removable connectors is necessary.  I've ordered an M8 male 4 pin panel connector which is wired, and that will connect to the fan.  I also ordered a 5m female M8 cable, which I will cut off at about 1-2m and use the cut end with the PWM controller (it will go into the controller using an M12 cable gland).  It's a bit of an expense in cables, but I have had to deal with plenty of intermittent garbage connections in the past, and having a reliable (and pre-wired) connector will be worth the extra cost.  The final design will have a couple different options though, including a simple M12 cable gland at both ends, which are pretty cheap.  I will also need to redesign my doggie door outlet to accommodate two hoses.  
Picture
10/21/2023: The PWM controller design was re-worked, since the previous version was way too small.  I added an addition 10mm to every dimension, and made some other changes, which I think will improve the assembly experience.  The prototype is printing now, and then I can really start to test this.  The PWM controller housing is designed to use an 8x0.5mm threaded 8mm aircraft type connector (4 wire in this case, linked above), as well as a DC input, and a PWM controller.  There are a pair of mounts for WAGO 221-412 connectors as well, which, if combined with some solder seal connectors, it would be a soldering iron free build.  

I also made some small changes to the hose couplers, which make them easier to assemble.  And finally, I'm working on a design to connect the duct to an unused doggie door, which will replace a similar setup on my current printer exhaust fan.
Picture
The test models are printed and everything fits in the new PWM controller design.  It's pretty much done now, I just need to write up a build guide.
0 Comments

Feels like I just joined the Dark Side (of 3D Printing)

8/28/2023

0 Comments

 
​I bought something last week, which I'd considered (but couldn't justify buying) since I saw it on Kickstarter... but so far I am having few complaints about my Bambu Labs X1C.  Yeah I know, "You still haven't finished the Voron, and you bought an X1C!?!".  It's not that bad though, the Voron is going to get completed, and will become my "big" printer, it's just that my Ender3 and CR10S Pro, which are good printers when I'm not tinkering with them, are being left in the dust by the newer CoreXY printers on the market today.  And the best of them so far, at least when it comes to the feature set, is the Bambu X1C with an AMS.  While it's true that the P1S is $500 cheaper, and does most of the same stuff, and the Creality K1 Max is bigger, right now I just wanted a printer that works, that I don't have to tinker with much.

It's not all sunshine and roses though, I'm not stoked that my dollars went to a company which is moving 3D printing away from opensource, and I have no excuse for that one.  I'd have much preferred to give my money to Prusa, since they have given a lot back to the community, but it was not to be.  Although I was fully aware of it going into the purchase, it still bugs me that the X1C is cloud centric, and Bambu seems pretty opaque on what they collect in their encrypted log files.  I didn't go full Grant Posner and isolate it to the LAN without firmware updates, but before I even connected the printer, I had to set up a way to isolate it from the rest of my network.  Adding to my reservations is the very closed nature of their hardware and software.  Practically, that means if I have a problem, I better hope they will sell me the parts, or provide some basic support to locate a fault.  Finally, in my limited time using the printer, it initially told me to lube up the Z screws after initial calibration (which was easy, but what's up with that, eh?), and there have been a few disconnects from wifi (however I'm going to try boosting the signal from my router).

So now that the bad is out of the way, the good is that UPS did not destroy it, and it was safely delivered.  It even printed great out of the box, including a couple multicolor prints with the AMS, which is a huge achievement for a 3D printer!  It's also not as noisy as I thought it would be based on reviews, though it's located in a room which is not often used (or maybe my hearing is going out).  Overall I'm pretty impressed with it, and I can see that the LiDAR will probably become more useful over time (although it seemed to work well enough for the 4 spools of random PLA I tried).  The touchscreen is also something I consider a requirement these days, and the one on X1C is actually very useful.  I'm hopeful that the X1C can be my goto printer for smaller things, and that I can get proficient with OrcaSlicer (or possibly BambuSlicer).  My plan right now is to use those tools with the Voron, and maybe other printers as well.  And again, the Voron is going to be finished ("he had to tell himself" - Morgan Freeman, get out of my head!).  To use a car analogy, the Voron is gonna be like a Camaro, which gets driven to the track every weekend, while the daily driver 2023 Honda Accord (X1C) will be doing the milk runs to the grocery store.

And because I can't help myself, there will be a few things which I am going to add to the X1C.  The small carbon (only) filter included with the printer is pretty insufficient to rely upon, so I'm working on a design which I hope will help clean up the air blown out the back of the printer.  I also have plans to add a duct with a booster fan to it later (waiting on parts for that though).  Further down the road I am considering a better lighting solution for the printer.  Although it has a light inside, it's just adequate to see what's going on using the camera, but very hard to see through the tinted glass door. 

Below is a pic of the filter I'm working on.  It will get posted to Printables once I can confirm the filters fit (and I get it printed).  There are several versions, the two on the right use M3 screws (which requires tapping a few holes), and the one on the left uses 8x3 magnets to hold it in place.  I will update the blog when it's posted, with some more pics of it.  

Updated 8/30/2023: Adding some pics of the filter, which is not yet posted.

Update 8/31/2023: The fan filter needs more work, the filter being used is too much for the weak chamber fan to deal with.
0 Comments

Odd Issue With My Cyberpower 1000PFCLCD After Power Outage

8/17/2023

0 Comments

 
I have an older model Cyberpower 1000PFCLCD, which does not have any front USB ports, and no tilting display.  About a month ago, it was plugged in during a power outage, and when power was restored, the display stopped working.  I could get only a beep from the power button, but no other signs of life on the unit.  The power button, which is normally illuminated, was not lighting up, and none of the buttons appeared to be working either.  I tried leaving it plugged in for half a day with nothing connected (to charge the battery), but that did not help, so I swapped it out for another UPS that I had, until I could get back to check it closer.  Today, I had some time so I tested the voltage of the single 12V battery, and it was 12.8V.

​I decided to try connecting it to a PC using the Cyberpower PowerPanel Personal software to see if I could get any response from the UPS that way.  I had to dig up an old USB A/B (printer) cable to connect it, but once hooked up, the UPS was detected, and indicated that everything was OK... But even more strange, when I connected it up, the panel and buttons started working again.  I unplugged the USB cable from the PC, and toggled the display button and it was working normally after that, and the power button is also illuminated again.  So it's odd, but I thought I'd post it here in case it may help somebody with a similar issue.

While I had it connected up to the PC, I also updated the firmware and ran the self-test, which passed.
0 Comments

Great Deal on a USB Microscope (expires 08/19/2023 12:01AM PDT)

8/16/2023

0 Comments

 
This is not a deals site, but I found a really good deal thanks to PlasticFantasticDeals.com, and wanted to pass it along since I find using these USB microscopes really handy for soldering work.  My eyes are not what they used to be, and having a USB scope to inspect things is super handy.  I picked up the scope which is linked because it's an upgrade over my current scope which has a smaller screen, no LEDs and no remote, yet cost the same (and I have an idea to make my smaller scope portable).  I received it yesterday and it's going to be the primary scope I use now. 

​The linked USB Microscope is $40 after the coupon (606VJQH4), and has a bunch of features which are big upgrades over the small scope I currently use (bigger 7" 1080P screen, higher magnification, two bright LED lights and a remote).  It also has a solid aluminum stand which is rarely found in a scope for this price.  These usually go for double or more.  The deal expires 08/19/2023 12:01AM PDT.
0 Comments

Golden Technologies Lift Chair Remote Quick Fix

8/11/2023

0 Comments

 
My parents had a lift chair left to them some time ago, and it had been working great until yesterday, when the back stopped actuating up and down, so they asked me to have a look.  The Golden Tech lift chair is really well built by the way, it had been running without any other issue for over a decade by now I'd guess.  After checking over the cable and not finding a problem (other than where the insulation fell off, and had to be repaired with tape previously), I took the remote apart.

The remote has an interesting design, instead of just using low voltage signal level stuff, I found that it actually contains the MOSFETs which would drive the linear actuators.  That means the motor current has to go through the remote controller (and remote cord), which is not a problem, just not how I expected they would design it.  In any case, this probably makes it easier to troubleshoot, and if the board goes bad, it's just the remote that needs to be replaced (at a cost of about $77). 

Fortunately, when I opened the controller (there are 5 screws by the way, with one under the label), I found that one of the wires had broken off (probably from years of slight twisting of the wires, despite the pretty robust strain relief).  After cleaning up the wire and the hole it goes into, I found others were also a bit broken, so I removed a total of 4 wires and resoldered them.  Then I added a zip tie for strain relief, and covered the wires in hot glue for good measure, so they'd be less likely to break again.  Next I cleaned up a decade of crumbs which had gotten into the remote, cleaned the silicone oil that had leached from the number pad, and then cleaned the board pads with alcohol to remove the remaining oil there.  After that simple fix, it works like new again.  It's not a big deal, but I haven't been able to post much lately and thought the pics may help anyone with a similar remote, or a similar problem with it.  
0 Comments

Quick Pi Panel Update

8/3/2023

0 Comments

 
I uploaded the latest version of the Pi Panel to Printables.  I have not been able to test it yet, however I have printed earlier prototypes and the latest design is mostly the same.  The main changes are a more complete wire management setup, and a Lilypad button is now used.  The design is pretty complicated and not an easy print, and there are a number of parts needed, so it's only for the folks that like to live life on the edge, and don't mind the possibility of wasted time and filament - at least until I can either test it myself or some brave soul prints it and provides feedback.  But I will do what I can to fix any issues (as time permits).  I probably won't be able to make a detailed guide build guide for a while, but once the design is confirmed working I plan to make one (but it will be a while).  

If you want to have a look at the files, they are posted here:

Pi Panel Voron 2.4 Skirts are here (there is a normal version, and a version that can be printed with a screen to fill the holes)

​The Pi Panel itself is here.  

0 Comments
    Picture

    Stoopid Me

    Welcome to my Stoopid corner of teh Internet.  It's mostly gonna be 3D printing stuff, but I also post some recipes, projects, and the occasional rant here as well.  More Stoopid stuff is updated regularly.

    I recently joined the Amazon Associate program, so some of the links on this site are Amazon affiliate links. This means that, at zero cost to you, I will earn an affiliate commission if you click through the link and finalize a purchase.  This will help to support this site, and pay for more Stoopid Stuff.

    Currently, there are no active authorized sellers of my designs.  If you see my stuff (such as my Dummy 13 Weapons) for sale on Amazon, Etsy or AliExpress, the seller is using my designs without permission.

    If you want to help out with my parts and filament budget, you can also "Buy Me A Coffee" using the link below.
    ​​

    Buy Me A Coffee

    Archives

    March 2025
    February 2025
    January 2025
    December 2024
    November 2024
    October 2024
    September 2024
    August 2024
    July 2024
    June 2024
    May 2024
    April 2024
    March 2024
    February 2024
    January 2024
    December 2023
    November 2023
    October 2023
    September 2023
    August 2023
    July 2023
    June 2023
    May 2023
    April 2023
    March 2023
    February 2023
    January 2023
    November 2022
    October 2022
    September 2022
    August 2022
    July 2022
    April 2022
    February 2022
    January 2022
    December 2021
    November 2021
    October 2021
    September 2021
    August 2021
    July 2021
    June 2021
    May 2021
    April 2021
    March 2021
    February 2021
    January 2021
    December 2020
    November 2020
    October 2020
    September 2020
    August 2020
    July 2020
    June 2020
    May 2020
    April 2020
    March 2020
    February 2020
    January 2020
    December 2019
    November 2019
    October 2019
    September 2019
    August 2019
    July 2019
    June 2019
    May 2019
    April 2019
    March 2019
    February 2019
    January 2019
    December 2018
    November 2018
    October 2018
    September 2018
    August 2018
    July 2018
    June 2018
    May 2018
    April 2018
    March 2018
    February 2018
    November 2017
    September 2017
    August 2017
    June 2017
    December 2016
    October 2016
    September 2016
    July 2016
    March 2016
    February 2016
    September 2015
    August 2015
    June 2015
    May 2015
    April 2015
    March 2015
    February 2015
    January 2015
    December 2014
    November 2014
    October 2014
    September 2014
    July 2014
    June 2014
    May 2014
    April 2014
    March 2014
    February 2014
    November 2013
    August 2013
    July 2013
    June 2013
    May 2013
    April 2013
    March 2013
    January 2013
    December 2012
    November 2012
    October 2012
    September 2012
    August 2012

    Categories

    All

    RSS Feed

Powered by Create your own unique website with customizable templates.