My Stoopid Stuff
  • Home
  • Projects
  • Blog
  • Lec'tronics
  • Links
  • CNC
  • Quick Recipes
  • 3D Printer Tips

COMPLETED - Spool Holder for a Rubbermaid 21 Cup Container

8/27/2021

0 Comments

 
Picture
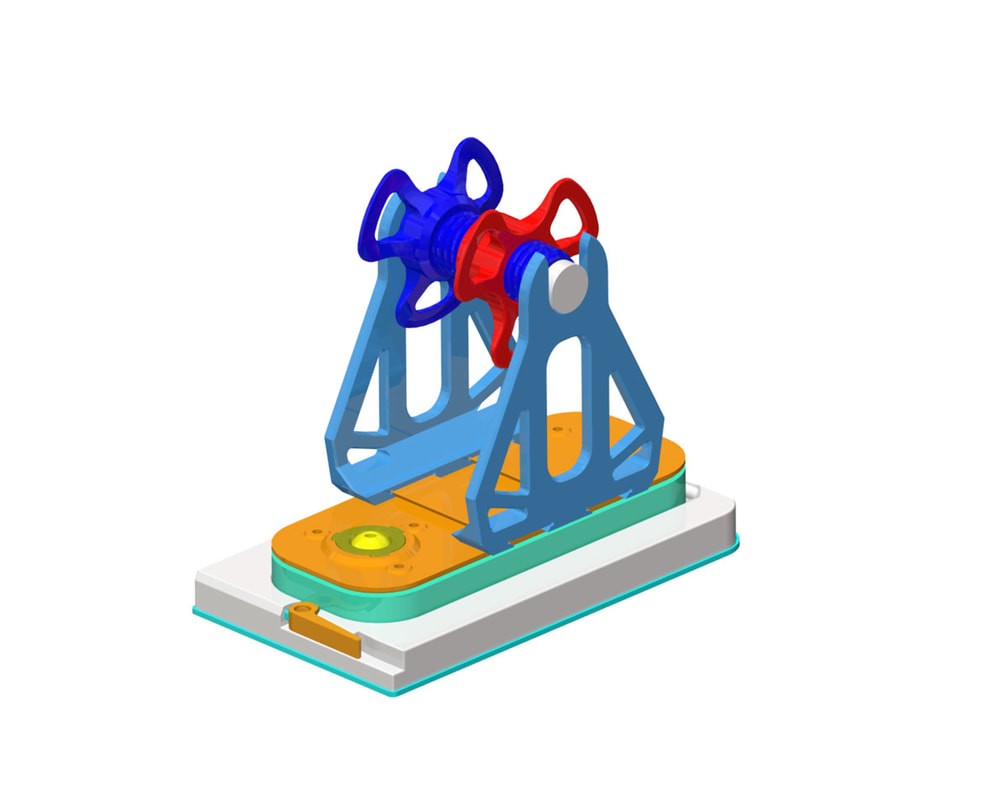
This is a Dr Frankenstein type remix, where I started with Ocieward's "Ocie's 21-Cup Filament Silos" which looks great, and added a few extras like a latch and my filament guide.  I also re-worked the spoolholder to use use an adjustable type, though it can also use the regular roller type that is original to Ocieward's design.  I'm not sure which I will use yet, but like the idea of using fewer bearings.  I'm hoping that everything fits but will update the design as I go if it does not.  This will likely not be posted for a few weeks since there is a lot to print and test.
Picture
Picture
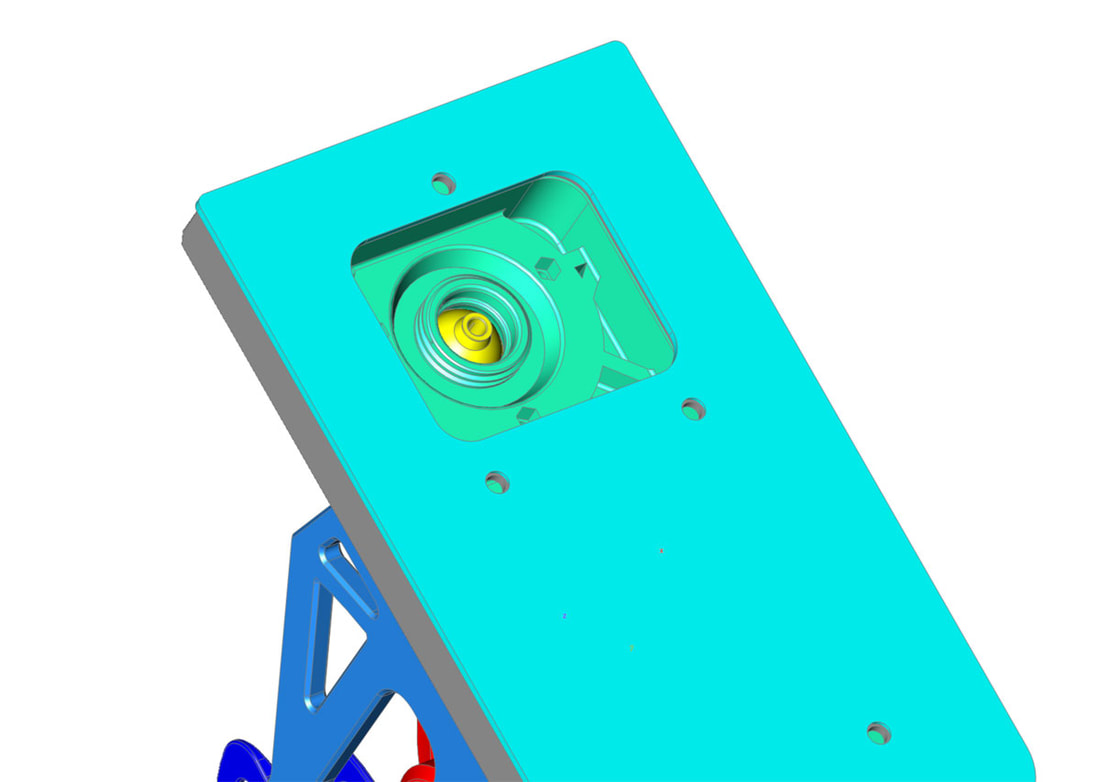
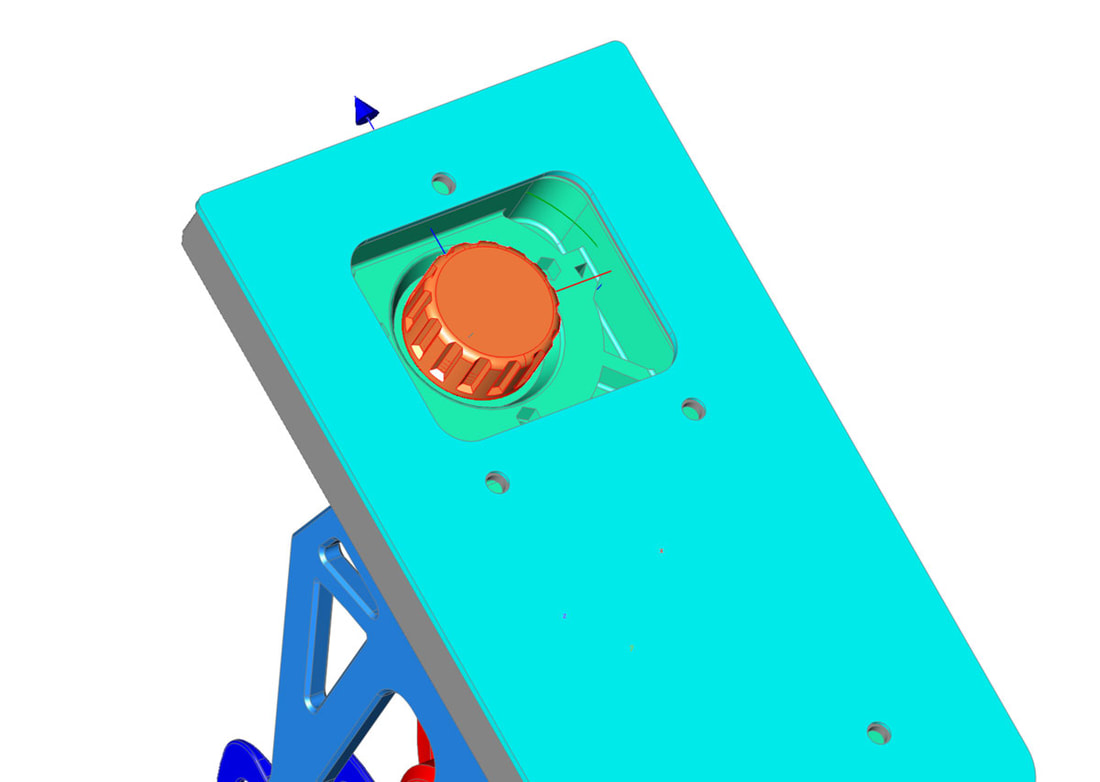
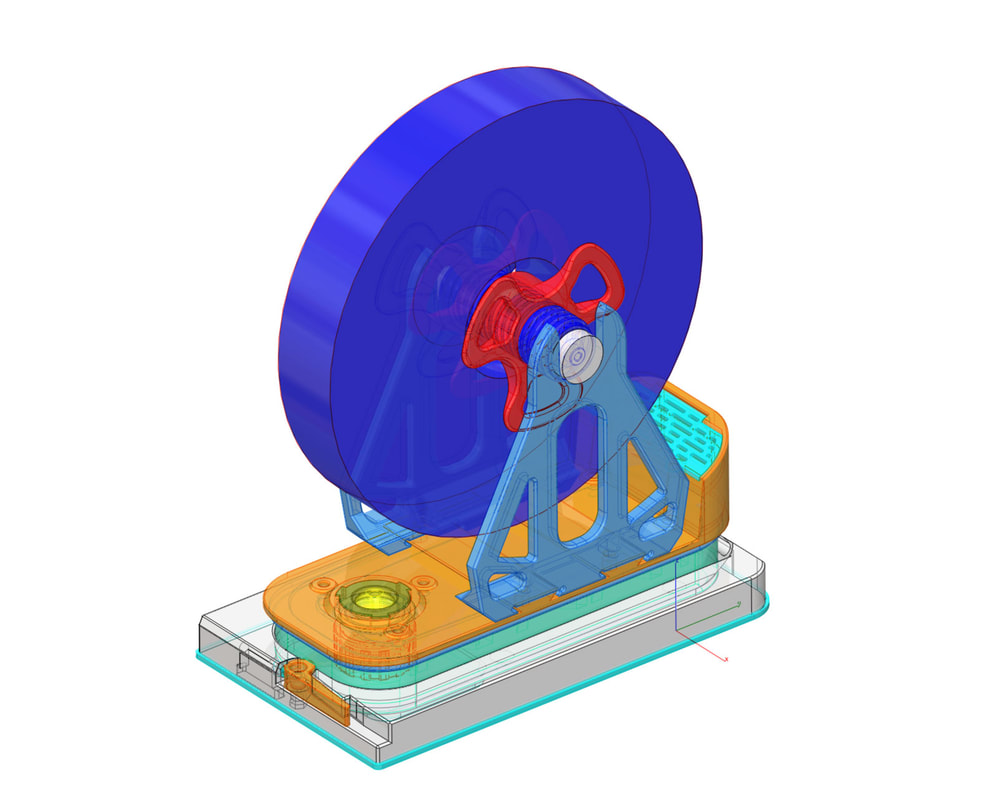
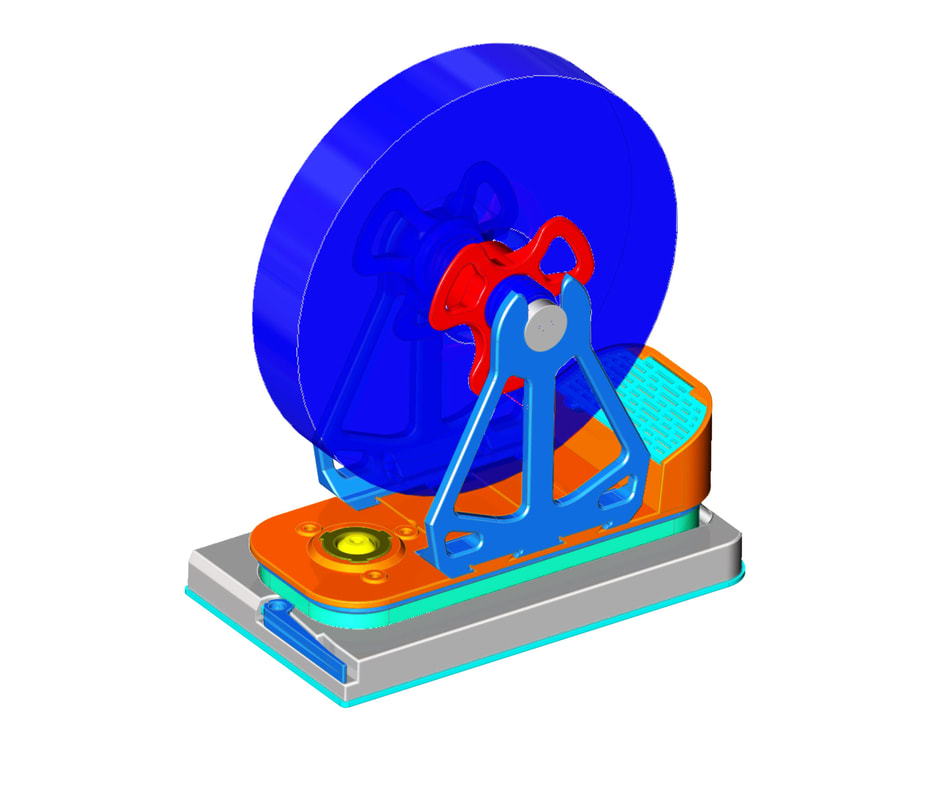
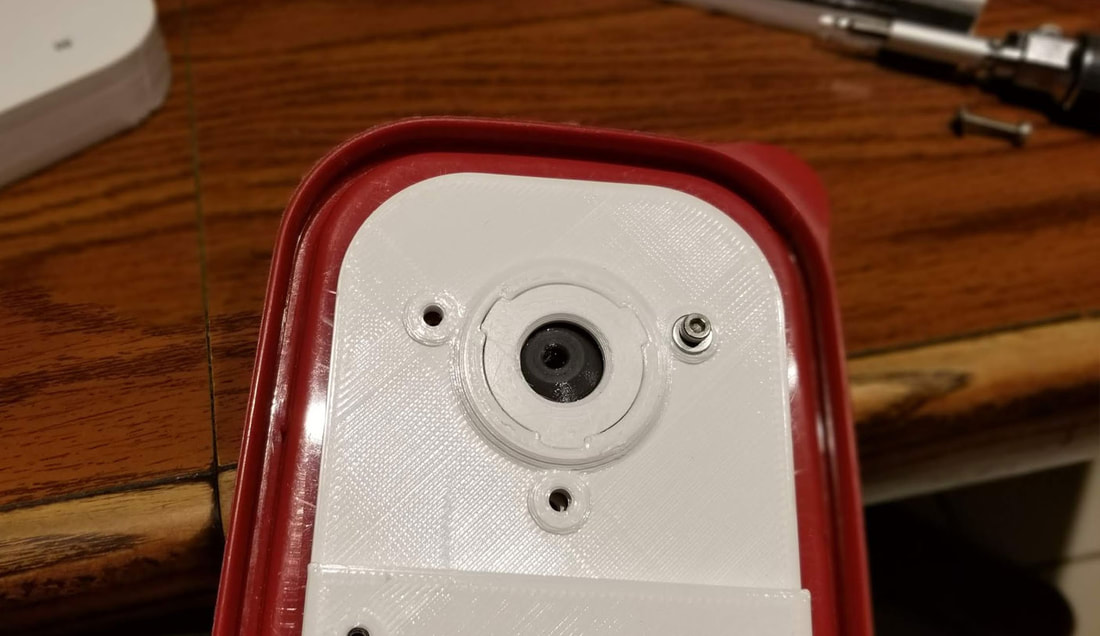
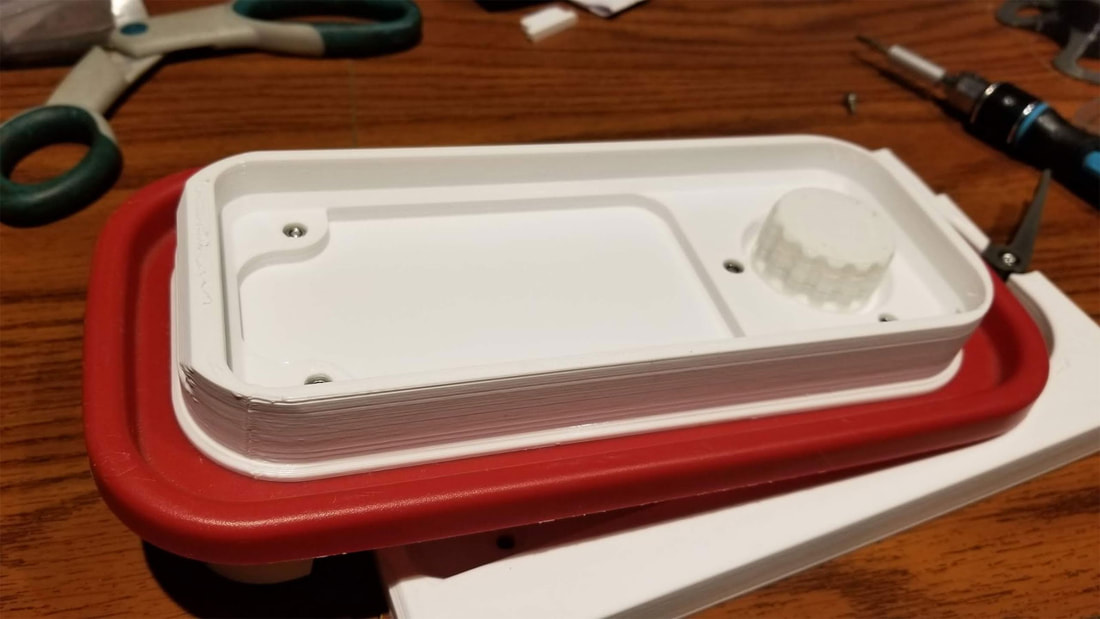
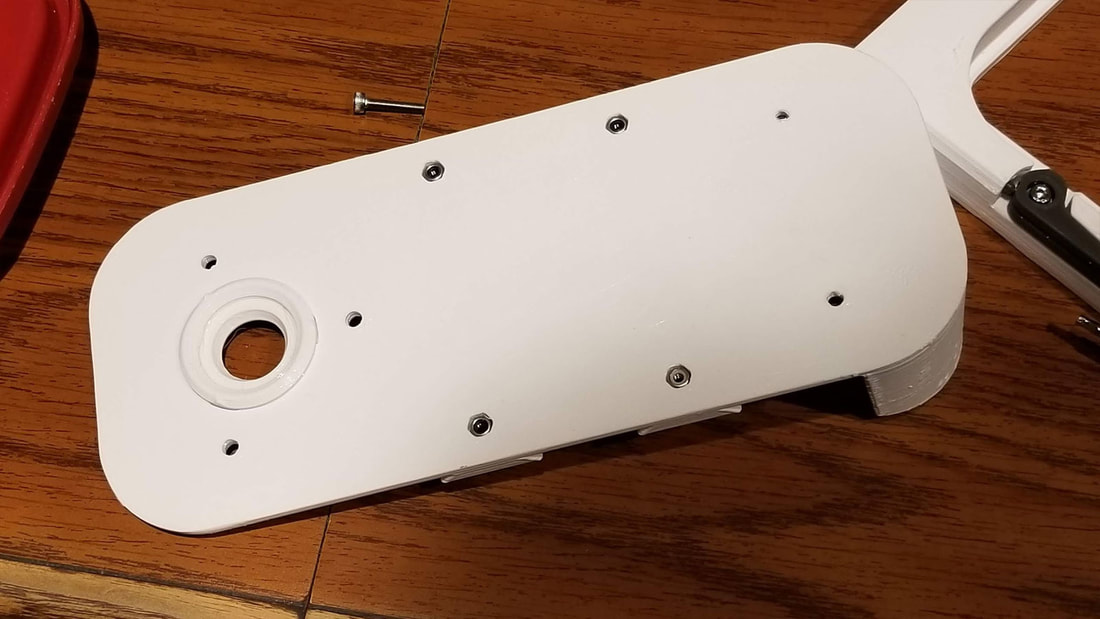
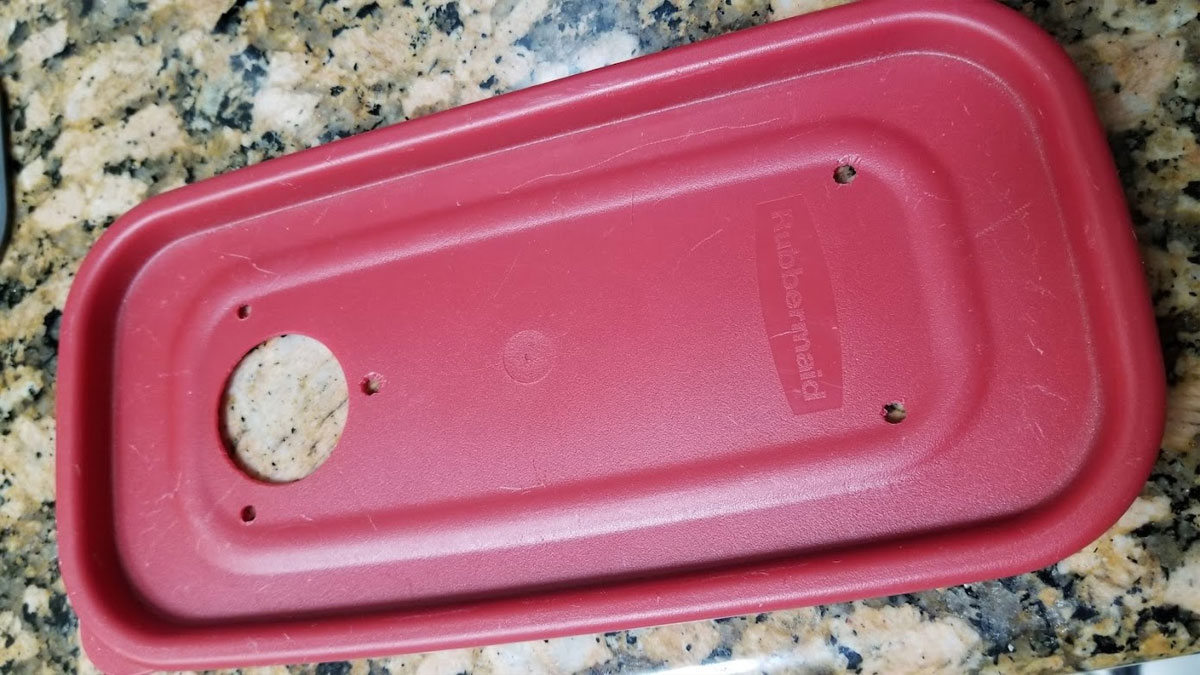
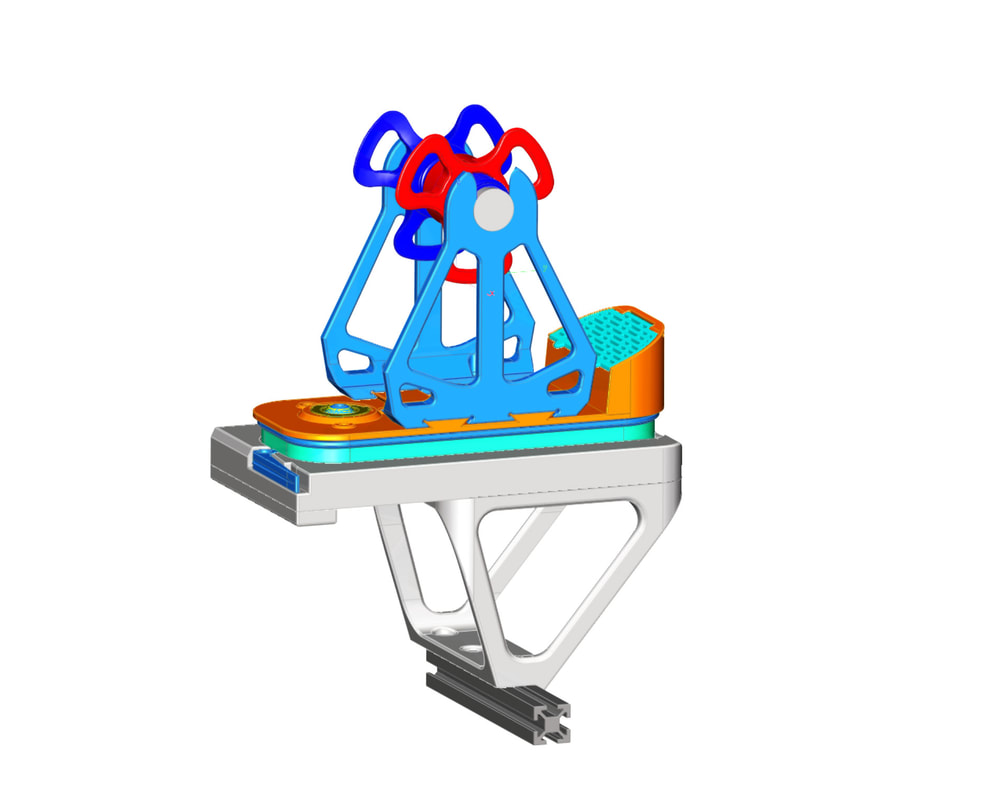
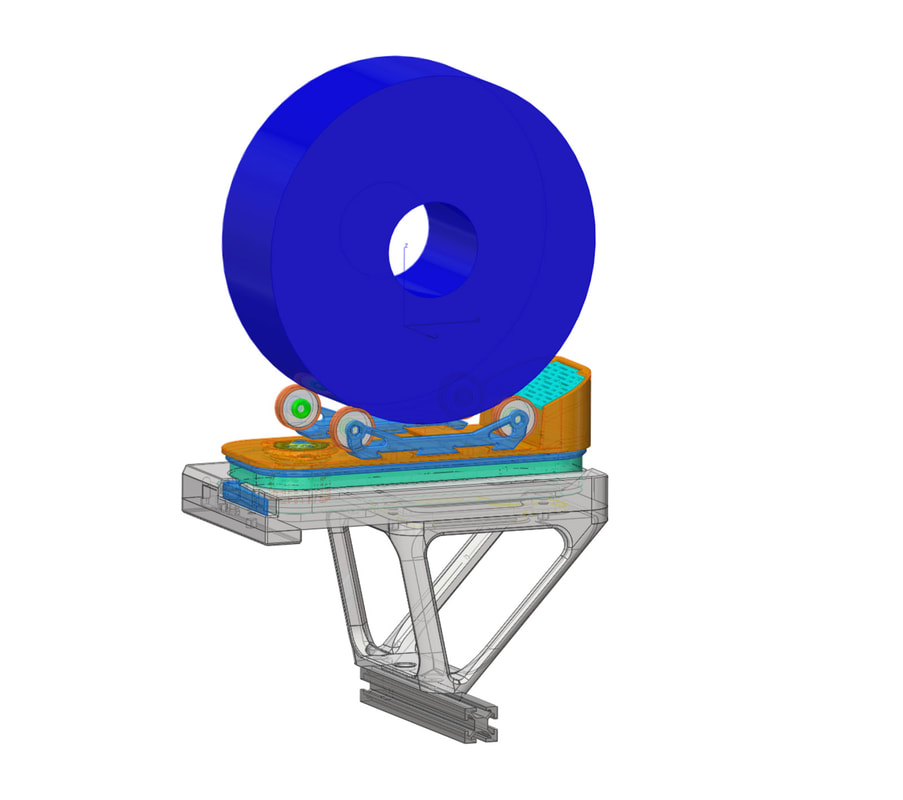
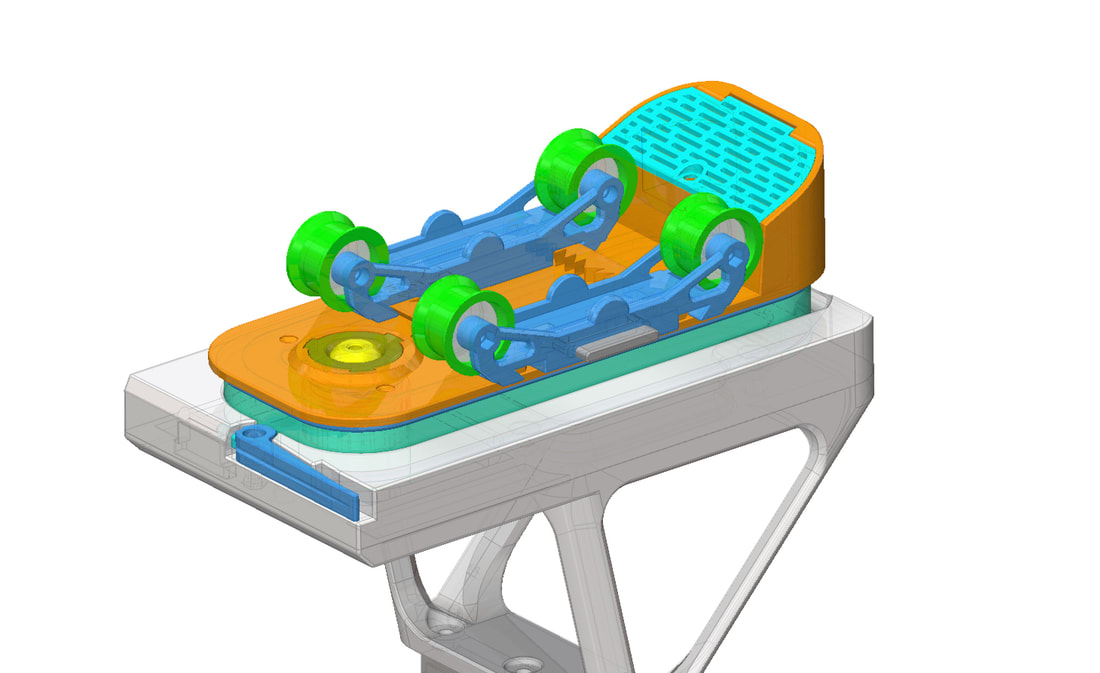
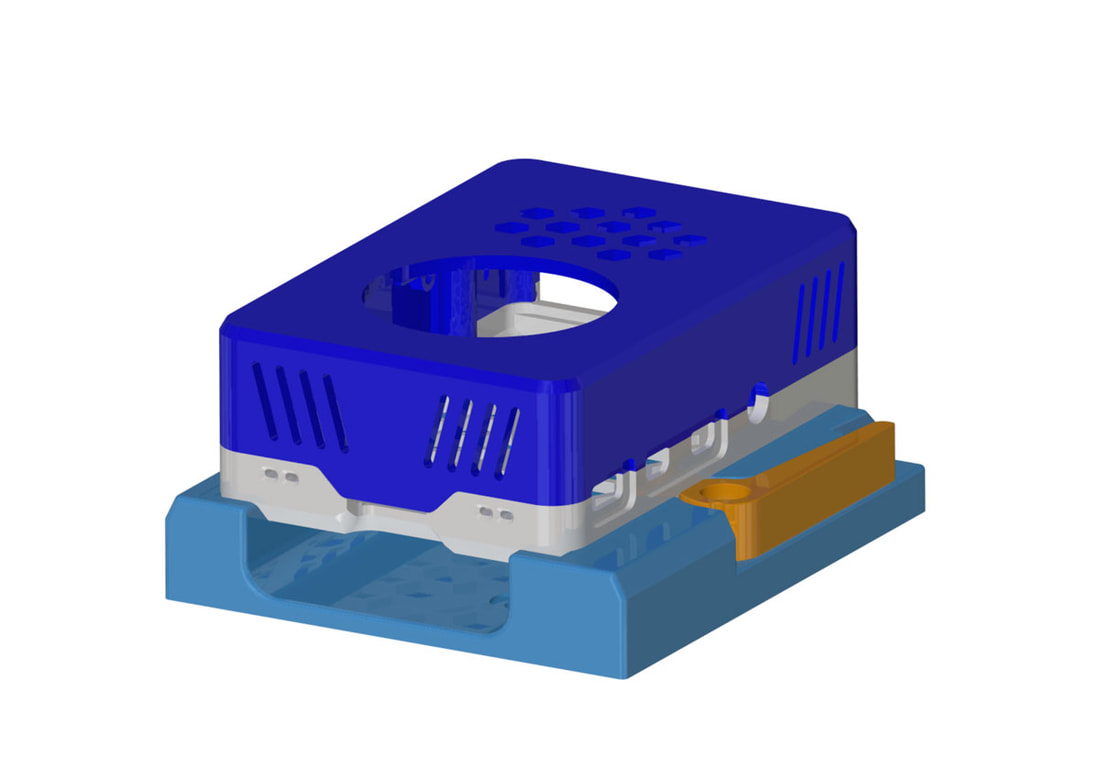
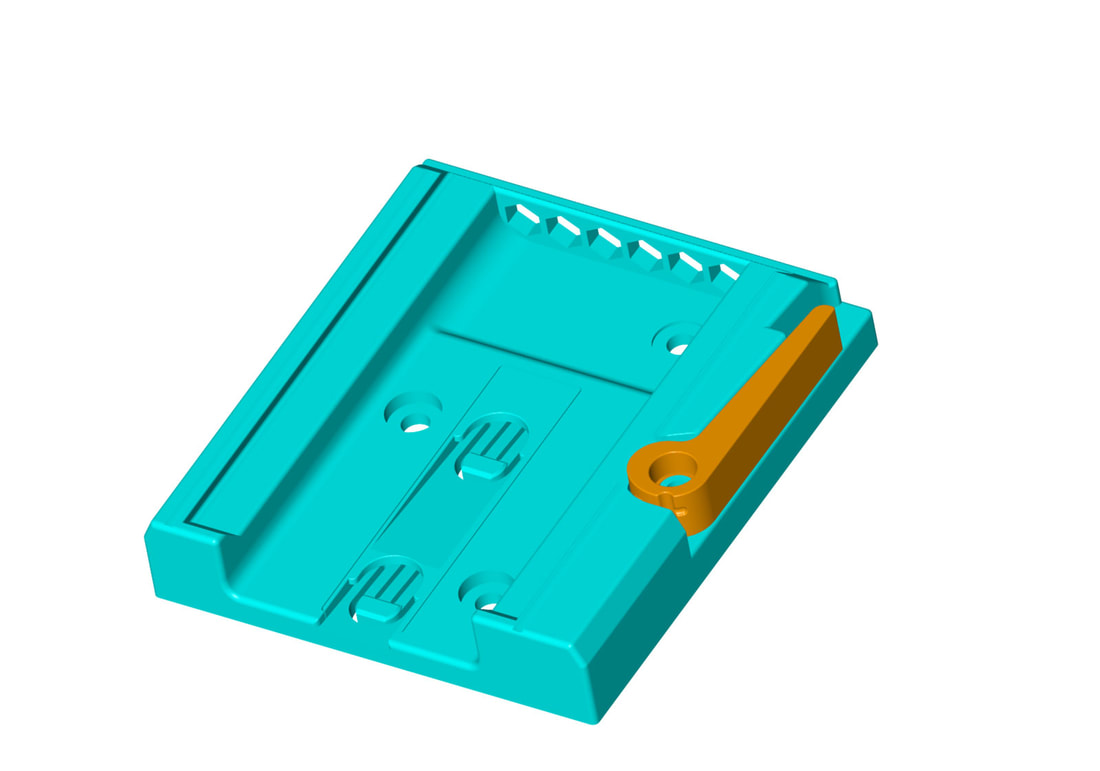
Update 1 - 8/28/2021:   This is close to the final design if everything works.  I'm printing some test parts now to see if things fit well or need some adjustments.  The plan is for the back of the container, with the plate attached to the lid, to catch on the "heel" and then rotate "toe" down into the mount where it will be held by the quick release lever.  That will allow the bowden tube to be connected up.  There is also a version to use a pneumatic coupler (which is like everything so far untested).  With the pneumatic coupler, the regular cap (pictured in orange) should be able to be used, which will allow the container to sit flat.  The major changes to the design are that I split the base up to make it easier to print without supports.  This also allowed me to make a bit of a pocket to accommodate some bumps in the lid of the Rubbermaid 21 cup container.  There is also now a desiccant container and some screw positions to hold the spool holder which will still allow some adjustment or swap out for the rollers.  Assuming everything works when printed, I expect this to be posted in the next 2 weeks.

Updste 2 - 8/29/2021:
Doh!  After uploading the pics I noticed that I chopped part of the threads off the base, which has been fixed, along with a few other optimizations for printing.  I have shaved several hours off the total print time by adding some holes here and there, and decreasing the thickness of parts in non-critical areas.  The first prototype is not much to look at, but everything works as I'd hoped for the most part and where it has some issues, I'm hopeful the current version will fix some minor annoyances.  I still expect this to be done in about 1 to 2 weeks, and then it will be posted to Thingiverse.
Picture
Picture
Picture


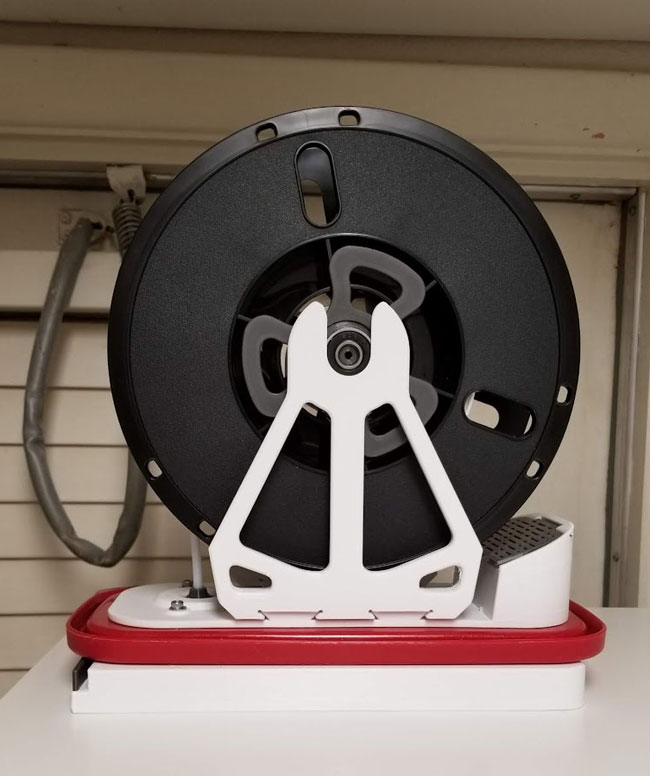
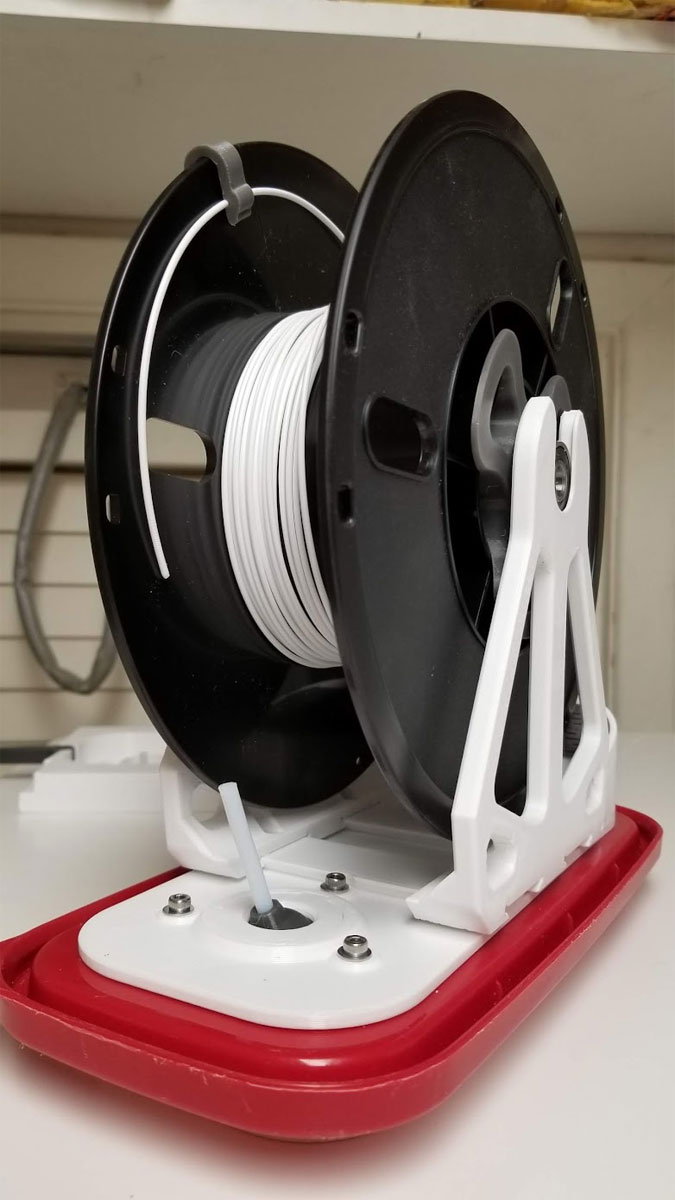
Update 3 - 9/1/2021: I had to make some changes but the design is now tested and works.  It will be posted to thingiverse in the next week and I will add a link to it below.

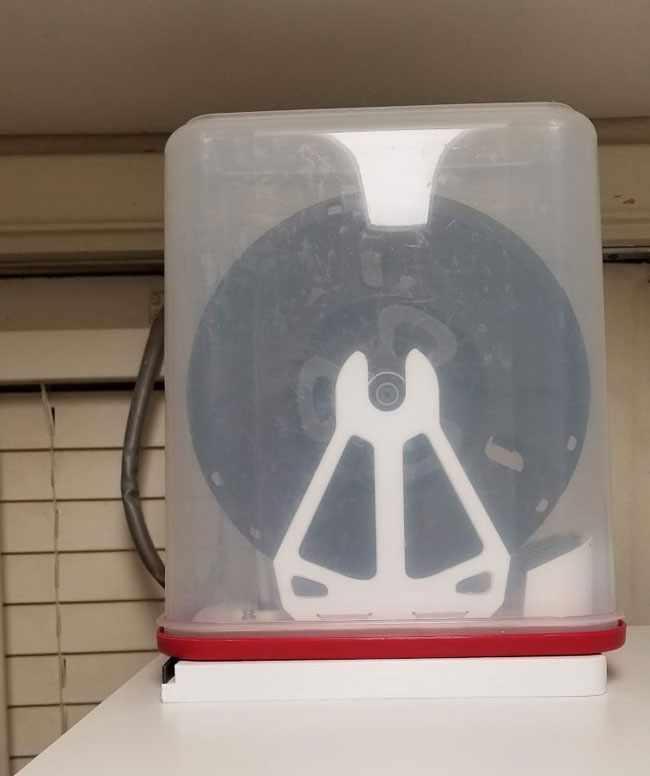
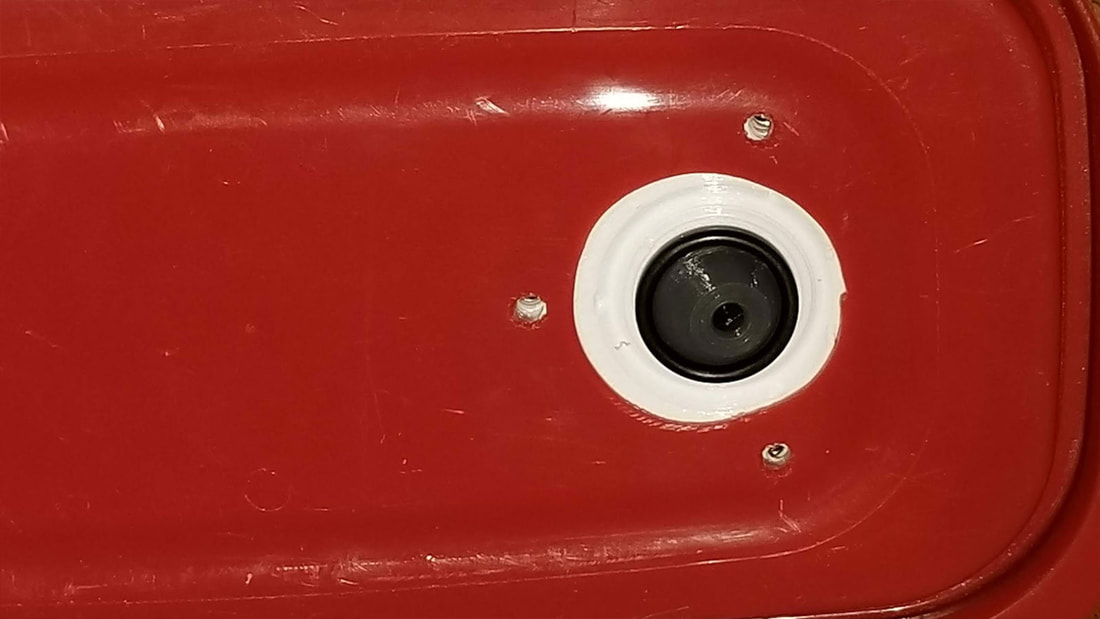
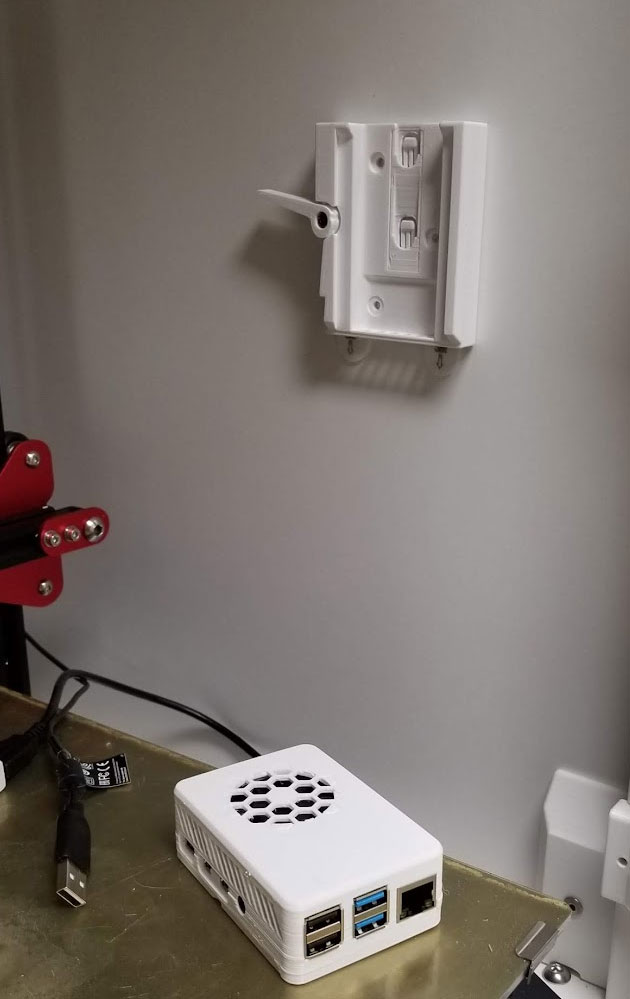
I uploaded some new pics of the completed design.  Pardon the poor print quality on some of them, it is partly due to a worn 0.6mm nozzle (now swapped) and mostly due to the problem this holder is meant to solve - which was too much tension in the filament path.  Prior to this the filament had to make two 90° turns to get to the extruder, now it only makes one and there is no tension in the filament prior to the extruder.  I have yet to print the TPU gasket but plan to do that tomorrow, and will see if I can mount this to the top frame of my ender3 as well.
Picture
Well... maybe one more thing to do, and then this will be done:
Picture
Picture


Update 4 - 9/10/2021: As usual I can't keep messing with the design.  But since I printed and used it, I noted two things and thought of one more thing that could be improved:
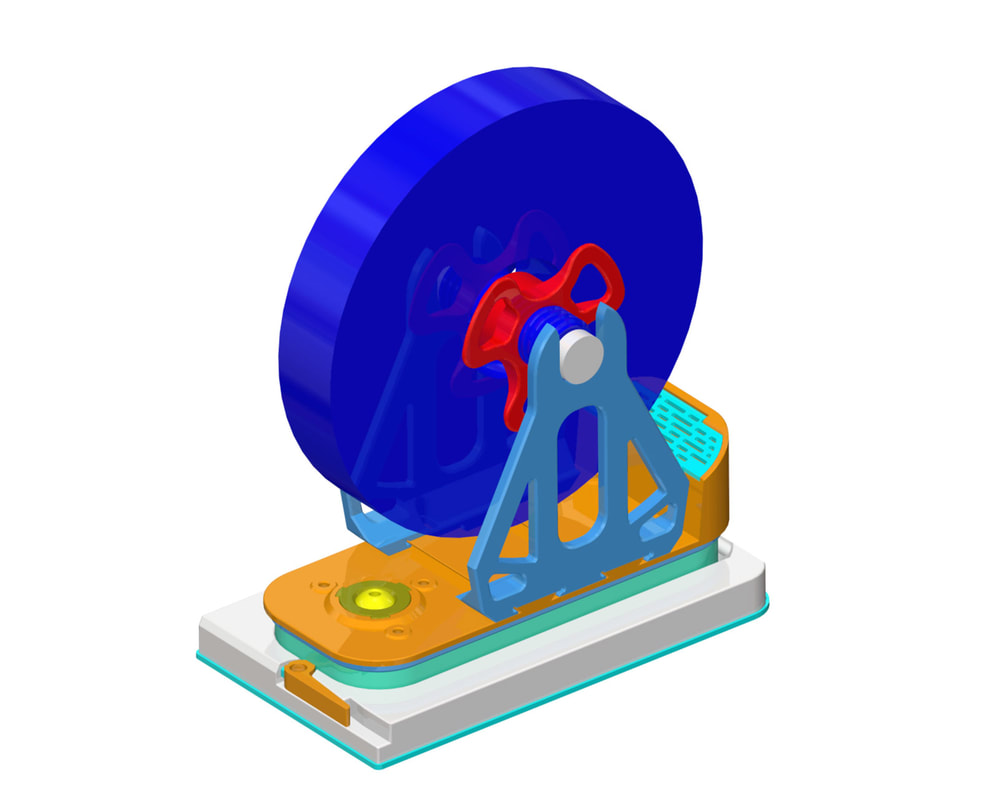
  1. The center axis spool holder has too little friction for some materials like TPU which wanted to come unspooled when I used it with this.  So I re-worked it into a roller like the original model has, but this prints with one side and has some caps which hold the bearings on.
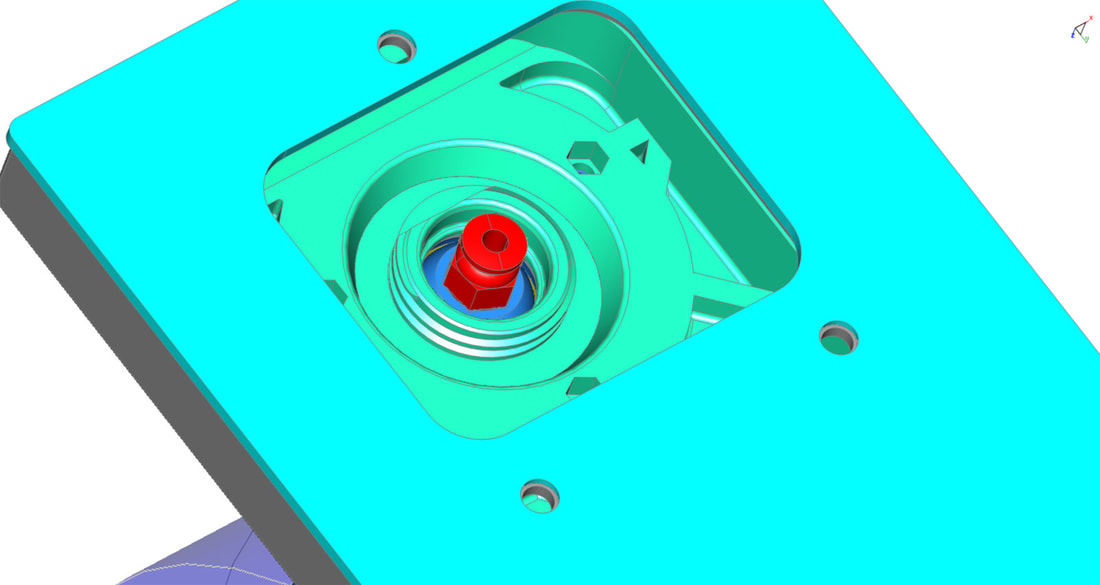
  2. The desiccant compartment needed a way to be closed more or less securely.  I don't use the loose pellets in mine (I use the pouches), but for anyone who does, it would be frustrating to have them spill.  I fixed that by adding a way to hold the lid down with a screw.
  3. Probably not a big deal but the center of mass of the spool is now over the 2020 rail on the "top mount" version which is designed to be mounted above printers that have 2020 rails.  This version will also have a wire conduit to route a wire to the area below the spool holder since that seems like a nice place for a light, however I have no plans to develop that idea further since I cannot use this version on my printers.
I will need to re-print some parts but that'd OK since the originals will not go to waste.  But it will mean that this will not get posted for a bit longer.
Picture
Update 5 - 9/16/2021: This project is not abandoned, it's only getting better :D  I have completely re-designed the bogies for the wheels and the way they attach and can be adjusted will be much more convenient (no need to use screws to secure them in place anymore).  It's a bit hard to explain, but I have designed and tested a button and ratcheting mechanism which will be used to adjust the bogies in or out.  I'm still fine tuning some parts of the design but I could post it tomorrow and be 95% fine with it.  The last bit to make it as good as it can be, just takes a bit longer.
Picture
Picture
Update 6 - 9/17/2021: Assembly instructions posted here.  I should be getting this uploaded this weekend.

Update 7 - 9/19/2021: Thingiverse seems to be having some problem since when I posted the design for the label roll holder (posted above), that thing did not make it into my designs on Thingiverse.  So I can only find that thing when I go to it directly, but I don't find it using search or in my designs.  So the design exists on Thingiverse but nobody can find it unless they go to the design directly, and that sucks.  That's pretty much the way it is with Thingiverse, but I'm gonna wait till they get that problem fixed before I post this spool holder system, since I would guess the only way to "fix" it would be to delete the thing and re-post it.

The design is now uploaded to Printables here:
https://www.printables.com/model/79719


0 Comments

Quick Notes on Updating Raspberry OS on an OctoPi

8/15/2021

0 Comments

 
I just updated one of my OctoPi's today, and thought I'd make some notes here on what I did.  I'm no expect on this of course, but this process worked for me.  Also these steps are not some special thing I came up with, they are the normal way to update a Pi as far as I know.

Unless you like to live on the edge though, it's a really good idea to make a backup image of the SD card in the Pi.  This can save you a lot of time when the SD eventually gets corrupted due to improper shutdowns too.  I use Win32DiskImager to create the backup image of the SD card and Balena Etcher to burn it to a SD card should the need arise.  Note that when using Win32DiskImager, you should see that the SD card from the Pi has two partitions, one is boot and one is root (larger). 

To image the SD card (with both partitions), I selected the smaller boot partition in Win32DiskImager, and then after entering a filename to save the image as, I selected "Read".  I don't know if it matters which is chosen, but I just picked the smaller "boot" partition here:
Picture
Picture
Now just keep that image in a safe place (you may need to add '.img" to the end of the filename if it did not automatically get that extension.  It is best to also consider the SD card that the image was taken from.  Try and stick with one brand or microSD since there are differences in actual capacity between brands, and it can be difficult to resize an EXT4 partition on a Windows machine if you find that the image will not fit a new card.

To update the Raspberry Pi OS I used the following (steps are detailed here):

Log into the Pi using the "pi" user.  I use Putty to do this since it's free and it works.

Picture
It may ask you about saving keys and then a terminal window will pop up. 

Next I just entered the following:

sudo apt update

It will ask for the pi password again, and then it will start downloading updates (the Pi will need to have access to the internet for this).

After that is done, I ran this:

sudo apt full-upgrade

This took an additional 140MB or so and it asked me if I wanted to continue (I said "yes").  The update takes quite some time and will pause at a step where there are some notes regarding a change to the default behavior (had to do with a security patch), with the only option to press "x" to exit which is actually to continue, then I waited some more till it was done.

When the update was completed, I rebooted it.

sudo reboot


Once it was back up, I logged into Octoprint using the browser and updated that.  I started with:

Octoprint 1.6.1
Python 2.7.16
OctoPi 0.17.0

To update, I clicked on the "wrench" icon at the top right, then selected "Software Update" from the left side frame, and then just clicked on "Update All".  Octopi did it's thing and a few minutes later it asked me to reload it.  I did that and since I was already on the current version it just updated some plugins.

After I tested the updated OS, I burned another image of the SD card to have as a more current backup, and then burned that image to a spare MicroSD card which I taped to the Pi so I can have a quick way to recover it if it should fail.


0 Comments

UPDATE (completed) - Latching Case for the Pi 4

8/15/2021

0 Comments

 
Picture
Picture
Picture
This is a mash up of an untested latch design I made for my mini-PC and "Malolo's screw-less / snap fit customizable Raspberry Pi 4 Case & Stands".  I'm printing this now, but it may be a few days before it can be tested with an actual Pi.

Update 8/15/2021: Some updates to the design.  I'm testing some of the changes, but the MicroSD card will probably not be tested since that is a component from a previously verified design which was just spliced into this design.
Picture
Picture
Picture
Update 8/18/2021:  I'ver printed it after tweaking the design a bit and it works great.  The print of the case however was not super so I am re-doing it (printed it with a 0.6mm nozzle and I need to tune up the CR10S Pro).  Once I get the case re-printed I will post it up to thingiverse.

Update 8/19/2021:  The design is completed and tested, and now uploaded to Thingiverse.  You can find it here:

https://www.thingiverse.com/thing:4936218

Picture
Picture
0 Comments

Work in Progress - Raspberry Pi Case for a CR6 SE

8/7/2021

0 Comments

 
Picture
Picture
Im working on a remixed case for a Raspberry Pi that will fit a CR6 SE.  It is based on and remixed from the following things:


Malolo's screw-less / snap fit Raspberry Pi 3 Model B+ Case & Stands by Malolo

https://www.thingiverse.com/thing:3719217

Creality CR6 CR-6 SE Under-screen / Side Rail Raspberry Pi Model B 1 2 3 Case" by SANGER_A2

https://www.thingiverse.com/thing:4722944

Top for 35mm Fan" by PBahner

https://www.thingiverse.com/thing:4883985

You can find my remix at the link below, but I'm just now starting to print it and don't have a RPi to test it with currently (at least not without ripping apart one of my existing Pi cases).  This may also work with the ender3 and some variants, if the 40mm aluminum extrusions are similar.

https://www.thingiverse.com/thing:4927393

Update 8/18/2021:  The design was printed on my buddy's CR6 SE and it turned out well, but it did pick up some residual material that was stuck to his bed, but since it's a functional part I think it is fine.  I don't have a fan to test with it, but I have some 40mm fans on order.
Picture
0 Comments

CR6SE Tune Up

8/6/2021

0 Comments

 
PictureThe CR10S Pro didn't disappear, it's only giving up it's throne for a couple days so I can use the ducted enclosure to test the CR6 SE.

A buddy got a sweet deal on a gently used CR6-SE, but it had some issues.  He said he was having multiple failed prints early on, which he suspected an problem with the extruder to be the cause.  His printed also told me the power switch was bad.  I'm not sure if this was an early or late Kickstarter CR6 SE, but he said that he did not trust the power switch, and so he was just powering it on using the mains and leaving the switch in the on position.  I don't know the whole backstory on the faulty power switches on the CR6 SE, but apparently there were problems with a poor quality power switch on some of these.  In any case I found a replacement switch for $3 at TH3D Studio, and swapped it out for him.
Picture
The replacement switch is a Cherry SPST rated for 10A @ 120V(AC) Rated. The old switch (Part KCD1-104) also claims a 10A @ 125VAC rating, but was suspected to be faulty.
Picture
Picture
Removing the old switch. In this pic, all the wires are removed from the old switch to make it simpler to remove. To remove it, I had to release clips which are along the short side of the switch. Then I just snapped the new on in it's place and reconnected the wires as they were before.
I also added some black electrical tape around any areas where wires could have rubbed inside the power supply compartment before buttoning it up.  It was nice to see a genuine Mean Well Supply in there, though I heard they used them in this printer so it wasn't really a suprise.
Picture
Once the power switch was swapped and the case buttoned up, I checked and tightened all the wheels, some of which were quite loose.

Then I ran an autolevel, and it looked pretty bad.  Unfortunately with this printer there are no bed leveling screws (it is fixed).  That may be fortunate depending on your point of view, but in this case I realized that the bed skew had to have something to do with the z screws being misconfigured, the bed itself or possibly even the frame (or all of these things).  I first tightened down all the bed screws, which were only a bit loose so I did not expect they were an issue.  I checked the gantry to bed measurement from both sides of the gantry and noted that the printer was about 1mm higher on the right side.  I knew I would need to fix this but first something else was bugging me.
Picture
This a heat map of the bed prior to any corrections.

I had earlier noticed that the printer had a definite wobble when placed on a flat surface, so I loosened the eight large bolts which hold the sides on (not loose but just enough to allow me to adjust the frame).  Then I set it on a flat surface and firmly pushed the opposing ends of the feel down until the wobble was gone.  I also checked that the bolts holding the gantry frame to the base were tight (they were).  Adjusting the base to take the wobble out did not take much force, but it made a big difference, and the printer now sits perfectly flat.  Unfortunately these adjustments did not help much with the bed leveling.

Picture
The four screws in the center of the pic were slightly loosened (on both sides). Then I applied firm pressure to the opposing (high) corners of the printer base while it was on a flat surface. Once the wobble was gone I re-tightened the bolts (I tightened them in a "X" pattern).
So I was back to dealing with the gantry and the z-screws being misconfigured.  Based on the bed leveling heat map I could see that a good deal of the problem was with the out of step dual Z screws, but not all of the problem was there (which I was hoping the frame straightening would help correct).  In any case I adjusted the right side Z screw down just a bit to get it level with the left side.  To do that I just loosened the grub screws on the top of the right side (the side without the X stepper) and then turned the right side z coupler enough to bring that side down to the same level as the left side.  I had to hold the loosened gear at the top of the right side Z screw, to make sure that the turns on the right side screw did not translate to the left side.  When the gantry to bed height was equal on the left and right sides, I just tightened up the grub screws on the right side which I was adjusting from.  To make the measurements, I used a vernier caliper and rested the butt end of it on the gantry and the tip of the post that extends, on the bed.  The grub screws can be easily stripped so care is needed not to over tighten these.
Picture
This is the right Z screw seen from the back of the printer. The gear at the top was loosened and held steady (so it would not rotate) while I rotated the coupler at the base to adjust the right side height above the bed to equal the left side.
Picture
Close up of the right side z-screw gear. The hex wrench was of course removed once I was done. These two grub screws can strip out so care should be taken with them (aluminum threads and a steel grubscrew).

This adjustment helped a bit and I could probably spend more time to get the level a bit better from left to right.  But I think I will leave it here (even though I'd like to get it closer to level), since I think the auto-leveling can compensate for it.  From the bed heat map there is still some diagonal problem going on.

Picture
This shows an improvement over the initial test (this was actually the 3rd or 4th test I ran but it was the last one. Im sure with some more time it could be improved but this seems acceptable since the auto leveling should take care of it. If it looks like a problem I will spend some more time to see if it can be improved further.

I then checked the e-steps and found that it was off by 7mm over 100mm (I asked the printer for 100mm and it only extruded 93mm).  I verified that the extruder was tight and not slipping, and re-ran it again to verify it was really off by 7mm.

The M503 output from the printer showed the following:

Recv: echo: M92 X80.00 Y80.00 Z400.00 E93.00

Since the original Esteps were 93 steps/mm, and my adjustment factor is 100mm requested / 93mm actual, I ended up with an new esteps value of 100 steps/mm - so I ran the following:

M92 E100.0
M500

I re-checked the e-steps and it was a perfect 100mm when requesting 100mm on the extruder.  Its a puzzle why they are so far off, but the difference was repeatable and the fix was confirmed in a third test. 

Finally I decided to print My Stoopid Test Cube and discovered what I suspect was the cause of the problems my buddy was having, which he attributed to the extruder.  That is the z-offset was set too low.  It was set as 0.2mm and I had to raise it to 0.4mm before my 0.2mm feeler gauge would slip between the nozzle and bed (I later dropped it to 0.30mm since adhesion was suffering).  I'm still tweaking things before I try an larger print.

I can't help but throw in some thoughts on this printer.  Aside from the inability to level the bed I really like the CR6 SE, the load cell auto leveling sensor is a great idea, and it looks solidly built.  It's like a little CR10S Pro for ease of use and assembly.  Unless there was a compelling reason like price or amazing speed or some leap in quality, I don't think I would buy another ender3 class printer though, they are just too limited in volume.  For a beginner the CR6 SE may be or may not be a good printer.  It has a lot of bells and whistles, but that also means it can be harder to fix.  That said it's a good printer, this one just needs some love.

0 Comments
    Picture

    Stoopid Me

    Welcome to my Stoopid corner of teh Internet.  It's mostly gonna be 3D printing stuff, but I also post some recipes, projects, and the occasional rant here as well.  More Stoopid stuff is updated regularly.

    I recently joined the Amazon Associate program, so some of the links on this site are Amazon affiliate links. This means that, at zero cost to you, I will earn an affiliate commission if you click through the link and finalize a purchase.  This will help to support this site, and pay for more Stoopid Stuff.

    Archives

    March 2023
    February 2023
    January 2023
    November 2022
    October 2022
    September 2022
    August 2022
    July 2022
    April 2022
    February 2022
    January 2022
    December 2021
    November 2021
    October 2021
    September 2021
    August 2021
    July 2021
    June 2021
    May 2021
    April 2021
    March 2021
    February 2021
    January 2021
    December 2020
    November 2020
    October 2020
    September 2020
    August 2020
    July 2020
    June 2020
    May 2020
    April 2020
    March 2020
    February 2020
    January 2020
    December 2019
    November 2019
    October 2019
    September 2019
    August 2019
    July 2019
    June 2019
    May 2019
    April 2019
    March 2019
    February 2019
    January 2019
    December 2018
    November 2018
    October 2018
    September 2018
    August 2018
    July 2018
    June 2018
    May 2018
    April 2018
    March 2018
    February 2018
    November 2017
    September 2017
    August 2017
    June 2017
    December 2016
    October 2016
    September 2016
    July 2016
    March 2016
    February 2016
    September 2015
    August 2015
    June 2015
    May 2015
    April 2015
    March 2015
    February 2015
    January 2015
    December 2014
    November 2014
    October 2014
    September 2014
    July 2014
    June 2014
    May 2014
    April 2014
    March 2014
    February 2014
    November 2013
    August 2013
    July 2013
    June 2013
    May 2013
    April 2013
    March 2013
    January 2013
    December 2012
    November 2012
    October 2012
    September 2012
    August 2012

    Categories

    All

    RSS Feed

      Contact Form (Name is optional)

    Submit
Powered by Create your own unique website with customizable templates.