My Stoopid Stuff
  • Home
  • Projects
  • Blog
  • Lec'tronics
  • Links
  • CNC
  • Quick Recipes
  • 3D Printer Tips

Ways to Cut Down on Print Times

11/27/2019

0 Comments

 
Picture
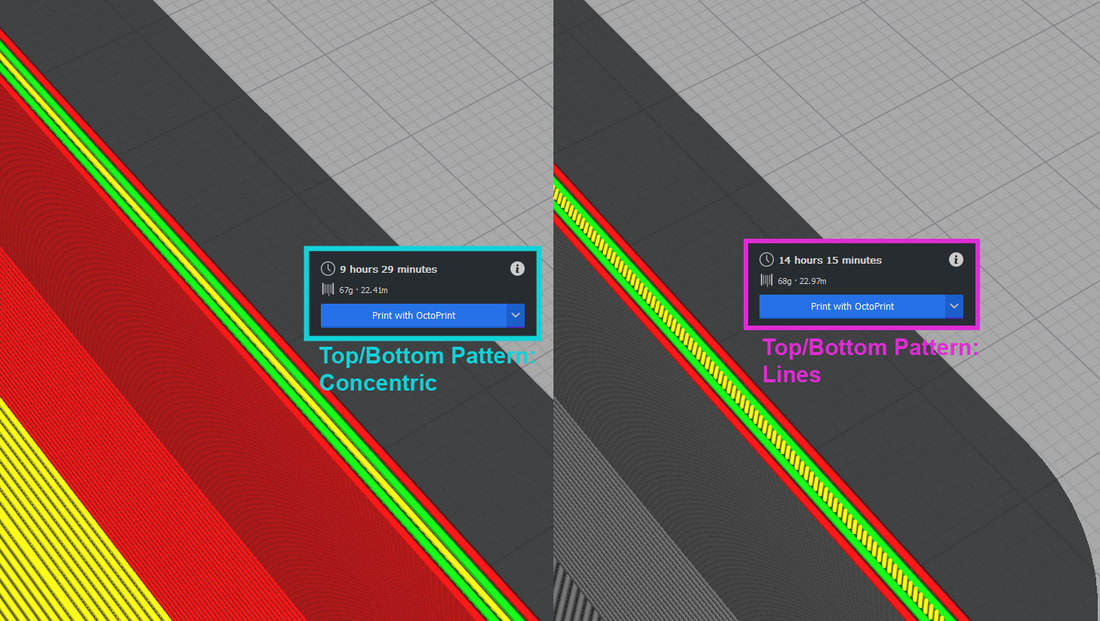
Almost 5 hours saved by changing the top/bottom pattern to Concentric.
A thread on Thingiverse got me thinking about ways to cut down on print times on some of the large prints I have been running lately.  These ideas are either cobbled together from trial and error, or something absorbed from youtube or Thingiverse forums, or searching the web (in other words, mostly not my own ideads).  I thought it would be a good idea to put them here though, for my own recollection later, and also to help anyone unlucky enough to have stumbled on this tiny corner of Teh Internets.  I use Cura 4.1.0, so some of these may be out of date.

Speeds are obvioulsy the first to try, but will be limited by the printer, so assuming that the speed is the best balance between speed, and quality, the rest are all slicer settings (for Cura 4.1.0):

  • Layer height, for big prints I use 0.24mm normally.
  • walls - 2 is usually fine, but for structural parts more walls usually means more strength, so it is a trade off.
  • infill - gyroid, usually between 10-25% depending on what it is for, you can also use grid and "gradual infill steps" to reduce unnecessary infill.
  • supports - aside from orientation of the model and increasing the overhang % to reduce them, it helps to use "enable conical supports" in the experimental settings.
  • shell> top/bottom pattern - changing from Lines to Concentric can speed up printing of thin walls where the infill is a bunch of time consuming zig zag patterns (see the pic - almost 5 hours with one change).
0 Comments

Setting up a Elecrow 5" Capacitive Touchscreen with OctoPrint

11/25/2019

0 Comments

 
This is how I got my new "Elecrow 5 inch Capacitive Touch Screen" working with a fresh install of OctoPrint on a Raspberry Pi.

First I downloaded, and then imaged the latest version of OctoPrint (0.17.0 Currently) to a microSD card. 

Once the image was created, the SD has to be installed in a PC to edit the "octopi-wifi-supplicant.txt" file which will be in the drive called "boot".  Note that it will probably ask if you want to format the SD card - don't do that. 

In the "octopi-wifi-supplicant.txt" file, add the following (and keep the SSID and passwords for your network in the quotes):

## WPA/WPA2 secured
network={
  ssid="SSID_NAME_HERE"
  psk="PASSWORD_GOES_HERE"
}


Save that, and then find the file called config.txt and add this - it can go at the top or wherever (this was provided by the Amazon seller):

# --- added by elecrow-pitft-setup ---
hdmi_force_hotplug=1
max_usb_current=1
hdmi_drive=1
hdmi_group=2
hdmi_mode=1
hdmi_mode=87
hdmi_cvt 800 480 60 6 0 0 0
dtoverlay=ads7846,cs=1,penirq=25,penirq_pull=2,speed=50000,keep_vref_on=0,swapxy=0,pmax=255,xohms=150,xmin=200,xmax=3900,ymin=200,ymax=3900
display_rotate=0
# --- end elecrow-pitft-setup ---


Save that, eject the SD card and install it in the Raspberry Pi, then connect up the Touchscreen to the Pi with an HDMI cable and a USB cable (micro-USB on the screen side).  Then connect power to the Pi using it's MicroUSB connector and it should boot up.

Now you will see stuff on the screen but no graphical interface.  We still need to do the OctoPi basic setup which is done using the the web interface.  Having the screen though does help find the IP which will be shown on the screen when it is done booting up.  Put the IP in your browser and go through the setup and add a password (or not, I don't care - but you should probably add one).  Also note that it will take several minutes before you will be able to successfully acces the Octopi web server, so don't freak out if you get an error, just give it 5 or 10 minutes and try again.

Once the Octopi is working and you can access it via the web browser, the next step is to install the "TouchUI plugin".  TouchUI is a touchscreen UI for Octoprint and is what makes all the neat graphics, and buttons and stuff.  The problem is, we need it to automatically launch when the Pi is booted up, but will get to that in a minute.  To install it, first click the wrench: 
Picture
Then click on the Plugin Manager, and then the "Get More" button:
Picture
Now search for "TouchUI" and then install it.
Picture
Now reboot the Pi. 

Now the problem is that there will still be no touchscreen showing up.  There are 2 ways to deal with this, you can either ssh into the Pi using a tool like Putty, or you can connect a keyboard and use the tiny little screen - or connect it to a monitor.  Either way we need to make changes on the command line.

I am using Putty and below is a pic of the screen you would see when launching it.  You should not need to modify any of the options, just put the IP address of the Pi in the field and then click Open.  It will pop up a box asking you about saving the key (yes), and then the terminal window will open where you can log in to the Pi.

Picture

When you log in, the username and password will not be the same as what you set up in the Octopi setup - that was the password for Octopi, not the Pi that it runs on.  To log in to the Pi, use this:

Username: pi
Password: raspberry


Now the first thing you probably should do is change that, do do so, type "sudo passwd pi", then the current password (raspberry), and then enter a new password (and then one more time) - I also did this for the root password "sudo passwd root" but there is a more secure way to do it by changing the pi username.  Obviously don't loose these or make them easy to guess.  It is a good idea at this point to open a 2nd SSH session to the Pi and verify you can log into it using the new "pi" user and password, and then do an "su root" to verify the new "root" password works also.  If both the new "pi" and "root" passwords work, then just exit out of the 2nd session and continue in the original ssh session.  That way if you have a problem, you can still fix it from your original (logged in) session.
Picture
Now, my installation, which was a clean install, did not have any of the required X11 files or TouchUI files installed where they should have been, so I ran this according to the guide here:

git clone https://github.com/BillyBlaze/OctoPrint-TouchUI-autostart.git ~/TouchUI-autostart/
Picture
Next (agian just following the guide) I ran this:

sudo ~/TouchUI-autostart/helpers/install
Picture
This takes ...a WHILE... and installs the required "dependencies".  When I ran it, it seemed like it could have been hung up installing the dependencies - but it just takes a long time...
Picture
Once it wrapped up, it popped this screen up - had to think about this one a bit, but added the username for Octoprint (which was the username that was set up in the Octopi initial setup - not "pi").
Picture
Then use the tab key to move over to "OK" and then on the next screen it will ask to reboot (yes).  When it booted up, the TouchUI loaded up automatically and the touchscreen also worked without any issues (yea!).  For grins, I powercycled it to make sure it still worked, and it did :D
Picture
I did notice that the CPU can really get up there with TouchUI running.  I tried bouncing around though the tabs to see how high I could get it and saw it spike to 80% on the CPU (briefly).  Normally it is under a percent CPU for Chromium though.  This probably goes for any touchscreen running TouchUI though, but also means it would not be a good idea to play around with it while running a print (if that can be avoided).  I have a touchscreen on my Kossel printer and although it has had a number of problems, I don't recall any that happened while I was using the touchscreen, but I also did not do that often when the printer was running.
Picture
0 Comments

5" Tocuhscreen for OctoPi

11/25/2019

0 Comments

 
Picture
Picture
Picture
Octoprint has become integral to my workflow when printing things, and having an interface on the printer is helpful.  Adding a touchscreen to a Pi does have some design considerations however.  Many of the older resistive touchscreens would be attached by a ribbon cable or a "sandwich" board which requires the Pi to be in close proximity to the screen.  On my enclosure however I want the Pi to be in a separate control box so I needed to be able to extend the display.  Fortunately the Pi has an HDMI output and there are now touchscreens (resistive and capacitive) which use the HDMI and USB for the power and data.  I have not used these before and am hopeful there are no major drawbacks.  I settled on this one from Amazon:

"Elecrow 5 inch Capacitive Touch Screen 800x480 TFT LCD Display HDMI Interface Supports Raspberry Pi 4B 3B+ 3B 2B BB Black, Banana Pi Windows 10 8 7"
https://www.amazon.com/gp/product/B07FDYXPT7

There is also a very cool case for this screen by YWabiko on Thingiverse which I am remixing to work with my enclosure:
https://www.thingiverse.com/thing:3444546

My remix however will require some special low profile HDMI connectors (similar to the ones below):
https://www.amazon.com/gp/product/B078J16HP9/
or
https://www.amazon.com/gp/product/B078HBPGQP/

And I am also going to need to get some low profile MicroUSB connectors as well.  Once I get everything figured out and tested I will post it up on Thingiverse with a BOM.

I will also post some info on how to get the tocuhscreen working with OctoPi, in another post as well (assuming I can get it working :D).

Update - here is info on getting the touchscreen working with TouchUI and Octoprint.

0 Comments

Making (slow) progress on the CR10 Enclosure

11/3/2019

0 Comments

 
Printing a simple thing like a door for the enclosure has been a big project.  The parts below represent more than a week of printing time, and some had to be printed several times due to one problem or another.  One more to design and make, and then I need to build the back shell.
Picture
Picture
Below are some updated pics of the almost completed side door.  It works great so far.  I am waiting on some thinner weatherstripping to help seal it, since the stuff I was going to use is too thick.  I am now working on the front door and that is about half completed.

Update 11/25/2019: The front and side doors are completed and installed.  I used some thinner weatherstripping from Amazon which is working well (https://www.amazon.com/gp/product/B07VS2FPZZ/).  The doors do not seal air tight however due to some gaps, but overall I am happy with it.  I also noticed that the doors have a sag of a mm or two which I am going to work on when I get the back shell completed (the printer is pretty much running non-stop due to the large parts).  The doors themselves are quite strong so I suspect the sagging may be corrected by adjusting the hinges.  I have also adjusted the latch on the front door, so now I can close and latch it just by pushing on it.  I will post some more pics of the doors when I get done with the back shell - which is about 1/2 completed printing.  The back shell will have a 2 port AC/2 port USB power strip, a cable pass through, tool holder and a filtered air intake (or optional exhaust fan).  I plan to use the optional filtered exhaust fan, and will add a hose to direct the exhaust outside.
0 Comments
    Picture

    Stoopid Me

    Welcome to my Stoopid corner of teh Internet.  It's mostly gonna be 3D printing stuff, but I also post some recipes, projects, and the occasional rant here as well.  More Stoopid stuff is updated regularly.

    I recently joined the Amazon Associate program, so some of the links on this site are Amazon affiliate links. This means that, at zero cost to you, I will earn an affiliate commission if you click through the link and finalize a purchase.  This will help to support this site, and pay for more Stoopid Stuff.

    Archives

    March 2023
    February 2023
    January 2023
    November 2022
    October 2022
    September 2022
    August 2022
    July 2022
    April 2022
    February 2022
    January 2022
    December 2021
    November 2021
    October 2021
    September 2021
    August 2021
    July 2021
    June 2021
    May 2021
    April 2021
    March 2021
    February 2021
    January 2021
    December 2020
    November 2020
    October 2020
    September 2020
    August 2020
    July 2020
    June 2020
    May 2020
    April 2020
    March 2020
    February 2020
    January 2020
    December 2019
    November 2019
    October 2019
    September 2019
    August 2019
    July 2019
    June 2019
    May 2019
    April 2019
    March 2019
    February 2019
    January 2019
    December 2018
    November 2018
    October 2018
    September 2018
    August 2018
    July 2018
    June 2018
    May 2018
    April 2018
    March 2018
    February 2018
    November 2017
    September 2017
    August 2017
    June 2017
    December 2016
    October 2016
    September 2016
    July 2016
    March 2016
    February 2016
    September 2015
    August 2015
    June 2015
    May 2015
    April 2015
    March 2015
    February 2015
    January 2015
    December 2014
    November 2014
    October 2014
    September 2014
    July 2014
    June 2014
    May 2014
    April 2014
    March 2014
    February 2014
    November 2013
    August 2013
    July 2013
    June 2013
    May 2013
    April 2013
    March 2013
    January 2013
    December 2012
    November 2012
    October 2012
    September 2012
    August 2012

    Categories

    All

    RSS Feed

      Contact Form (Name is optional)

    Submit
Powered by Create your own unique website with customizable templates.