UPDATE 3-25-2021 - I just reviewed this setup again since I have not touched it for a long time and thought there should be some additional info regarding generally securing the router and checking that no ports were left open when done. I don't really like this setup, though it works, since it requires a lot of hoops to jump through and does not seem ideal. I have been using this without an issue, but I'd say use this at your own risk and check things out for yourself when done to make sure no ports were left open (unless you intended them to be). Scroll to the bottom to see the updated info.
UPDATE 6-21-2019 - I had a problem shortly after applying this config, where I could not log into the router after a power cycle, but seems it was just a transient problem. I swapped the AC1900 for a spare at the time, until I had to to look into it. I reverted back to the AC1900 today, with the VPN config described below, and all is well (without making any changes), so whatever the problem was, does not seem to have anything to do with the changes I made to the VPN stuff.
I recently found how to get a VPN client (using a VPN provider), and OpenVPN server running on an Asus 1900 (same as the AC-68U) running Merlin firmware.
Without making some changes to the config, the OpenVPN server will not be accessible by an OpenVPN client on a smartphone or other device when also running an VPN Client on the same router (Asus 1900 in this case). I got it working and here is how:
First I set up the VPN server using OpenVPN, and tested that it worked with an OpenVPN client on a phone. Then I turned the OpenVPN server off (on the router), saved and rebooted the router.
Next I set up a VPN client on the router, using a VPN provider, and tested that it worked. Verified that it was directing all traffic to the VPN by going to google and searching for "what is my IP" - it was the same IP as what the VPN client on the router said it would be (and not the IP from my ISP).
Next, with the VPN client running on the router, I enabled the OpenVPN server on the router which I previously set up and tested. With both the VPN client and OpenVPN server both running on the router, I confirmed it did not work when trying to connect from an OpenVPN client on a phone (making sure to have wi-fi off when testing since it will always fail if connecting from the LAN side of the router). This was not unexpected since the OpenVPN server on the router would be seeing the client (on the phone) traffic from the WAN port, but would be sending it back to the phone via the VPN Client through the VPN provider (so the source IP of the returned traffic from router -> phone would not match what was sent from phone-> router).
Anyway, trust a random person on teh Internets that it will not work, without some giggling of the config (and note, I am not an expert on this). After some poking around I found out how to do it using policy based routing (found in the VPN Client config of the router). Note that it was a bit buggy at first, and when I ran into weirdness, like having just the LAN block set to route to the VPN, but google still showing my ISP's IP when searching "what is my IP". I found that even though a working config was "saved", the router needed a kick in the pants to actually clear out the cruft and start working as configured (so keep that in mind if it looks right but ain't werk'n right).
To git it werk'n...
First, for reference, say the router uses 192.168.1.0/24 for the LAN, with the router being 192.168.1.1 and the rest of the devices on the LAN using 192.168.1.2 through 192.168.1.254. That is pretty typical for most home setups. When adding an OpenVPN server setup on the Asus (using Merlin Firmware), the VPN traffic will get a different block, and that defaults to 10.8.0.0/24 (or 10.8.0.1 through 10.8.0.254). This means that when I connect to the Asus router from an OpenVPN client on the phone, the phone is assigned an IP of say 10.8.0.3 by the Asus router.
Pardon my crudely blocked out configs, but those are unrealted to this anyway. The below pic is from the the VPN Client config and shows the VPN subnet:

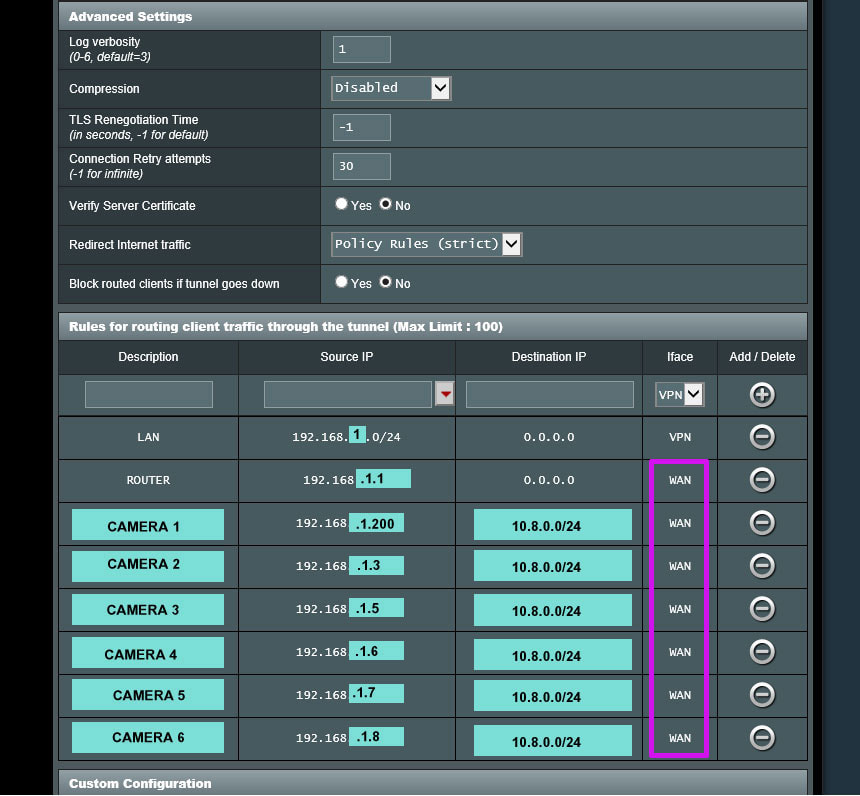
So I figured that for starters, for the OpenVPN server to work while the VPN client is connected to a VPN provider, I would need to send any traffic from the Asus router back to the OpenVPN client on the phone via the WAN port on the router, and not via the VPN provider. So I used the policy based routing configuration under the VPN CLIENT config on the router (note it is not called "policy based routing" but I will explain). To enable policy based routing, I set the following under the VPN Client config:
Redirect Internet Traffic > Policy Rules Strict
That will then allow editing of the "Rules for routing client traffic through the tunnel". In this section I did the following (see the pic below):
- Send all traffic from 192.168.1.0/24 (the LAN), to any destination (which is defined as "0.0.0.0" on the router's config), to the VPN provider.
- Send the traffic from the router itself (192.168.1.1 is the Router's LAN IP), going to any destination ("0.0.0.0"), to the WAN port. This is needed so the VPN client on the phone will make the connection to the router, and the router will send that traffic back to the phone via the WAN. So the OpenVPN client on the phone connects to the router on the WAN port, and the router responds to the OpenVPN client on the phone from the WAN port.
So that got me 50% the way there. I had the OpenVPN server running on the router, along with the router's VPN client connected to a VPN provider, the phone connected using an OpenVPN client (when not connected to Wi-Fi),. And I could see that the other LAN traffic was going to the VPN provider since when I went to another PC on the LAN and searched google for "what is my IP", it returned the VPN provider's IP and not the ISP assigned IP.
However the reason for using the OpenVPN server on the router in the first place is to access devices on the LAN remotely and securely, without opening ports on the router. In this case, the need was to access security cameras remotely.
With the current setup, although the OpenVPN client could connect to the router's OpenVPN server, the security cameras could not be accessed using the phone. So here is what fixed that - again in the VPN Client config's "Rules for routing client traffic through the tunnel":
3. Send the security camera traffic (which are in the 192.168.1.x range since they are on the LAN), to any destination which is in the IP block used by the OpenVPN server ("10.8.0.0/24"), via the WAN port (not the VPN).
Once I added all the cameras to the "Rules for routing client traffic through the tunnel" as seen in the pic below, I was able to both connect the phone's OpenVPN client, and then connect to the cameras remotely though the VPN (using their 192.168.1.x addresses on the phone). Note that it was OK to have a rule directing all traffic on 192.168.1.0/24 (which is any IP's on the LAN) to the VPN provider, and then having another rule for a single IP, say 192.168.1.200 going to the WAN instead. It just means that 192.168.1.1 through 192.168.1.199, and 192.168.1.201 through 192.168.1.254 will go to the VPN and 192.168.1.200 will go to the WAN (as an example).
Note, these are just the configs that got it working, and there may be a better way. Also the other rules not related to this, such as "Block routed clients if tunnel goes down" need to be determined based on how the VPN is being used and have nothing to do with getting the other stuff working.
I still need to figure out how to best keep outlook mail from having a fit when it sees a client connecting from a VPN provider's IP space. Ideally, SMTP/POP/IMAP could be shunted to the WAN, but there is no easy way to do that currently from the Merlin GUI (that I know of). Getting into the weeds of maintaining it using scripts may be the only way.
In the mean time I kludged together some more "policy routes" to send any LAN traffic that should go to gmail or live.com email servers, to the WAN. To determine the servers IP's, I looked at the email configs and then use the "nslookup" tool which can be run from a command line in windows. I then used these IP's and set up policy routes similar to the above, like this:
Source IP (192.168.1.0/24) -- Destination IP ("email server IP") --- Iface (WAN)
I have more than a dozen of these entries now between live.com and gmail email servers, but it seems to be working (no longer seeing that M$FT is locking the email accounts out when the VPN Client is enabled. There is a list of Gmail netblocks here, but likely not all of them will be used (but if there are problems I would probably just add them all until it could be figured out). I also set up a few other devices to use the WAN exclusively (so they will never use the VPN).
There is a workaround for setting policy routes for every damn provider that blocks VPN's however - and that is dedicated (residential) IP VPN's which cost a bit more but can bypass some of this stupidity.
Update 5-15-2020 Also one more update for running the VPN server on the router. The router can generate a client configuration, but I had some problems with the autogenerated one which did not include the client key. It has been a while since I did this, but I recall that I had to generate the CA, client and server keys and certs, as well as the DF parameters and then I set those on the router (server) and also edited the client.ovpn file manually to get it working. A similar process is described here and here.
There is another less secure way to get the VPN working detailed here, which basically negates the need for a client cert and only uses a user/pass for authentication (by setting Username / Password Auth. Only" = yes in advance settings, and then regenerating the VPN client config from the router). At that point the generated file will only have the "<ca>" section and will not have any client cert or keys present (. I did not try that but I read that it works, but is less secure so I would not do it).
Finally, here are some things I did to better secure my router (this is just what I did and again do your own research since there may be better ways to secure the router based on your config):
Under Administration > System:
Pic below shows some of these configs:
I still need to figure out how to best keep outlook mail from having a fit when it sees a client connecting from a VPN provider's IP space. Ideally, SMTP/POP/IMAP could be shunted to the WAN, but there is no easy way to do that currently from the Merlin GUI (that I know of). Getting into the weeds of maintaining it using scripts may be the only way.
In the mean time I kludged together some more "policy routes" to send any LAN traffic that should go to gmail or live.com email servers, to the WAN. To determine the servers IP's, I looked at the email configs and then use the "nslookup" tool which can be run from a command line in windows. I then used these IP's and set up policy routes similar to the above, like this:
Source IP (192.168.1.0/24) -- Destination IP ("email server IP") --- Iface (WAN)
I have more than a dozen of these entries now between live.com and gmail email servers, but it seems to be working (no longer seeing that M$FT is locking the email accounts out when the VPN Client is enabled. There is a list of Gmail netblocks here, but likely not all of them will be used (but if there are problems I would probably just add them all until it could be figured out). I also set up a few other devices to use the WAN exclusively (so they will never use the VPN).
There is a workaround for setting policy routes for every damn provider that blocks VPN's however - and that is dedicated (residential) IP VPN's which cost a bit more but can bypass some of this stupidity.
Update 5-15-2020 Also one more update for running the VPN server on the router. The router can generate a client configuration, but I had some problems with the autogenerated one which did not include the client key. It has been a while since I did this, but I recall that I had to generate the CA, client and server keys and certs, as well as the DF parameters and then I set those on the router (server) and also edited the client.ovpn file manually to get it working. A similar process is described here and here.
There is another less secure way to get the VPN working detailed here, which basically negates the need for a client cert and only uses a user/pass for authentication (by setting Username / Password Auth. Only" = yes in advance settings, and then regenerating the VPN client config from the router). At that point the generated file will only have the "<ca>" section and will not have any client cert or keys present (. I did not try that but I read that it works, but is less secure so I would not do it).
Finally, here are some things I did to better secure my router (this is just what I did and again do your own research since there may be better ways to secure the router based on your config):
Under Administration > System:
- Set a strong password and changed the username
- Service> Enable SSH (no)
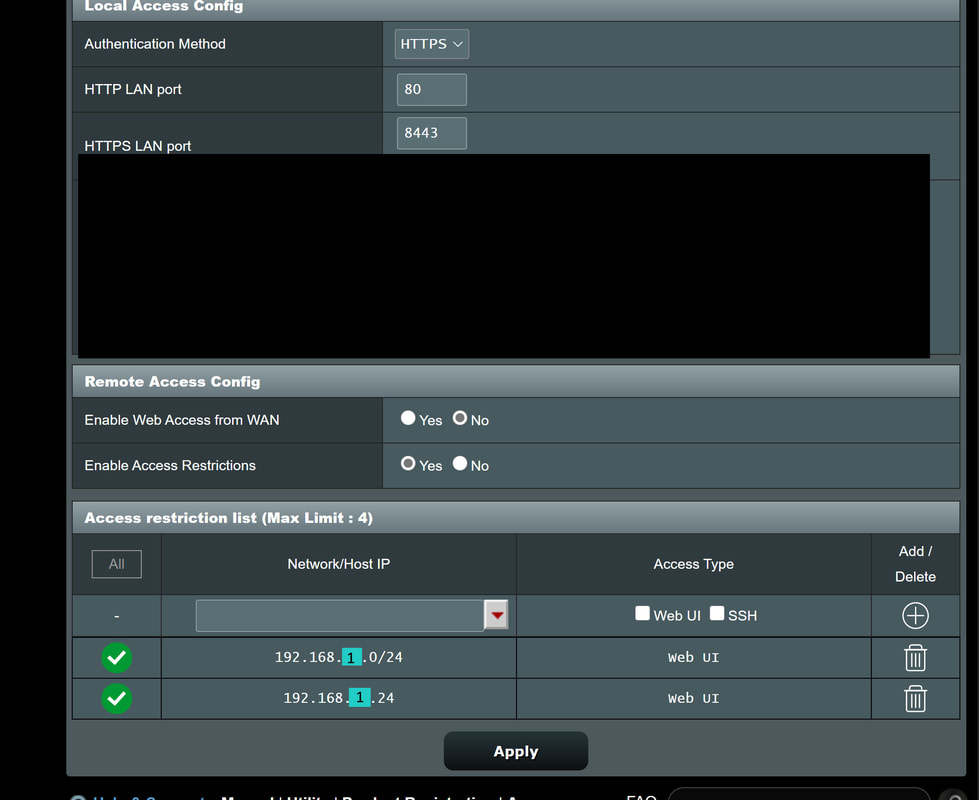
- Local Access Config > Authentication Method > HTTPS
- Remote Access Config > Enable Web Access from WAN (No) << this is important
- Remote Access Config > Enable Access Restrictions > (Yes)
Pic below shows some of these configs:
Once everything was working OK, I ran an online port scan against my actual (ISP provided) IP. This will tell if there are any exposed ports on the router. There may be some ports which were intentionally exposed (which should be obvious since they would have needed to been set up in the config), though generally it is a bad thing to have ports open. Running an online port scan against a VPN provider's address may not tell much since they will be allowing various ports most likely, but the actual IP from the ISP should not have open ports unless intended. I just googled "online port scanner" to find some, and used one with a list of common ports that it checks, and I also had to check some others. If using a port scanner while connected to the VPN service provider however, the IP it will automatically choose to scan will be the one assigned by the VPN provider, so I had to change the IP to the router's IP for the scan (which is found in the main page of the Asus, under "Network Map"> Internet Status).
I also back up my config once it works the way I want it to. That can be done from Administration > Restore/Save/Upload Setting and then choose "Save Setting". The file will then download so I can have it on hand just in case there is a problem later and I need to reload the config.
I'm sure there is more that can be done to secure the router, but that's all I can think of right now. If you have any other ideas or suggestions, or see something I screwed up on, please leave a comment. I am also looking for a better (simpler) solution to this, since it seems like a lot of hoops to jump through, and will update here if I find something better.


 RSS Feed
