My Stoopid Stuff
  • Home
  • Projects
  • Blog
  • Lec'tronics
  • Links
  • CNC
  • Quick Recipes
  • 3D Printer Tips
  • Voron 2.4

Bambu Parts Case

9/21/2023

2 Comments

 
Updating this post at the top (on 11/12/2023), since this model is finally posted.  If you just want to go download it, the models can be found at the links below:
​
https://makerworld.com/en/models/62636​
https://www.printables.com/model/626897-bambu-labs-x1c-spare-parts-case-box-for-stuff


There is also a build guide here.
Picture

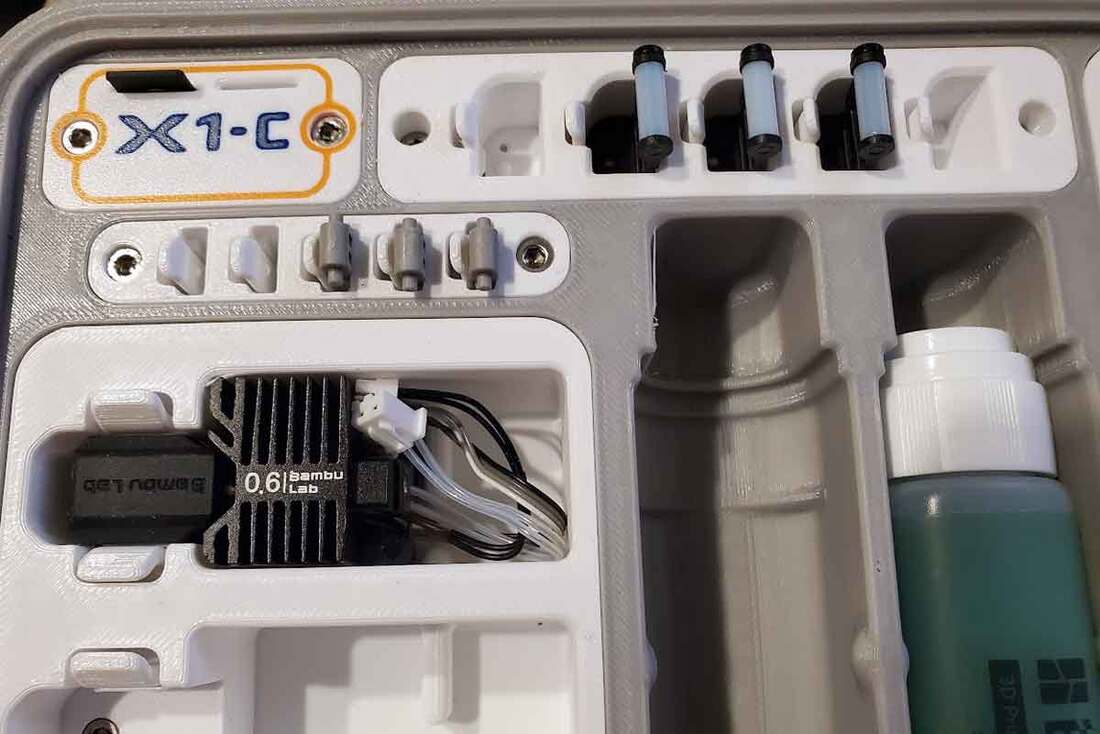
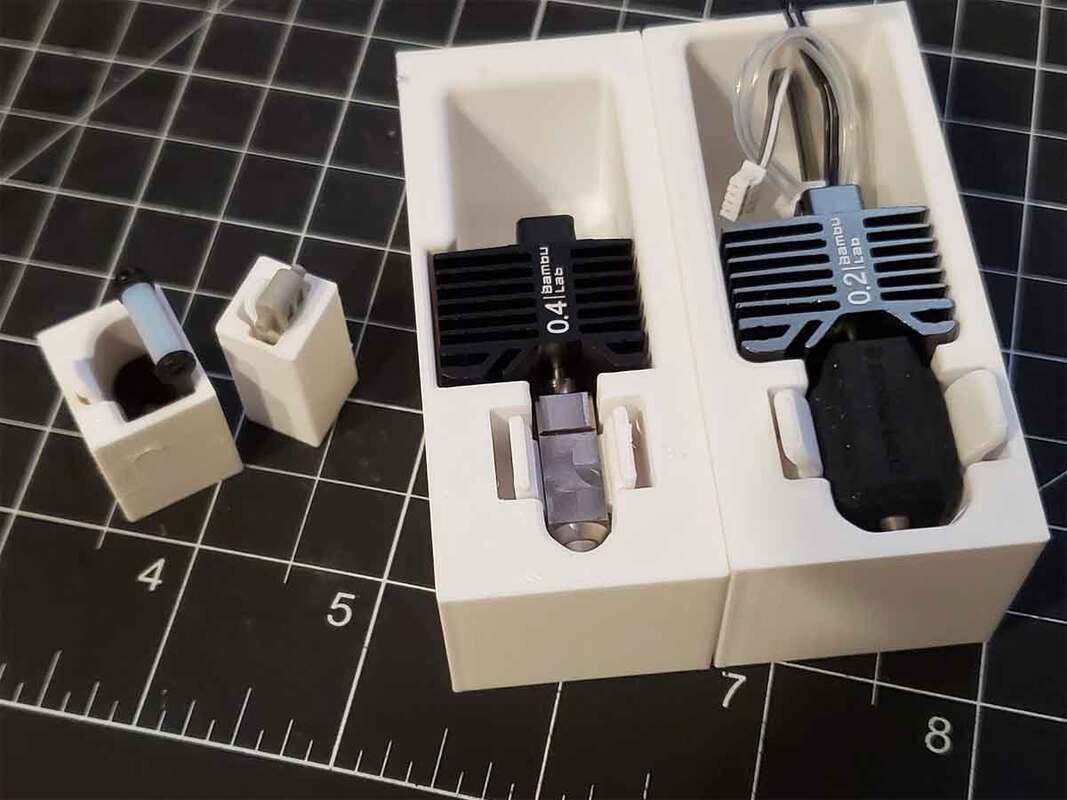
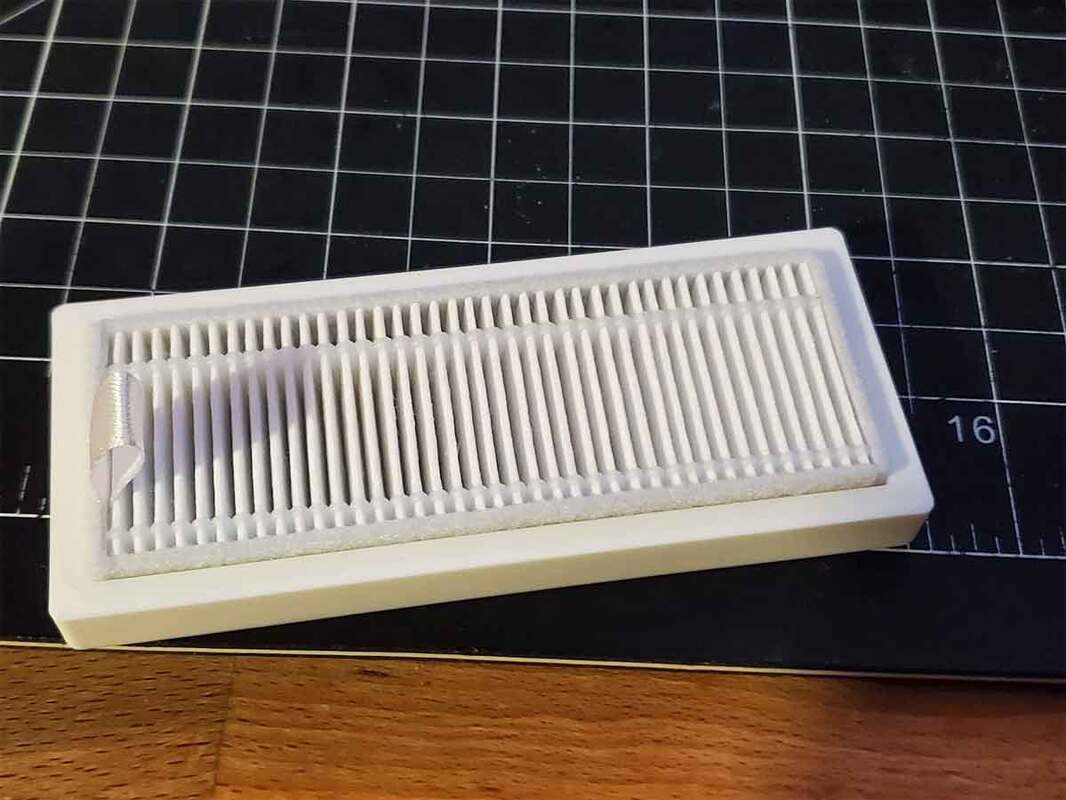
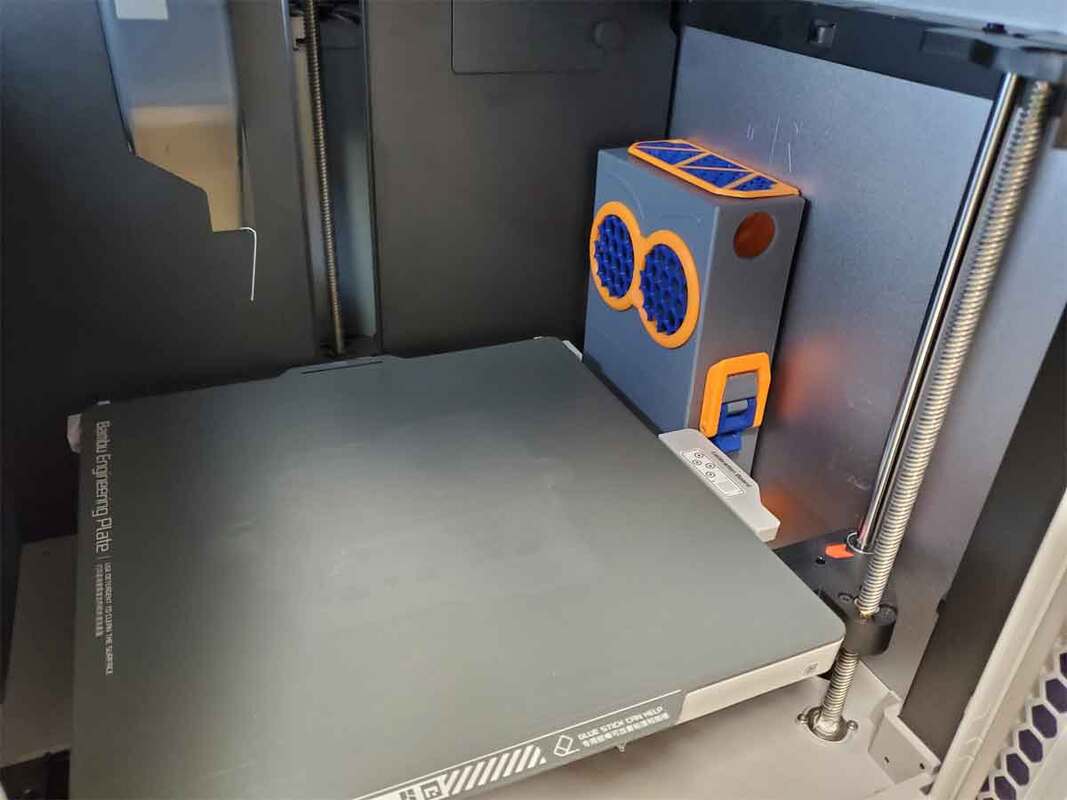
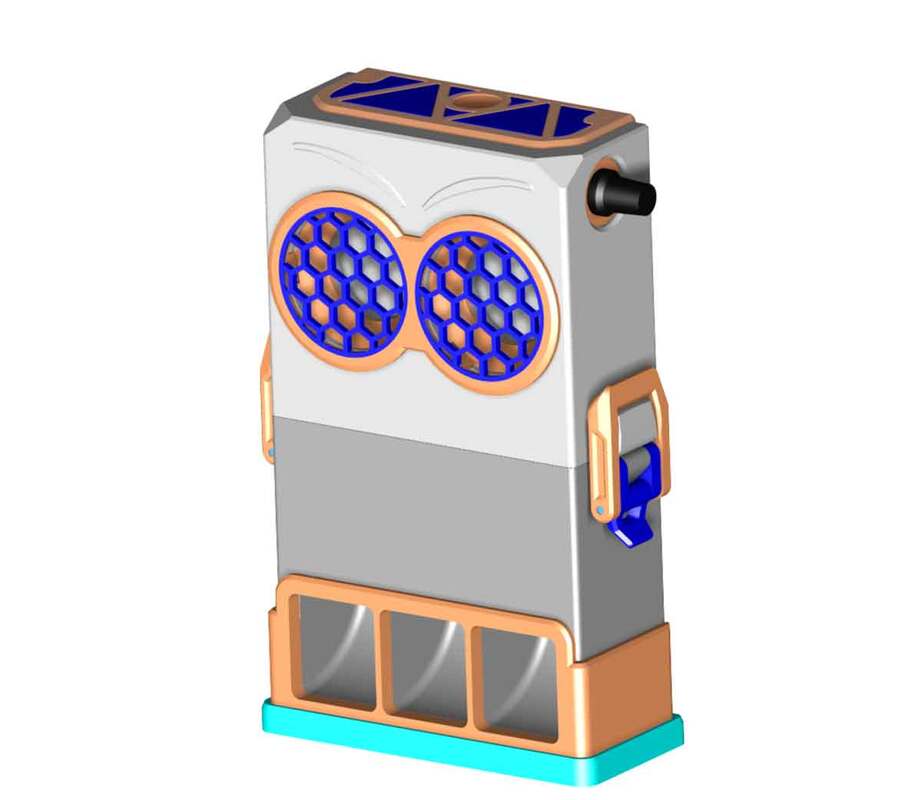
After making the draw latches for the recirculating filter design, I thought that it would be cool to use them for a case.  And when I saw the awesome Bambu printer accessory cases from Jorge_Rui and Mr. Sullivan on Printables, the idea clicked to try a remix of one of those designs, with the case.  I'm going to use the design from Mr. Sullivan since it has some improvements which hold the parts in place, is a bit more space efficient, and the STEP files were helpfully provided (which makes remixing much easier).  I ran some test prints to check the fit of the Bambu spare parts with the design from Mr. Sullivan, and the hot ends fit very well, as do the microSD cards.  I did not test the cutters though I plan to later.  I may modify the nozzle wiper holders a bit to narrow them, and I'm considering how to lay everything out.  I have however tested the key parts of the case including the hinges and they function well.

There is also a Gridfinity version of the case in the works, which will hold 15 units (9 Gridfinity "units" high or 9x7mm).

Both the cases will be completed after the filter design is posted, since the cases will take some time to print and test.  But at least I don't need to wait on parts from China to get them done.
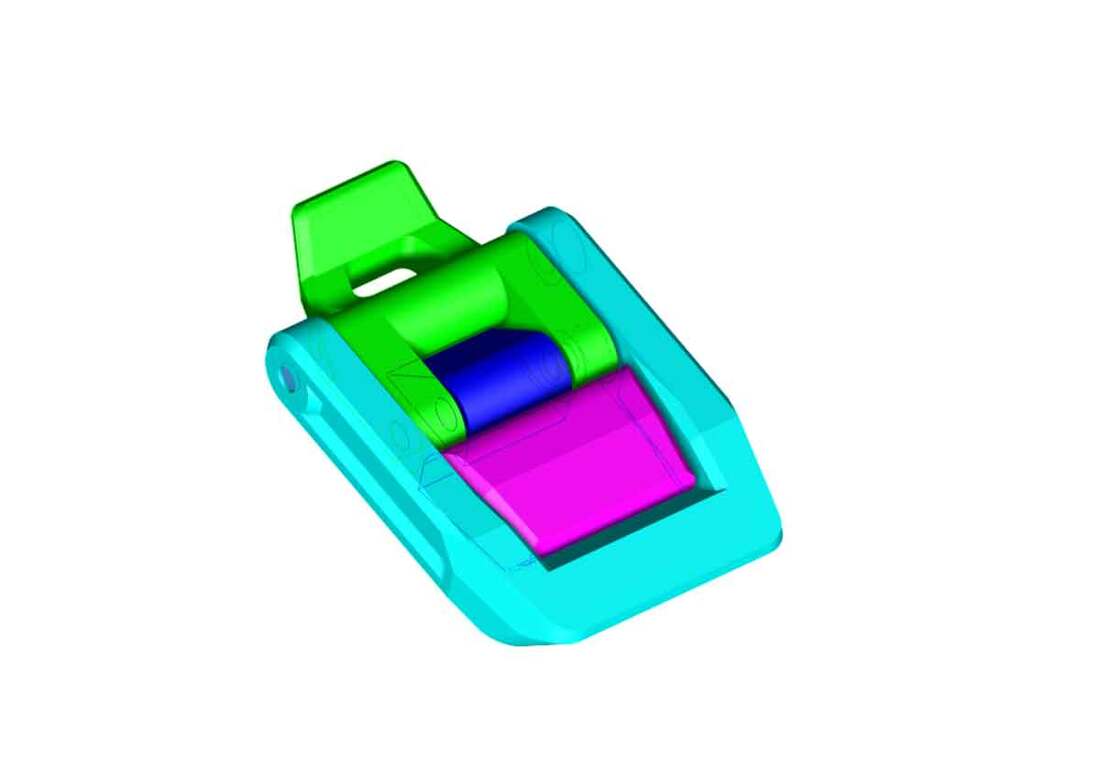
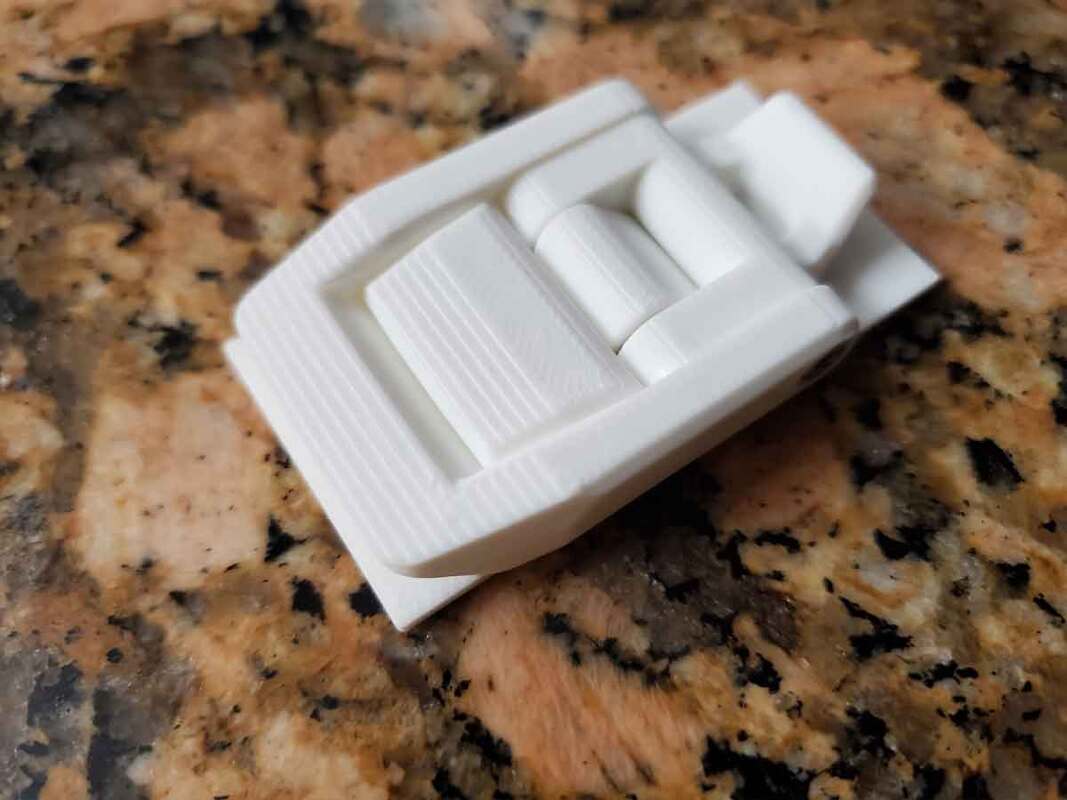
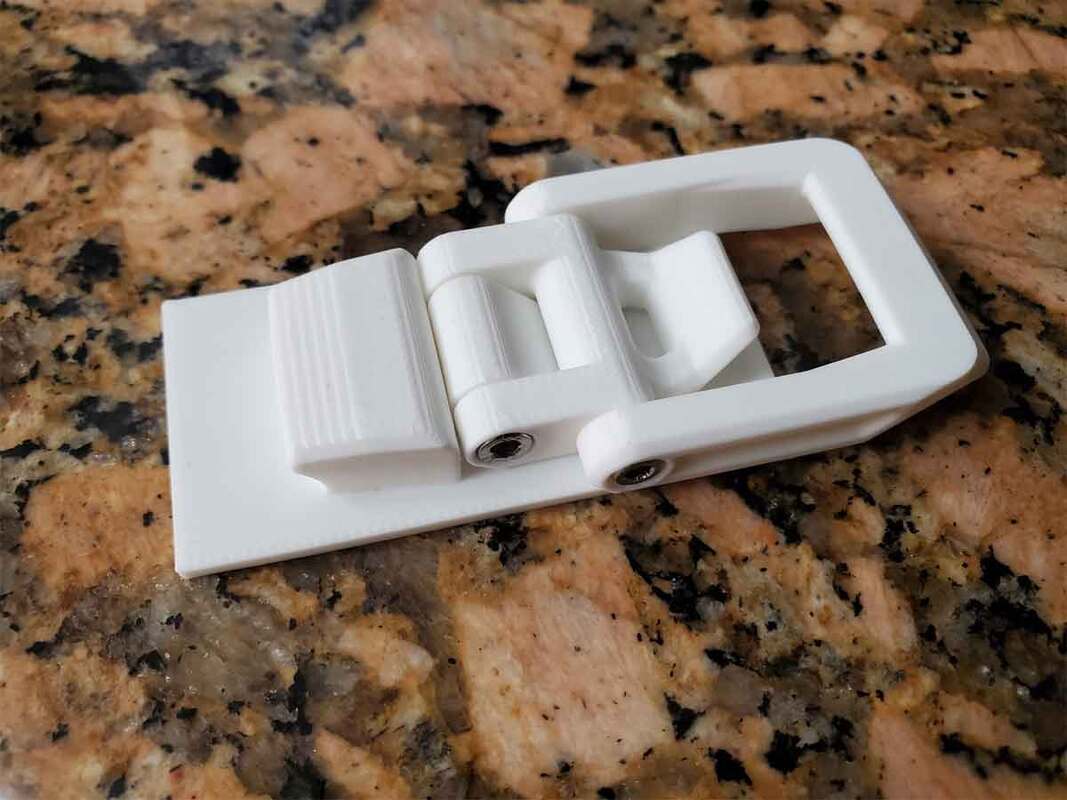
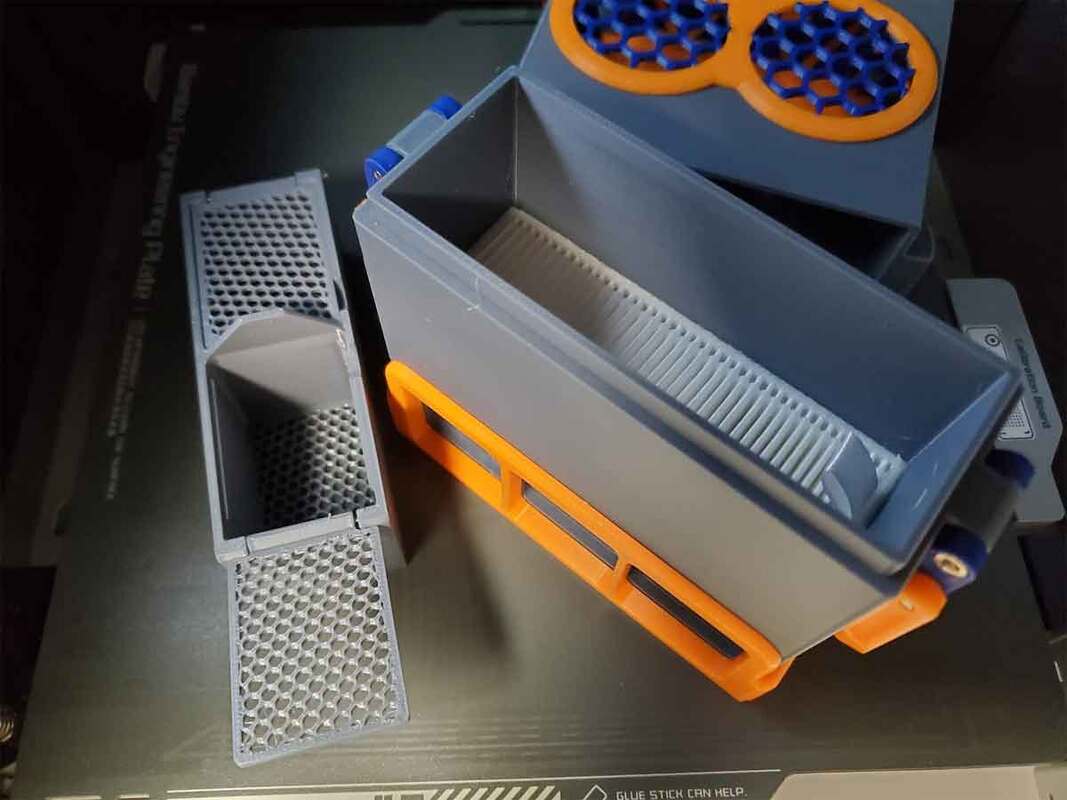
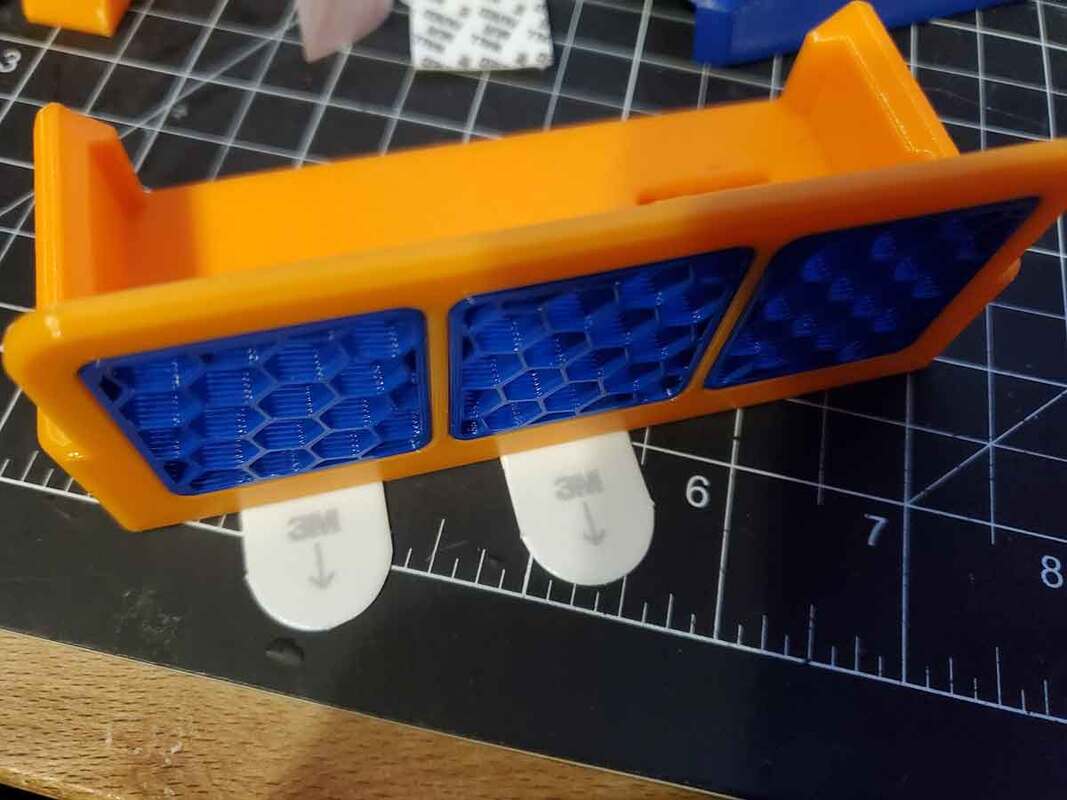
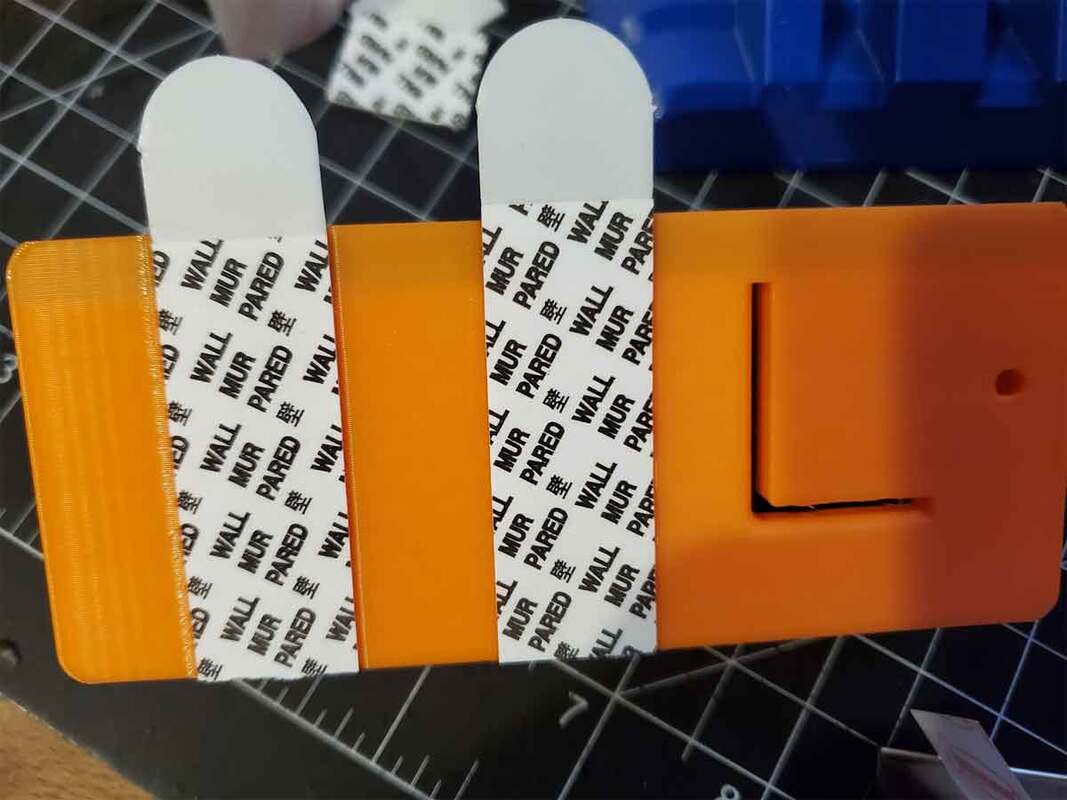
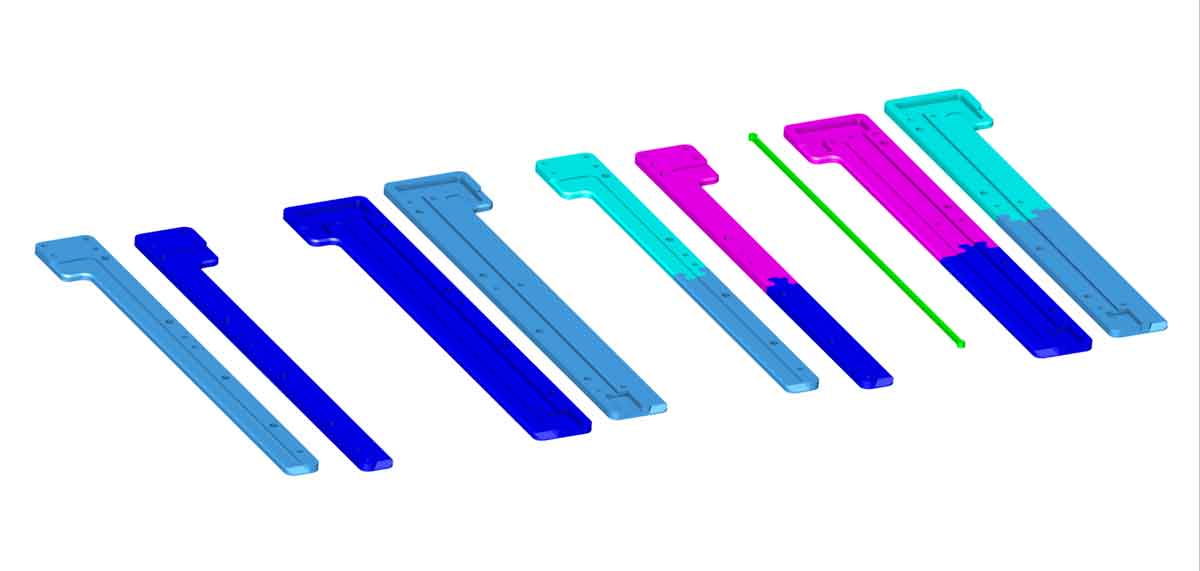
Update 9/29/2023: I've been working on and off to optimize the design for the various holders for the parts, using the designs from Mr. Sullivan on Printables, as a base to build from.  I slightly modified his design for the hotend holders with longer tabs, and some larger pockets to help remove the hot ends.  It was pretty simple as the original designs fit the hot ends perfectly.  For the wiper and cutter holders, I wanted to have a way to hold them in positively, so I designed holders for those parts from scratch.  To do that, I had to model the wiper, but since the cutter is such a simple design it did not require modeling.  What I ended up with were designs that hold the parts securely, but will release the parts with a push of a lever.  The levers seem robust enough.  But it's gotta be a balance between strength and usability, so there is always the possibility they could break in time.  To hopefully mitigate that problem, the various holders will be modular, and install in the case using M3x20mm screws.  That way, should any one tab break, only the holder (actually the group of holders) will need to be replaced, and not the entire case lid or base. 

I spent way too long with these simple designs, and probably printed a dozen iterations of the wiper and cutter holder prototypes, before I had a design that I could be happy with.  Now I just need to integrate them into the case design, and print those parts to test.
Picture
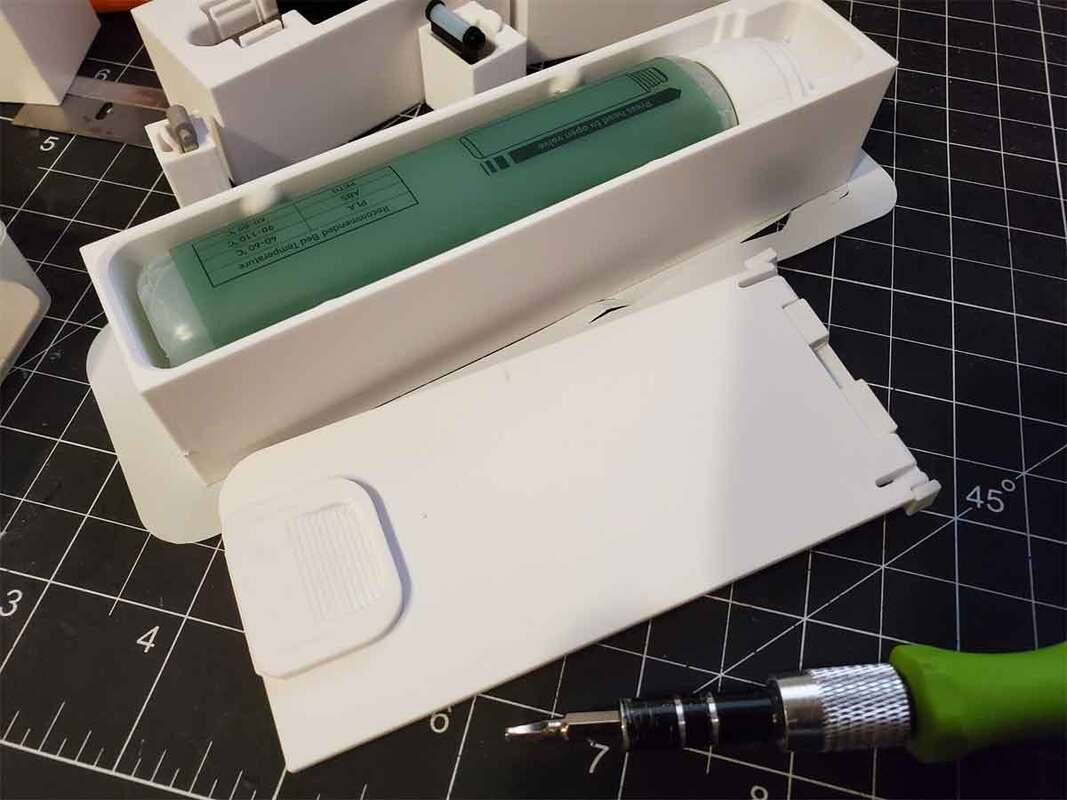
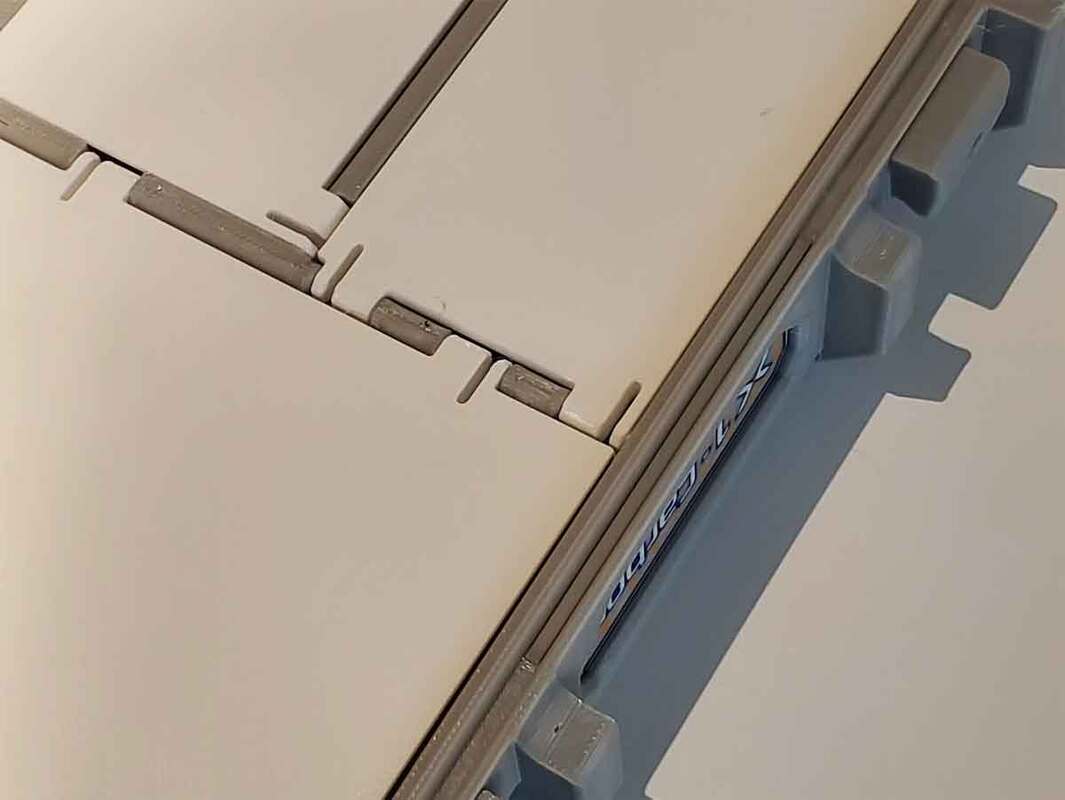
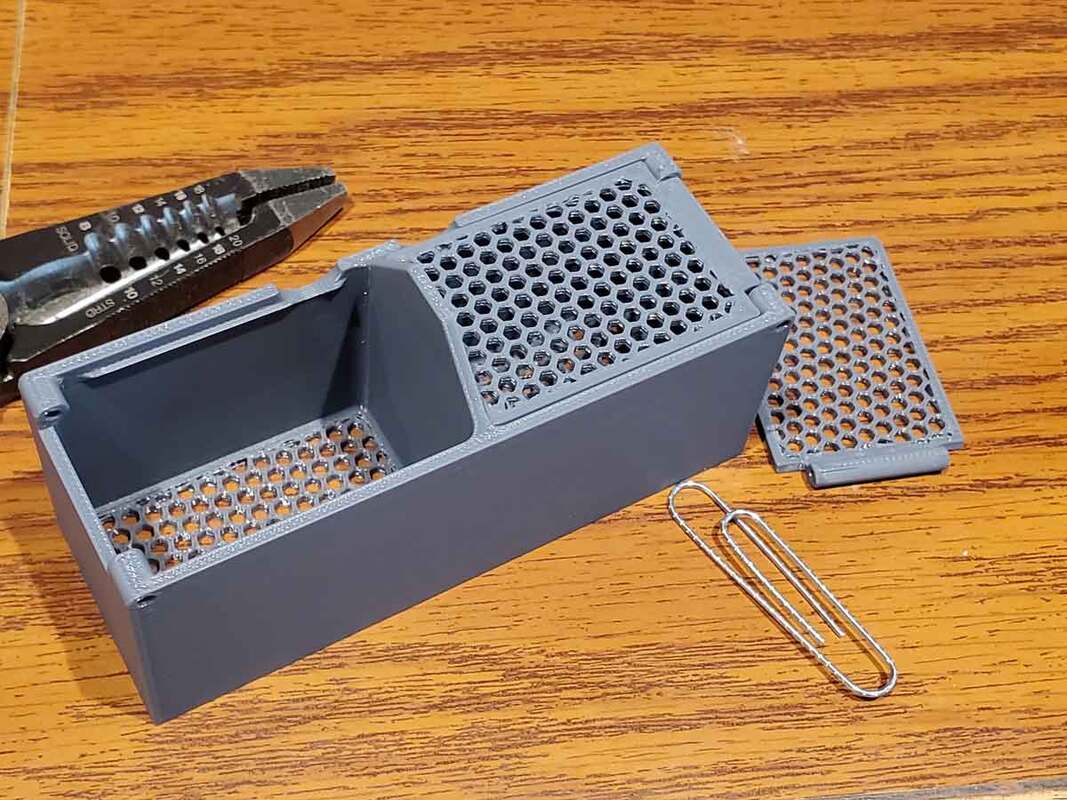
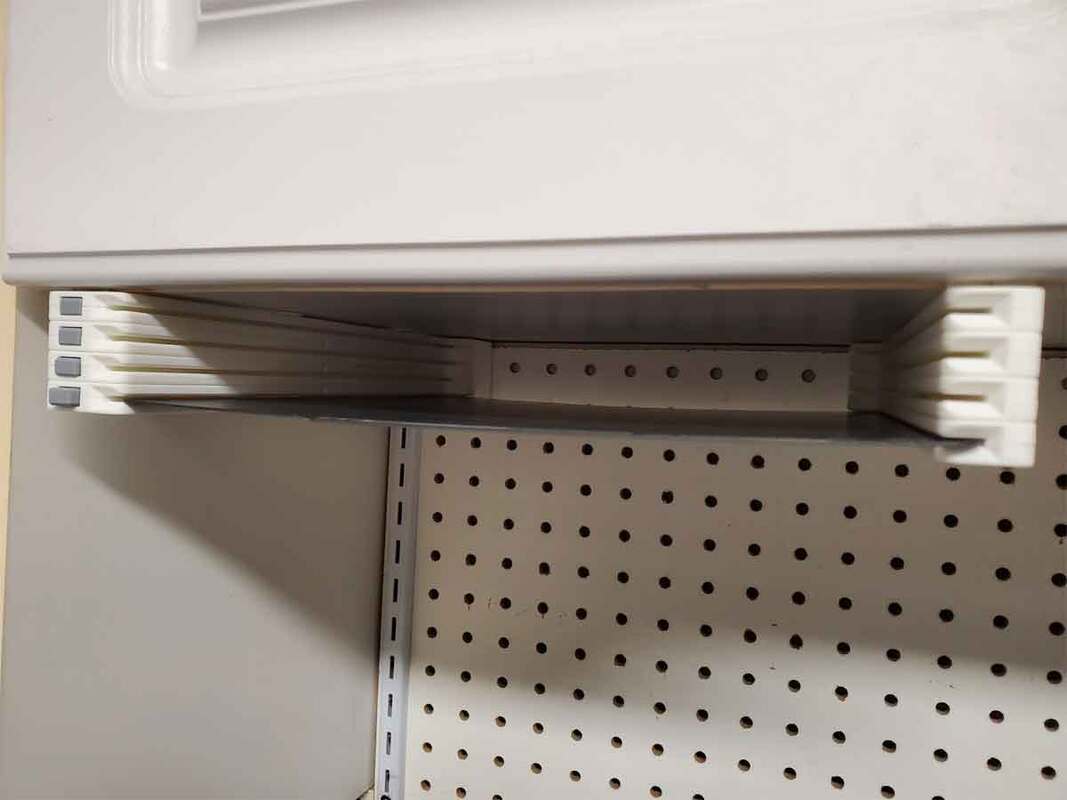
Update 9/30/2023: I forgot to model a holder for the liquid glue (sorry no glue stick holder). Now all the holders for the case are completed, and I'm just finalizing the design for the doors.  I wanted to have some sort of latching mechanism, and in the past I have used pen springs, which are ideal.  However many folks don't have those laying around, so I modeled some printed springs, but I'm trying to tune the spring force so the latches will be easy to open, but pop closed.  The latches have been tested, and seem to work well enough.

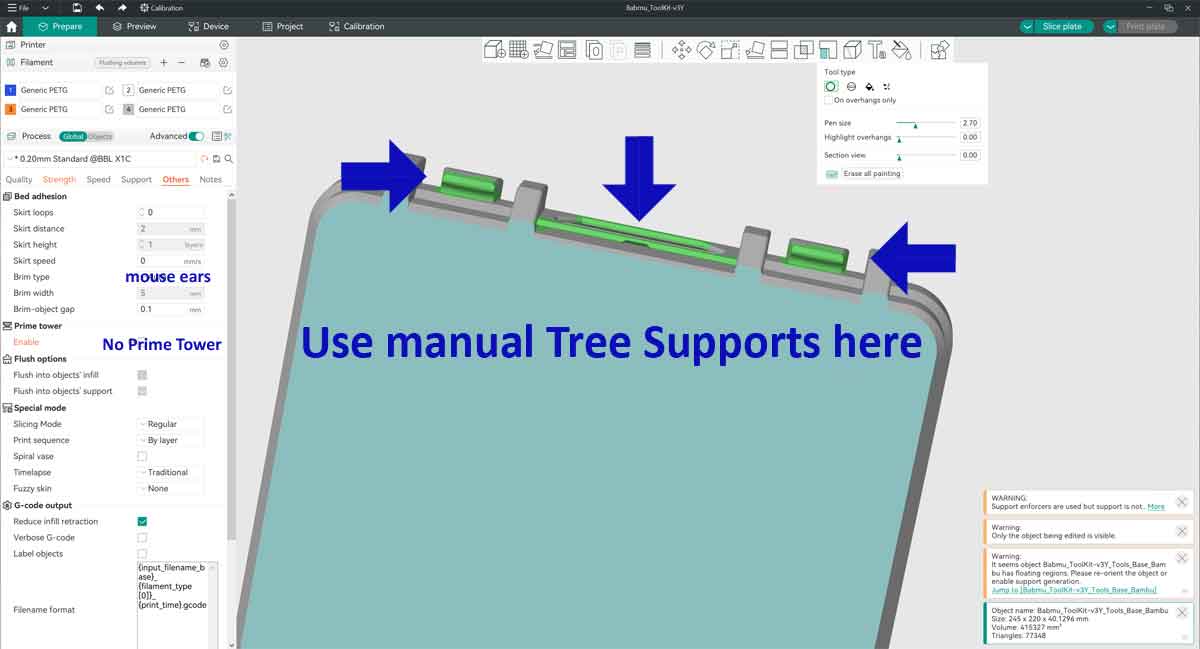
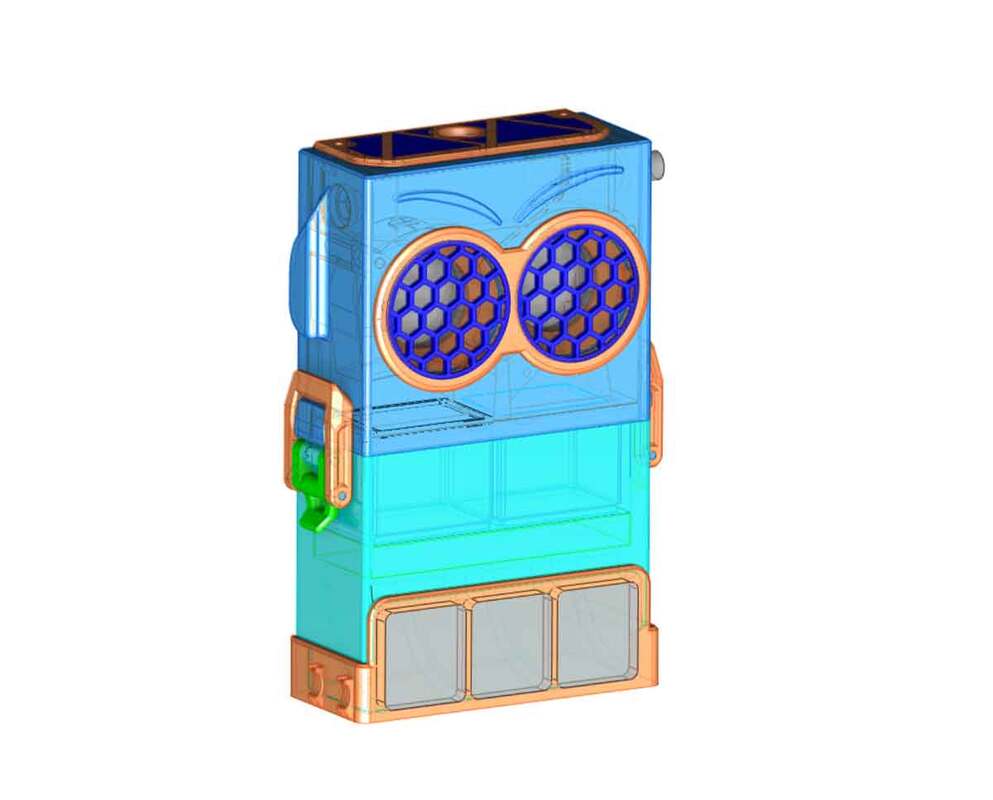
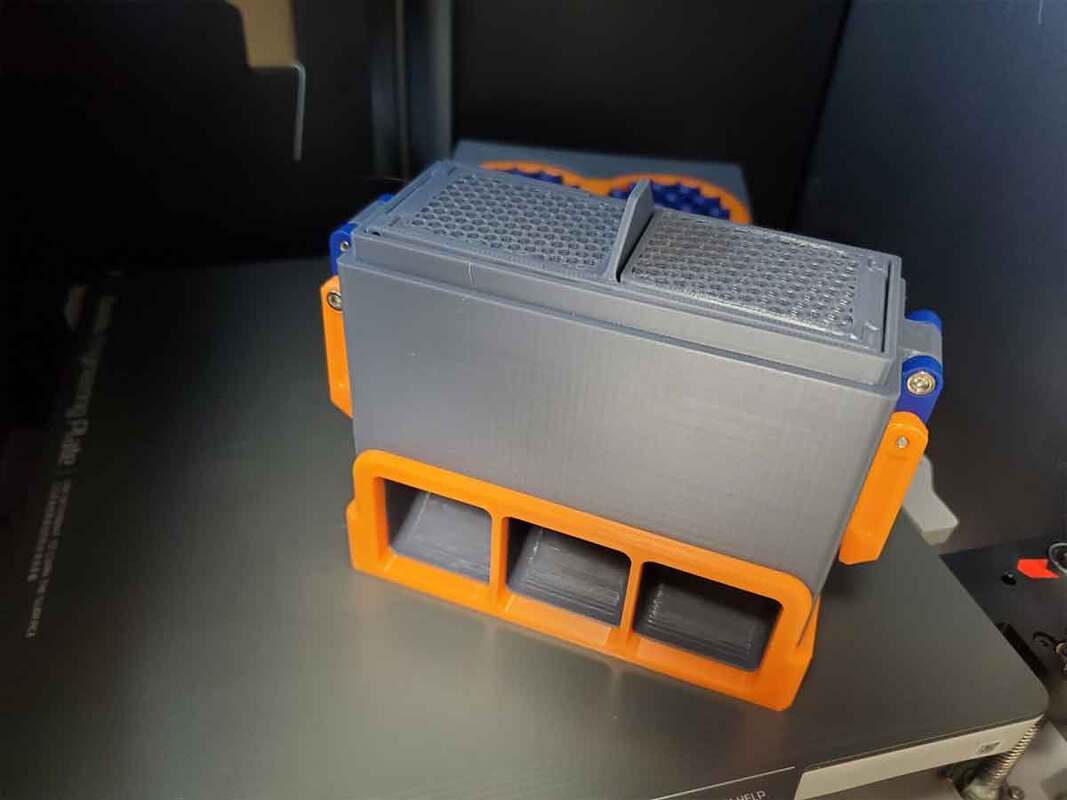
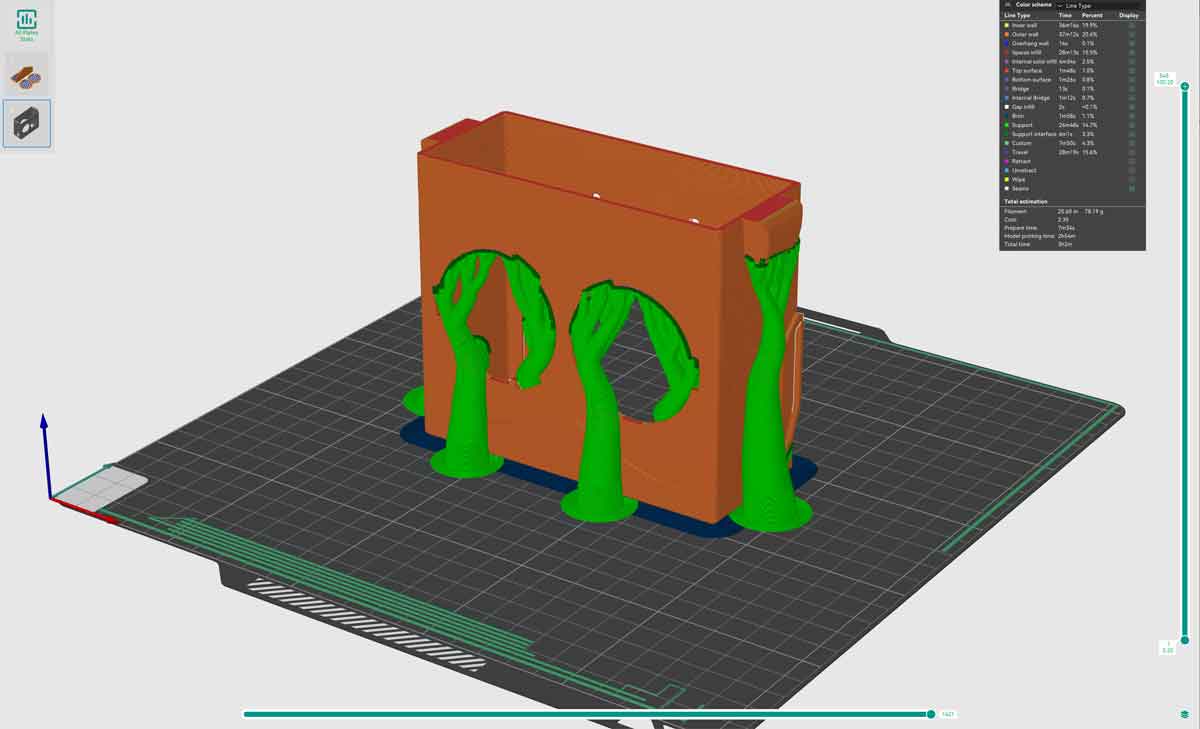
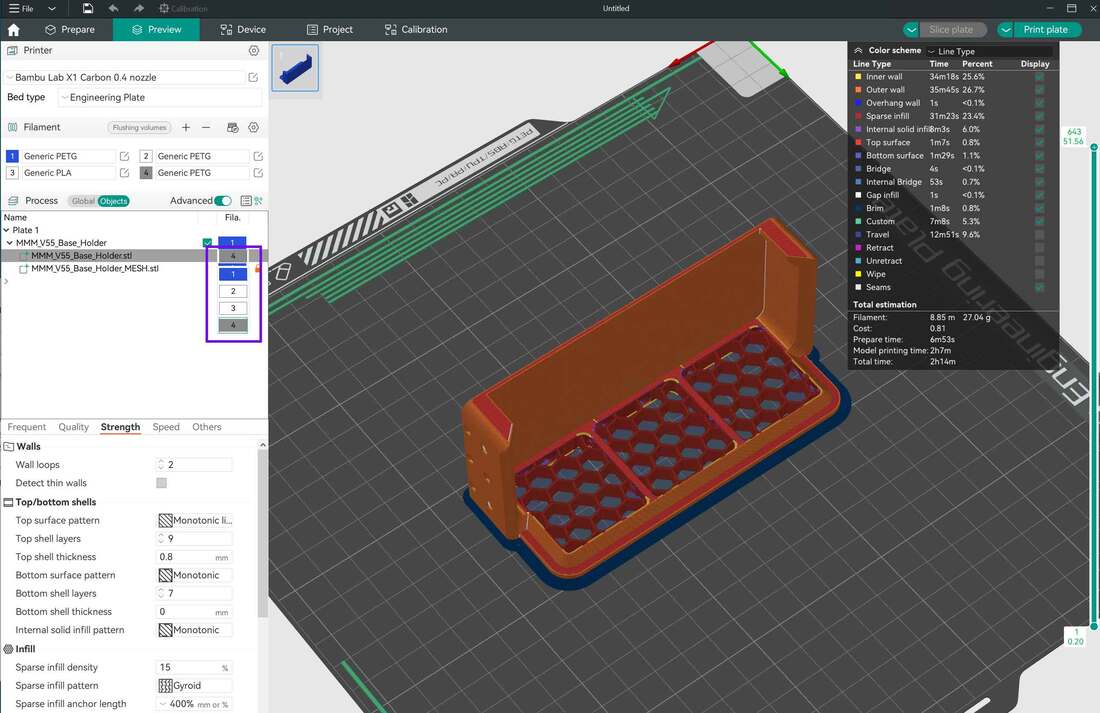
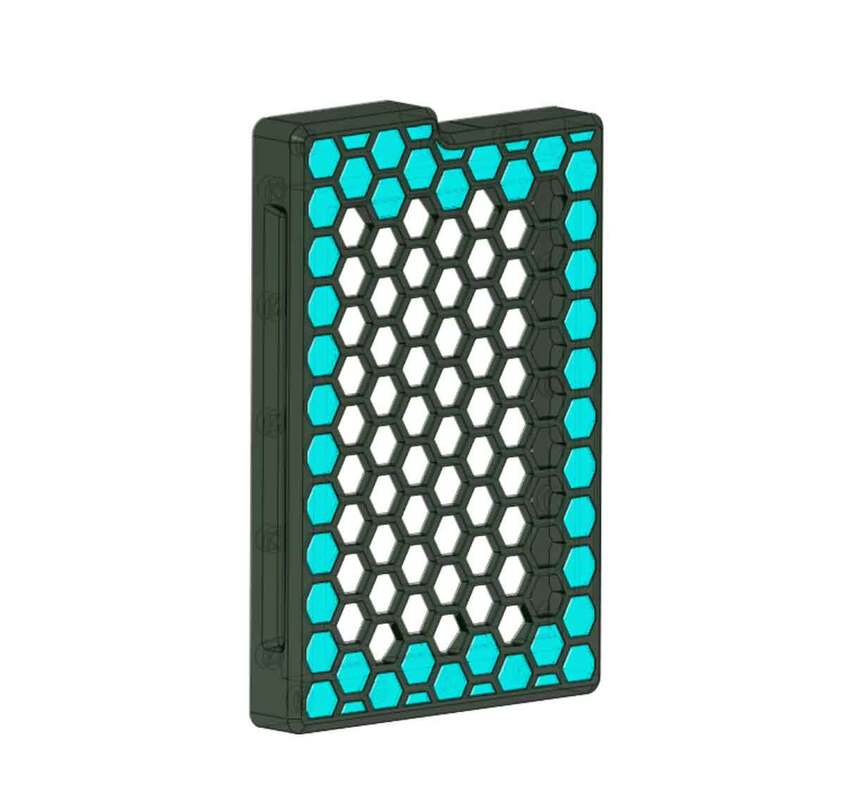
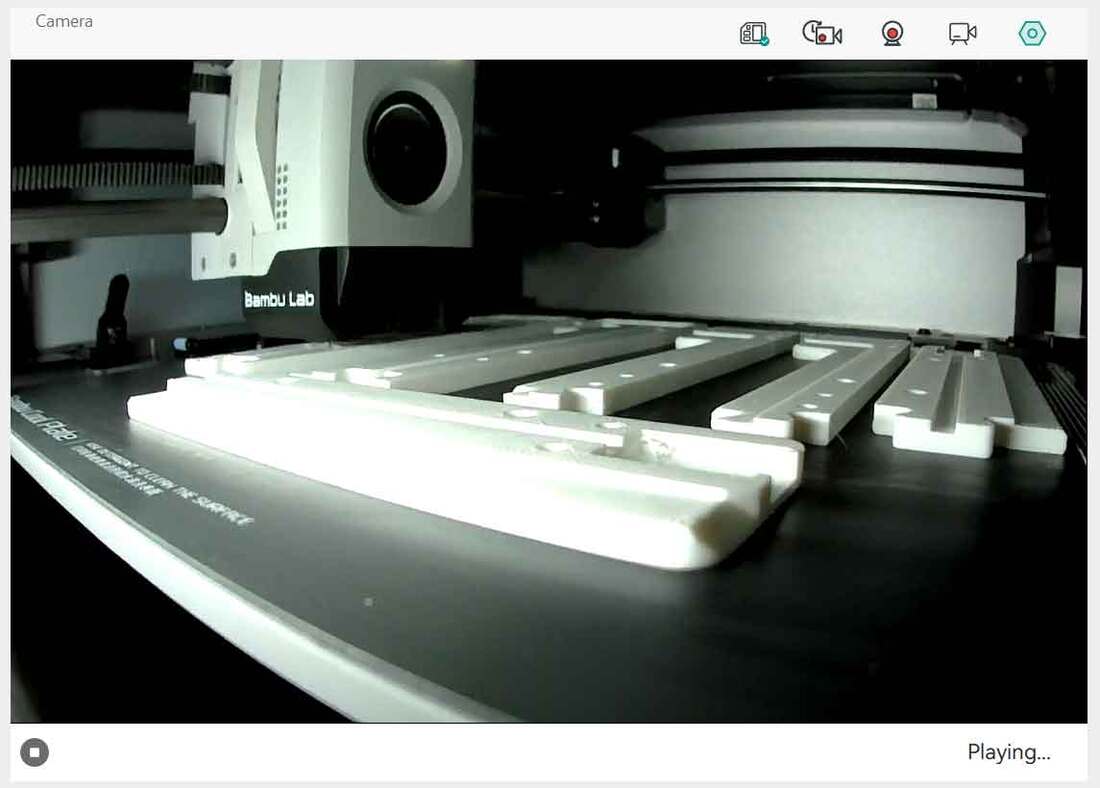
I'm currently running the top of the toolbox first (the part which will have the logo and compartments).  I had to print the top using no prime tower, mouse ears only and manual supports along the front where there are some unsupported overhangs,  Ideally the model would have no supports.  However due to the way the draw latches work, some supports are required.  There are also some supports in the area of the case label frame, which I think are unavoidable.  I expect that I can print this in 5 almost full plates and 2 multicolor plates (split the multicolor prints to minimize the waste).  
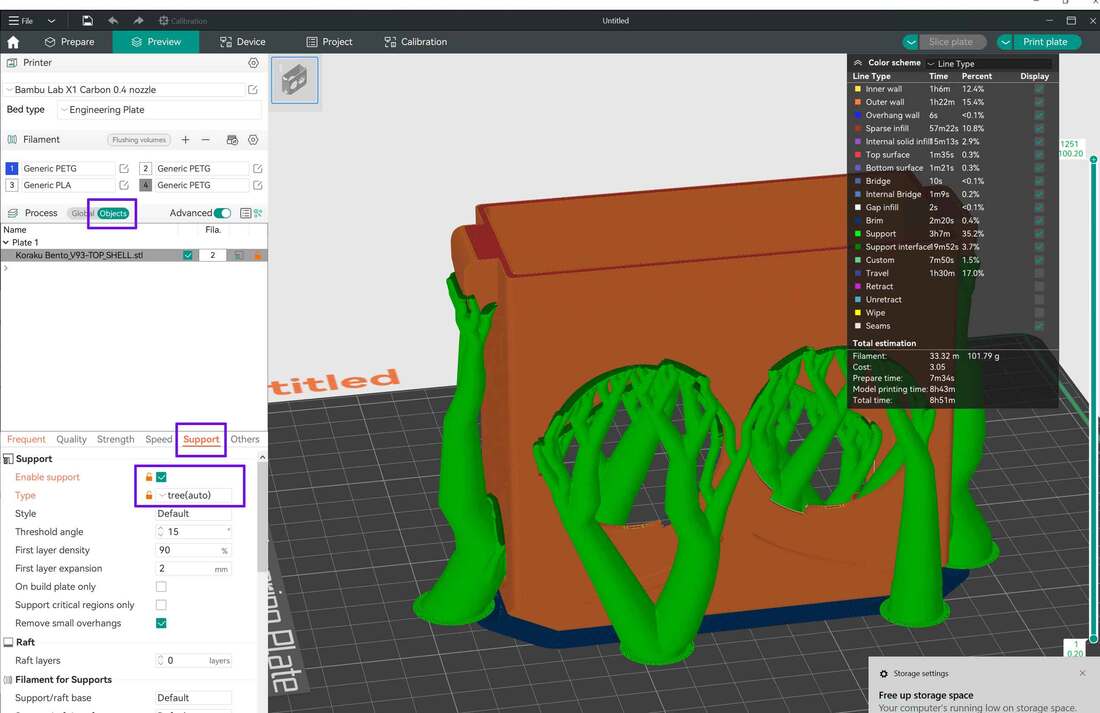
Update 10/4/2023: It often happens that I will print a design which I "think" is done, only to find out that I missed adding a hole somewhere, or a dimension was slightly off.  It's always the last 10% of a design which can take the longest to get done, but I think this one is there now.  There is still a requirement to use supports on one part, but that's part of the territory with 3D printing I guess. 

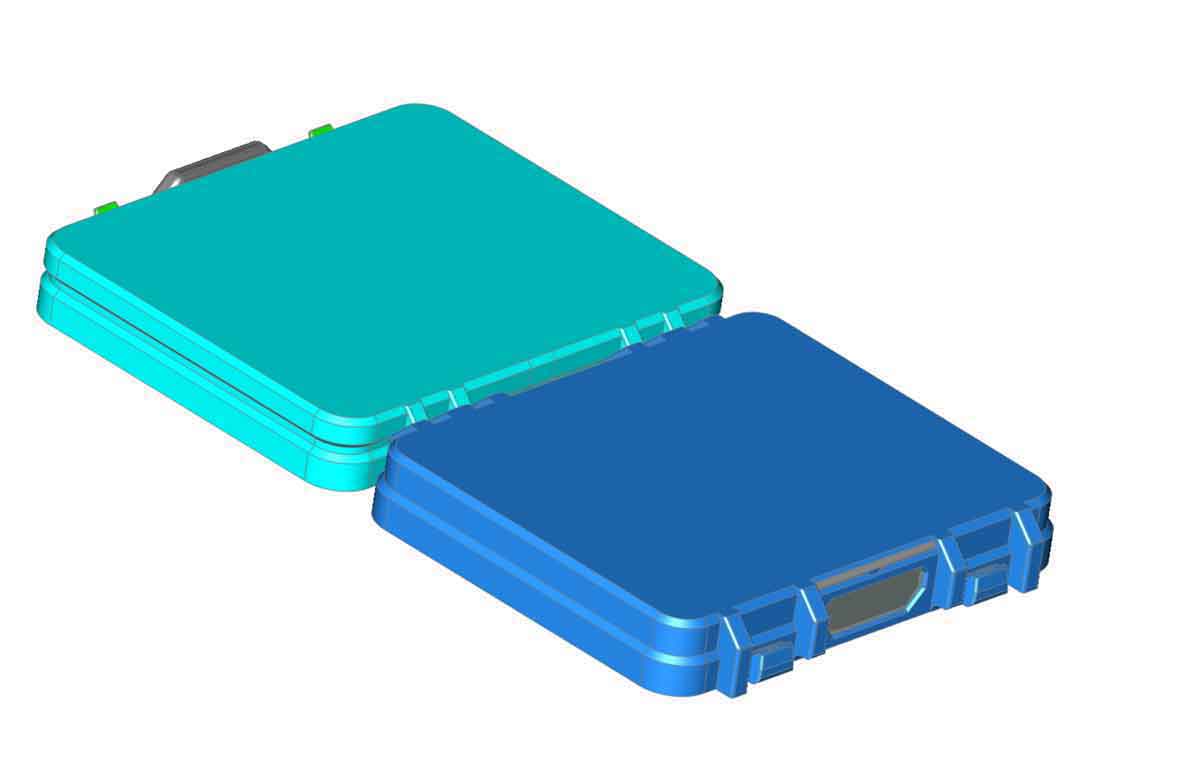
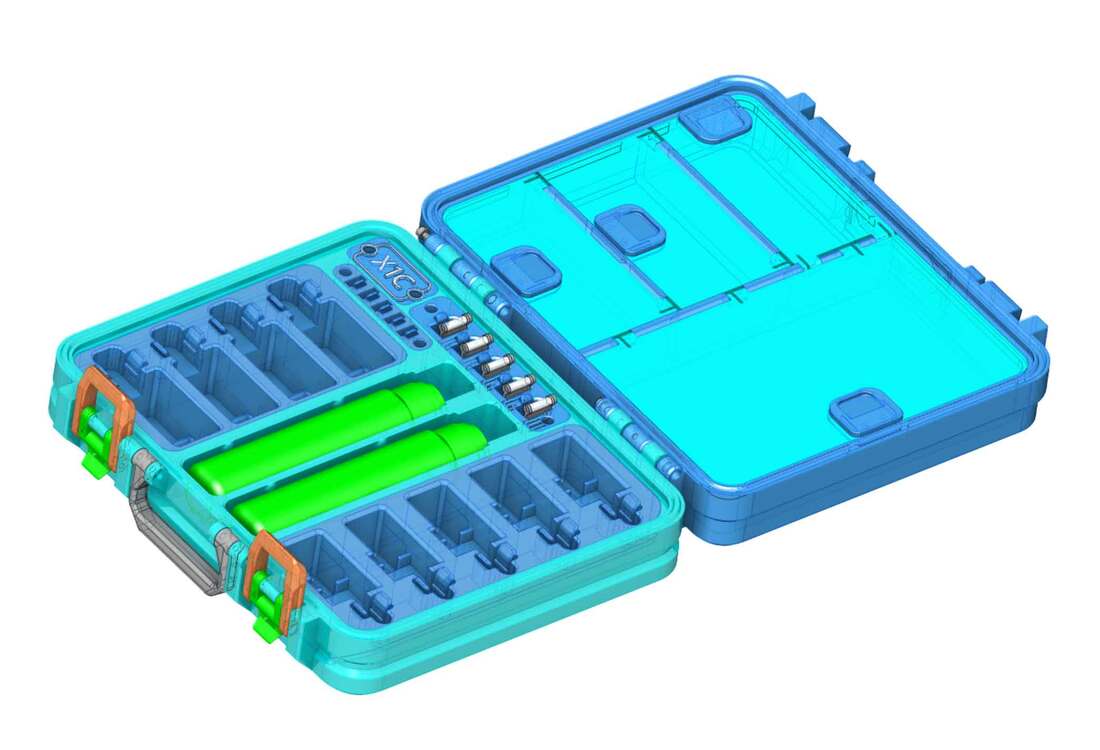
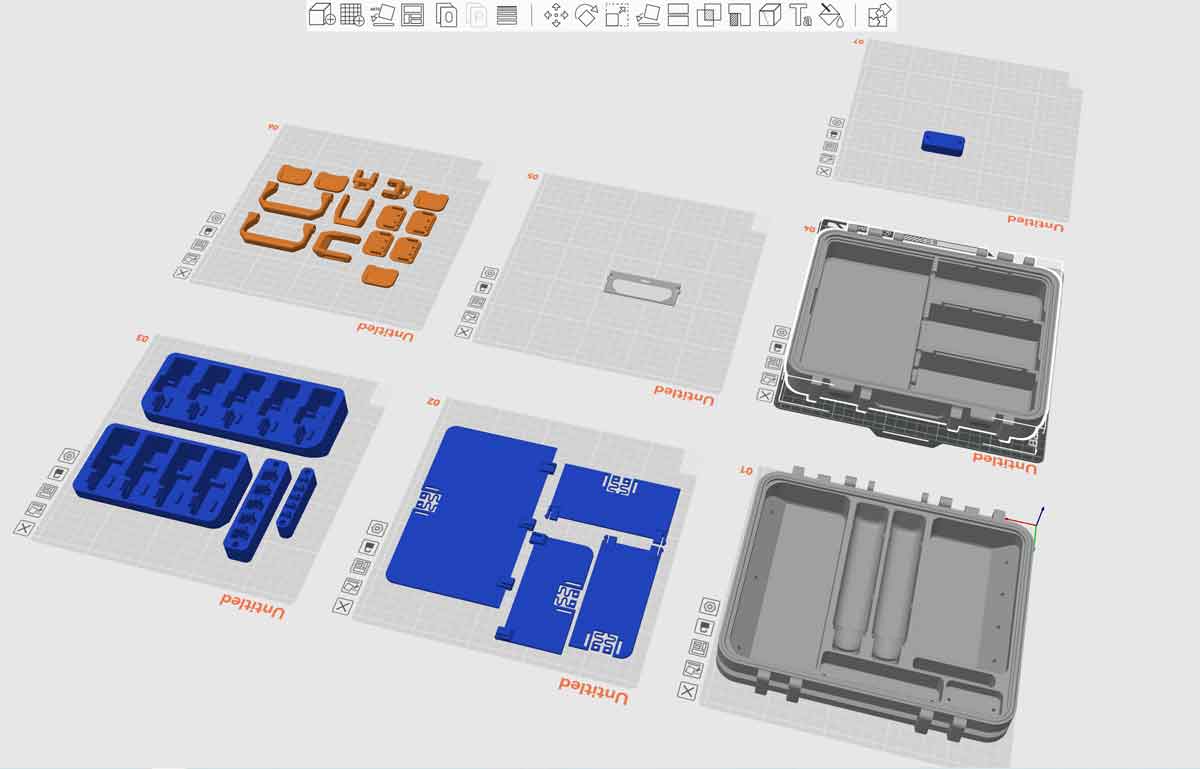
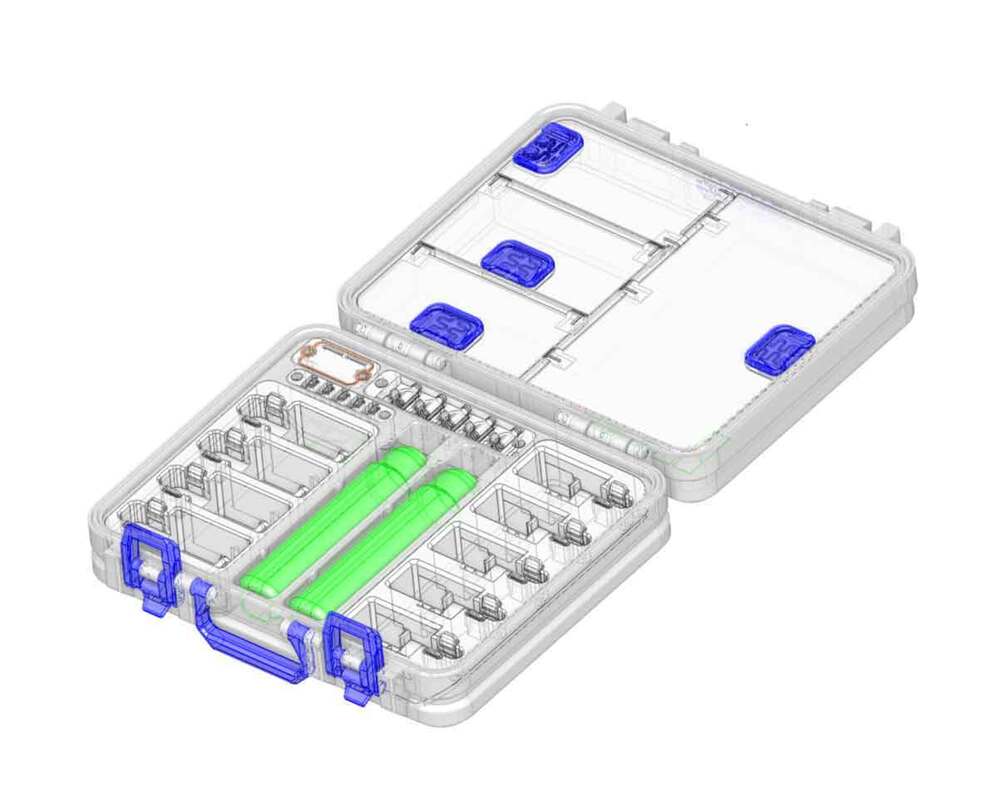
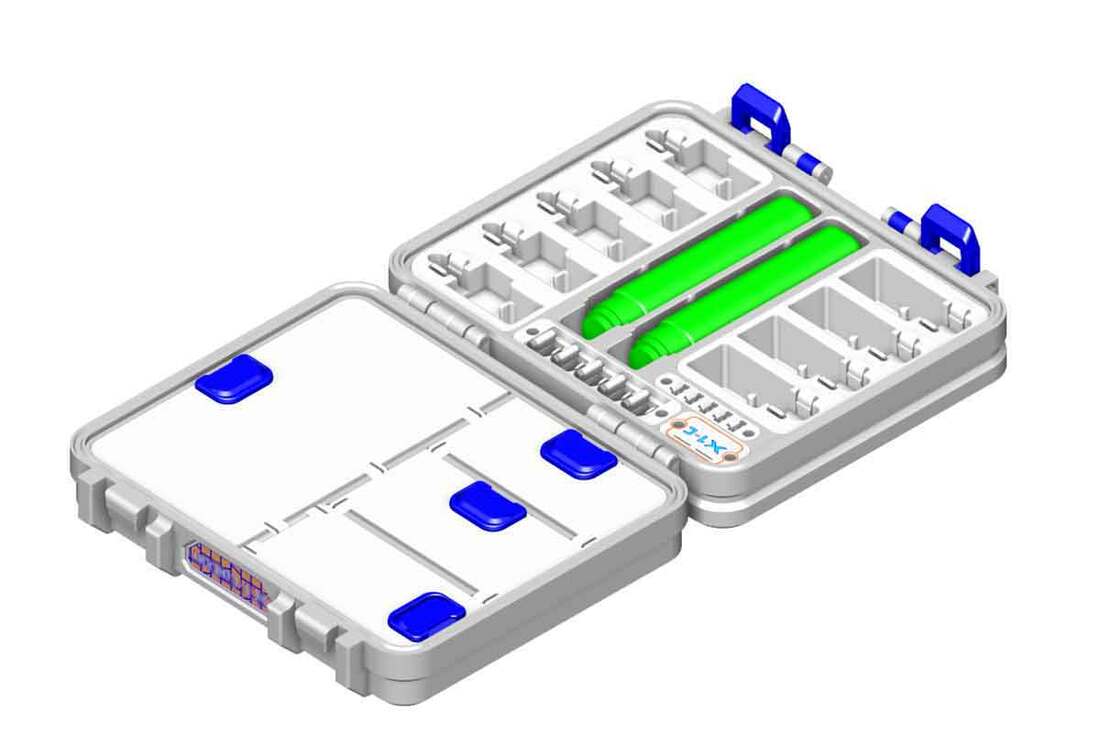
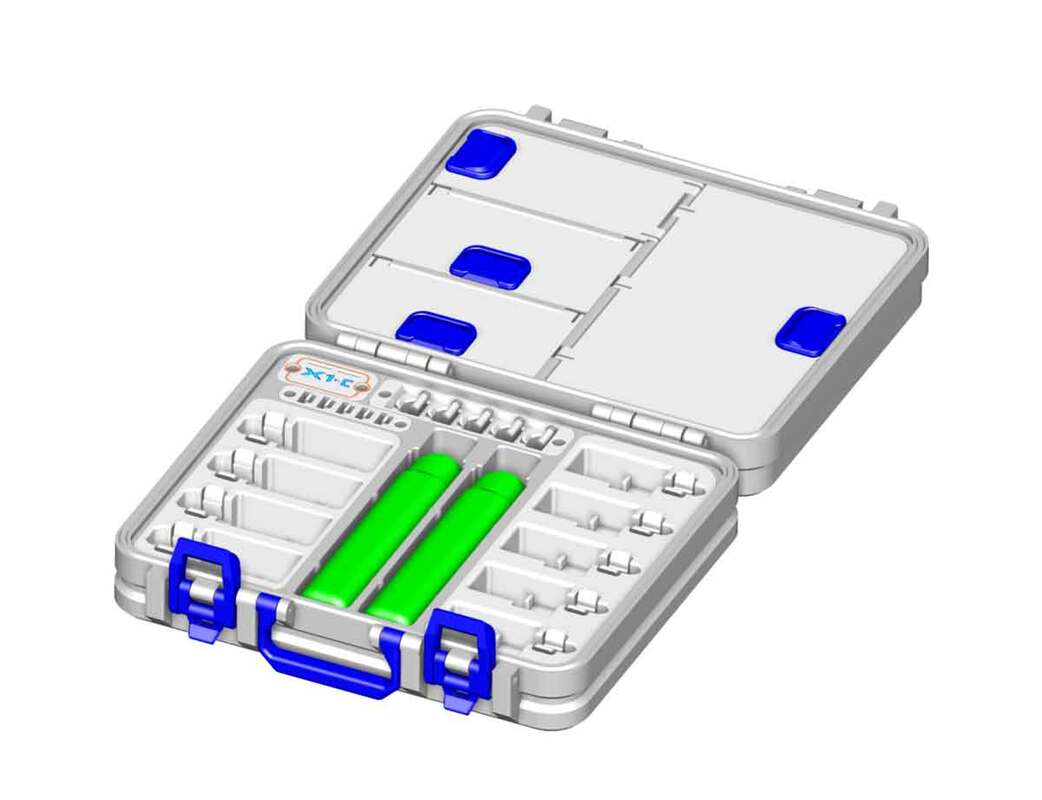
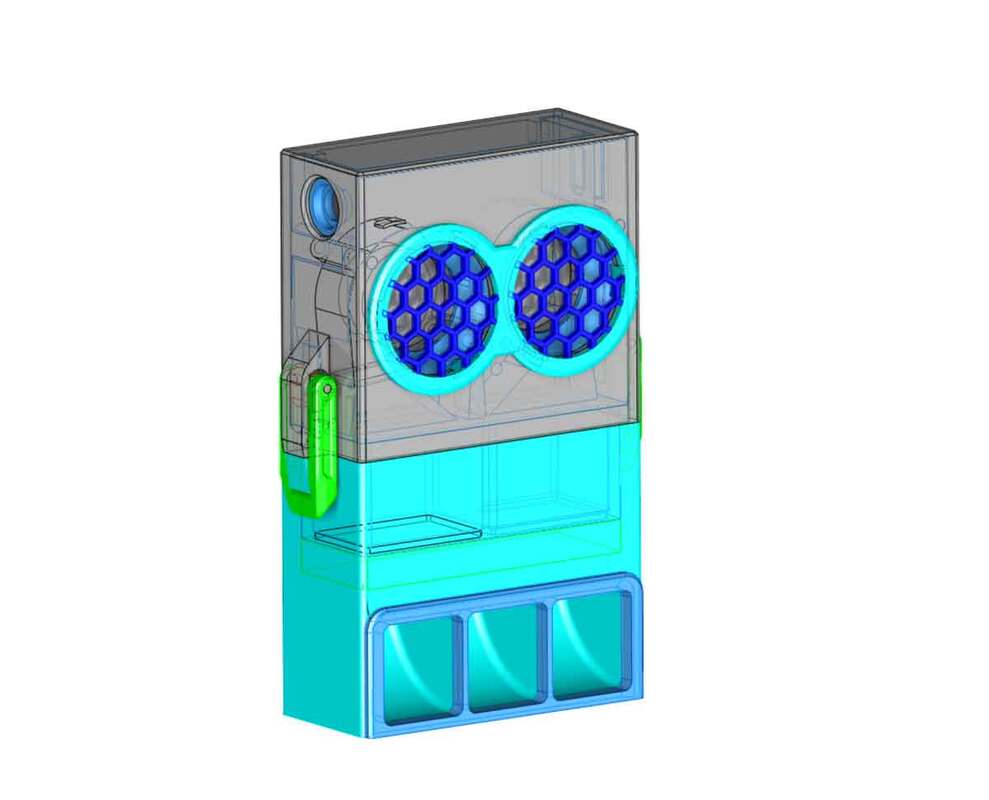
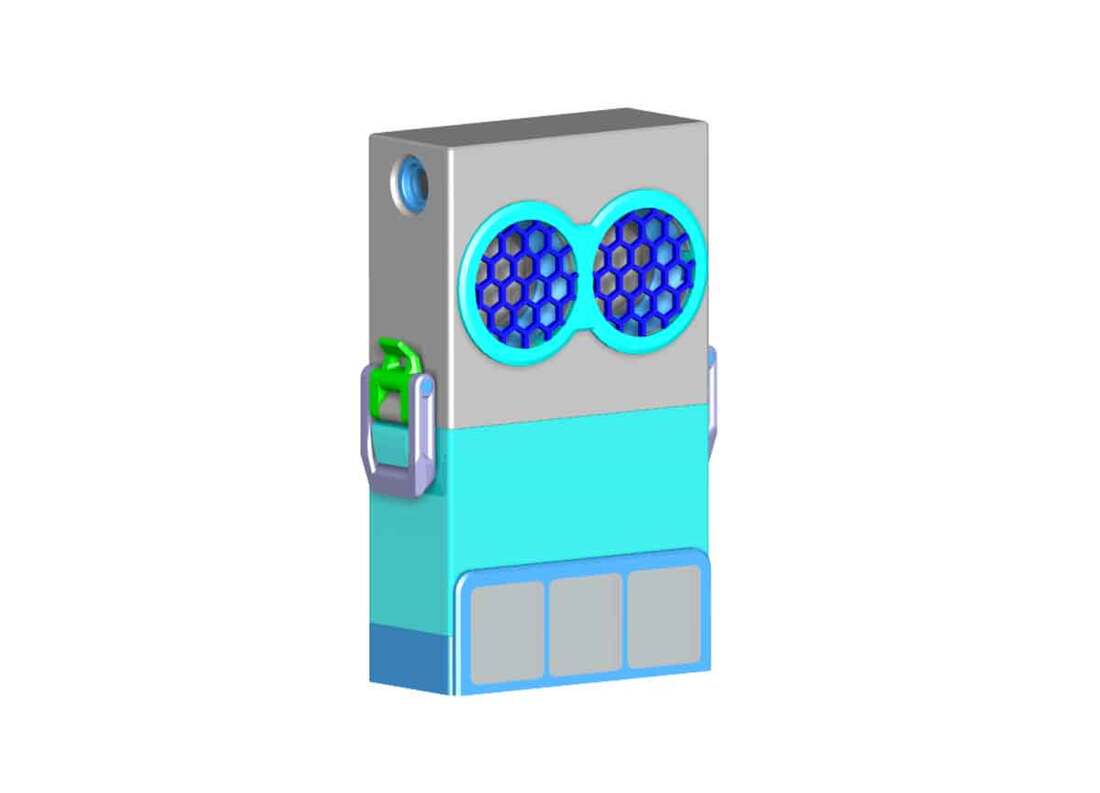
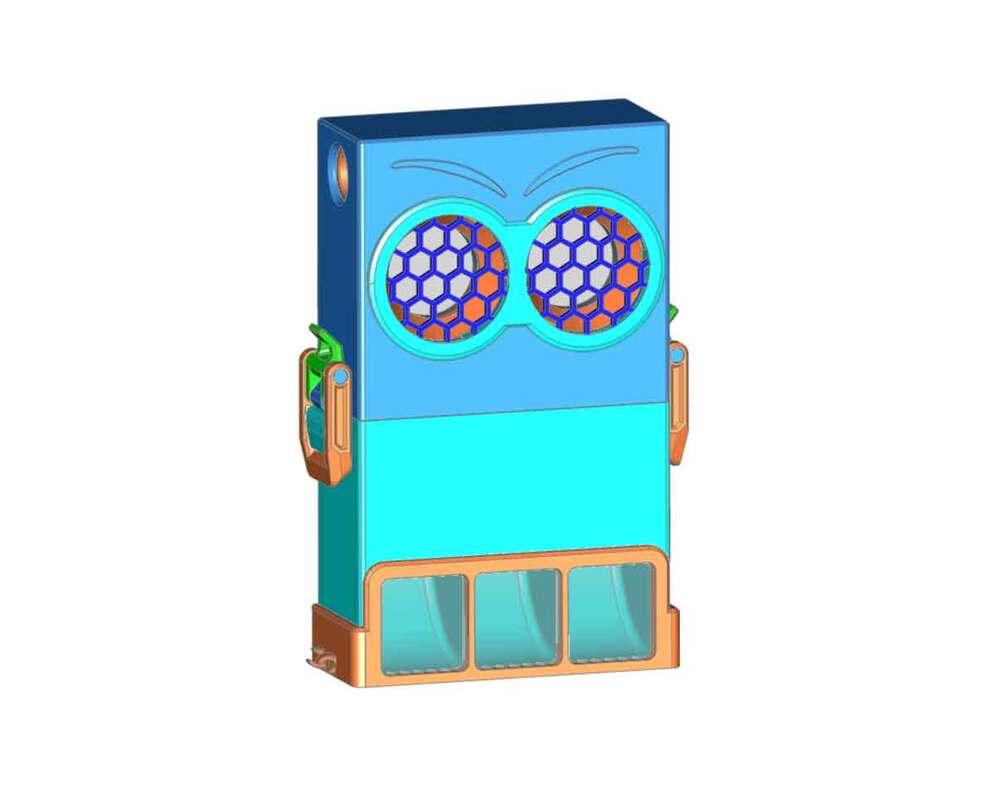
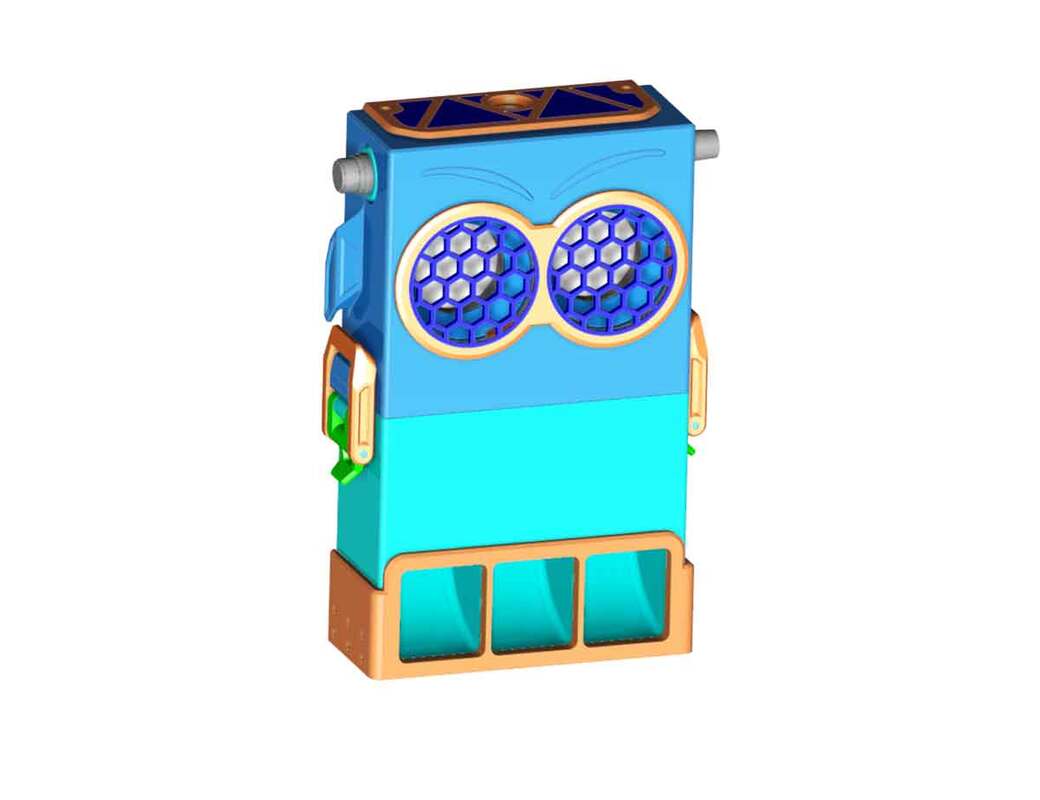
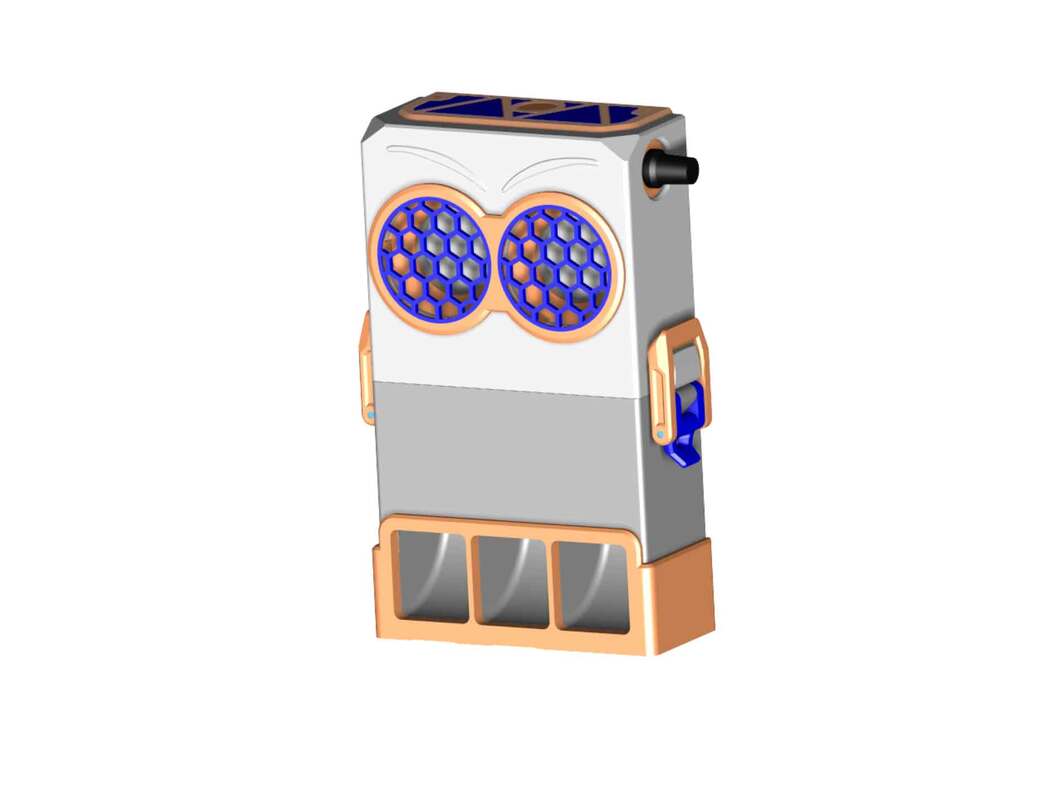
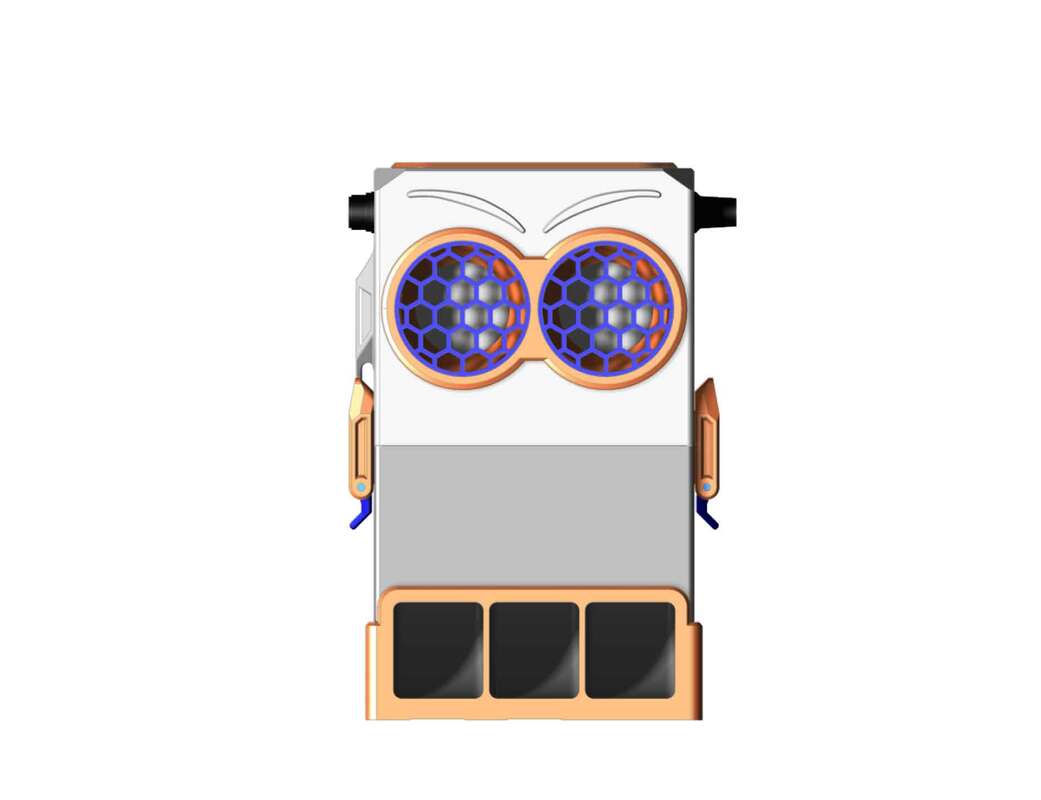
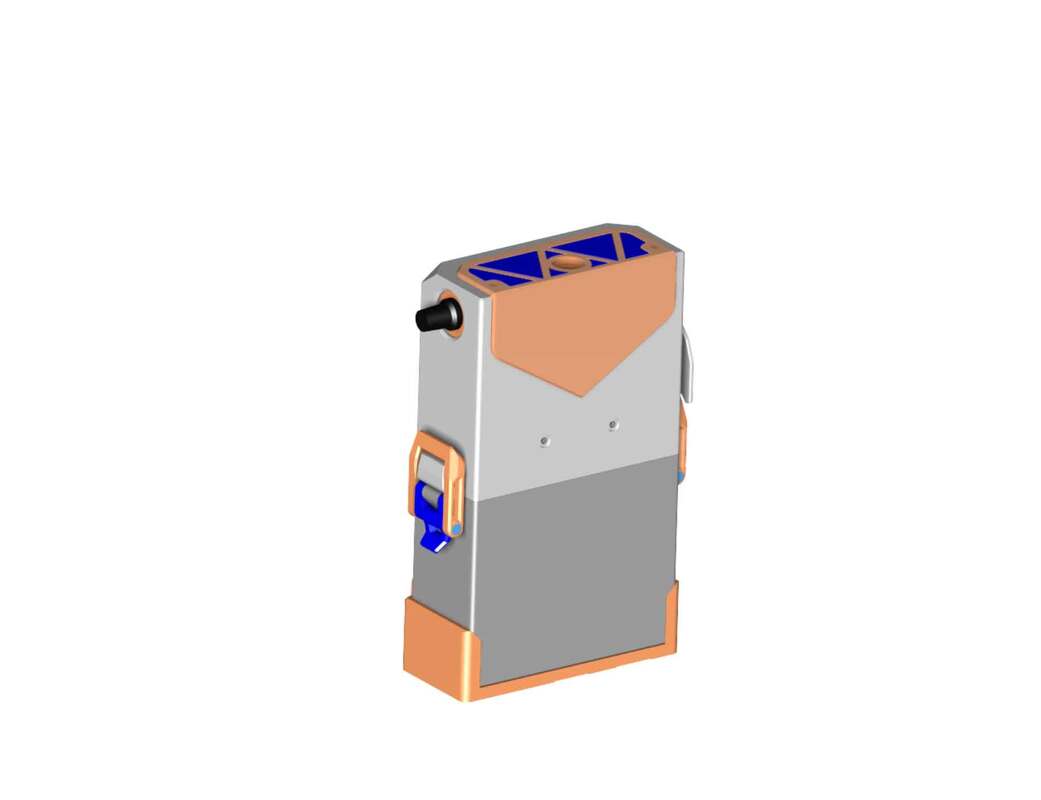
There are a number of optimizations which have touched on almost every part of the design, from the door springs to the wiper holders.  It's a good thing I enjoy doing this as a hobby, or it would feel like work, lol.  Below are some renders of the final design.  My prototype tool box however will not look as good.  It has many final parts, and some which I don't plan to reprint, since the changes are minor.  I have very high confidence in the final design though, since I've previously tested the changes with smaller sections of the model (or the changes were just an adjustment of a dimension... or a hole).  My prototype on the other hand, has holes drilled in it, and some other less than perfect aspects, but it's still functional and will be 95% as good as the final design.  I'm just not gonna waste the filament to print the final design, and will live with the imperfections in my tool case.  They will remind me of what a pain in the butt it was to make :D.

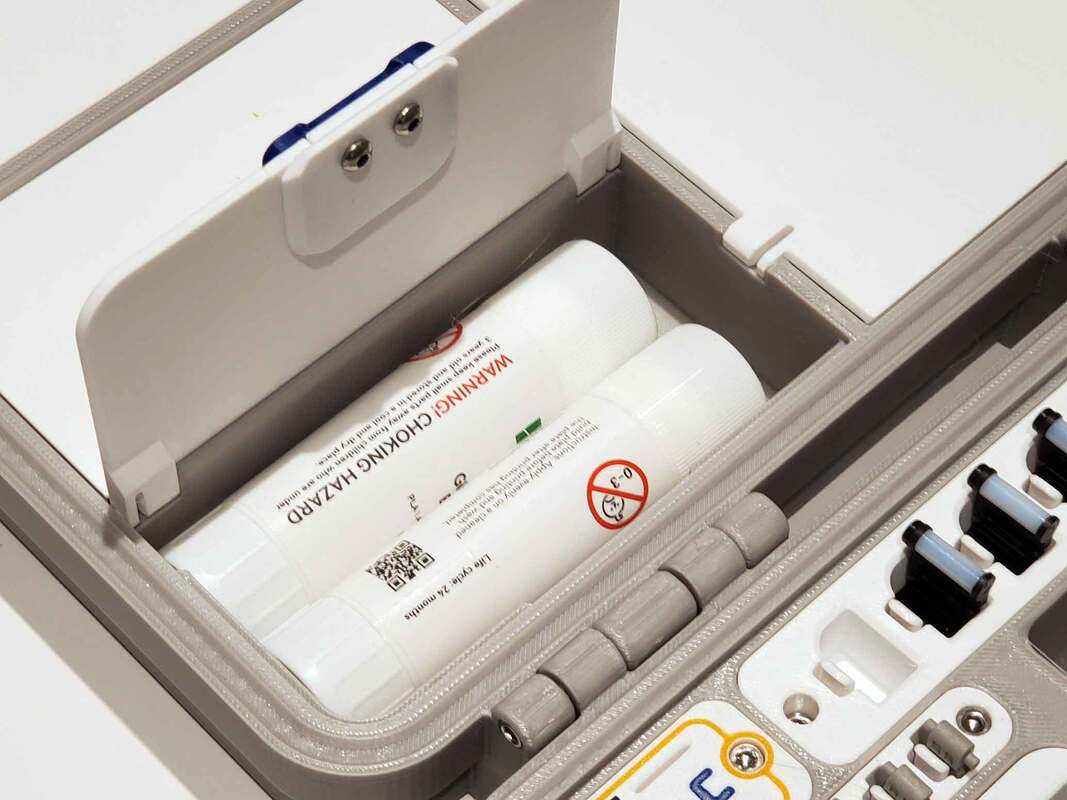
And don't worry glue stick lovers, two of the snack sized sticks will fit in one of the smaller compartments.   

This will get posted soon, I just need to find the time to write up a BOM and assembly instructions.
Update 10/5/2023:
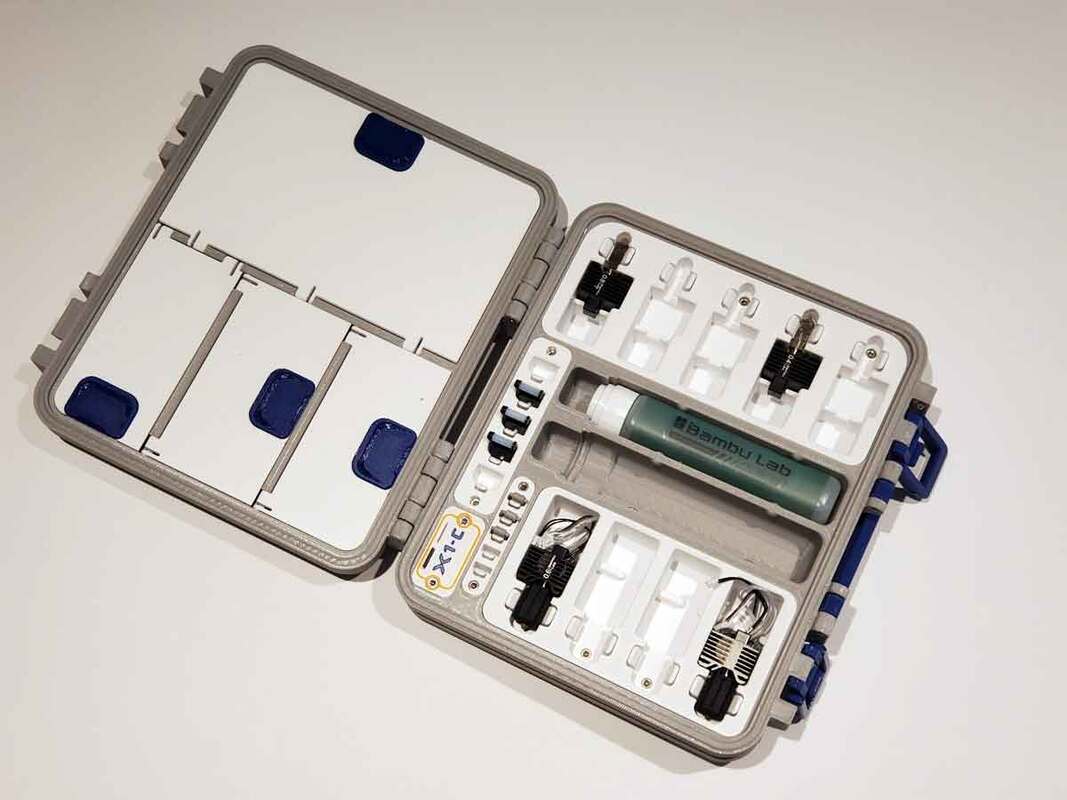
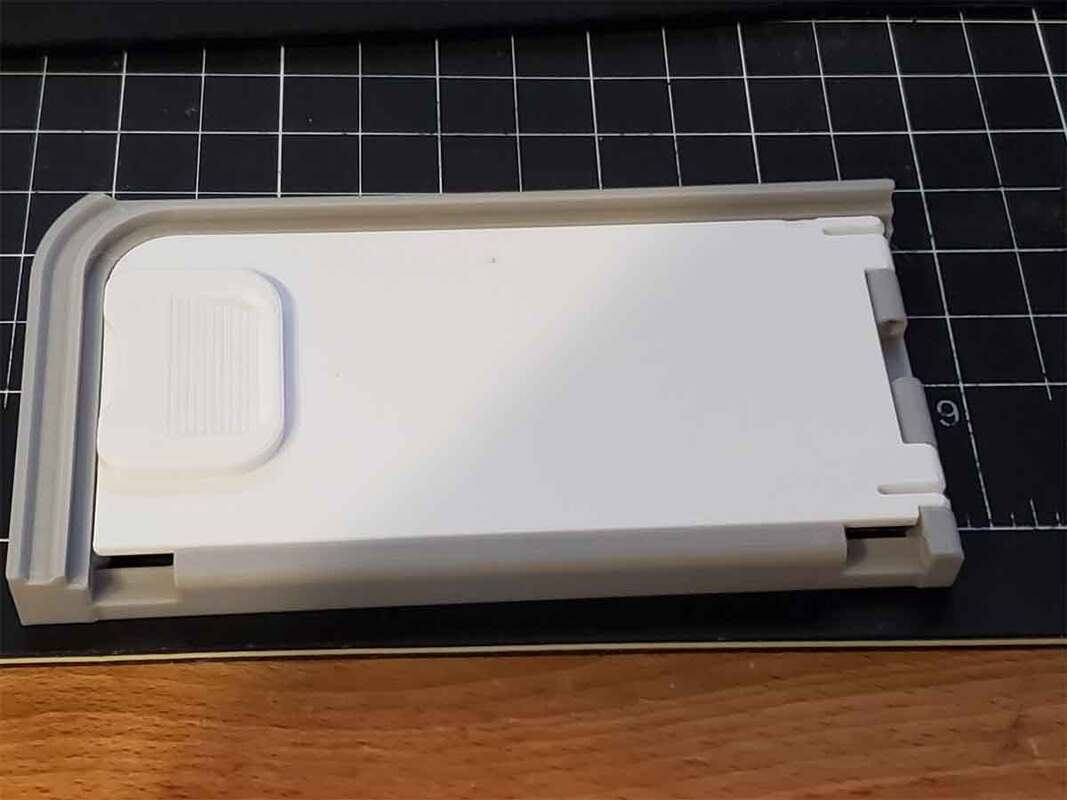
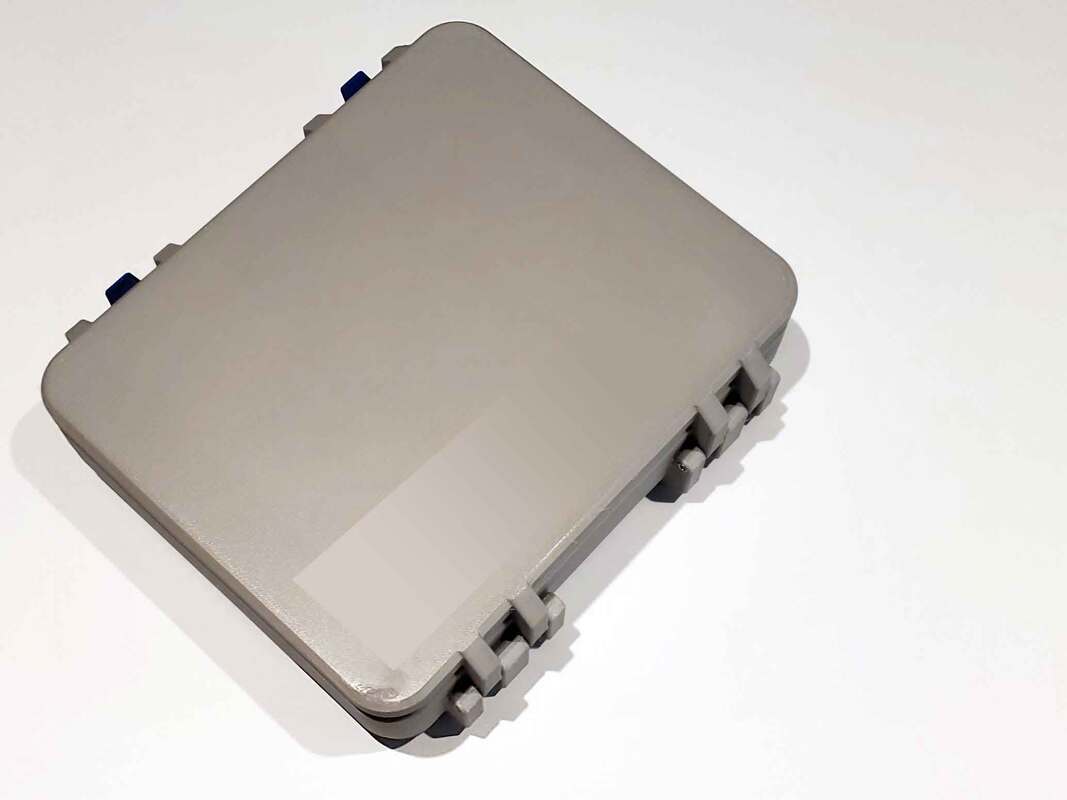
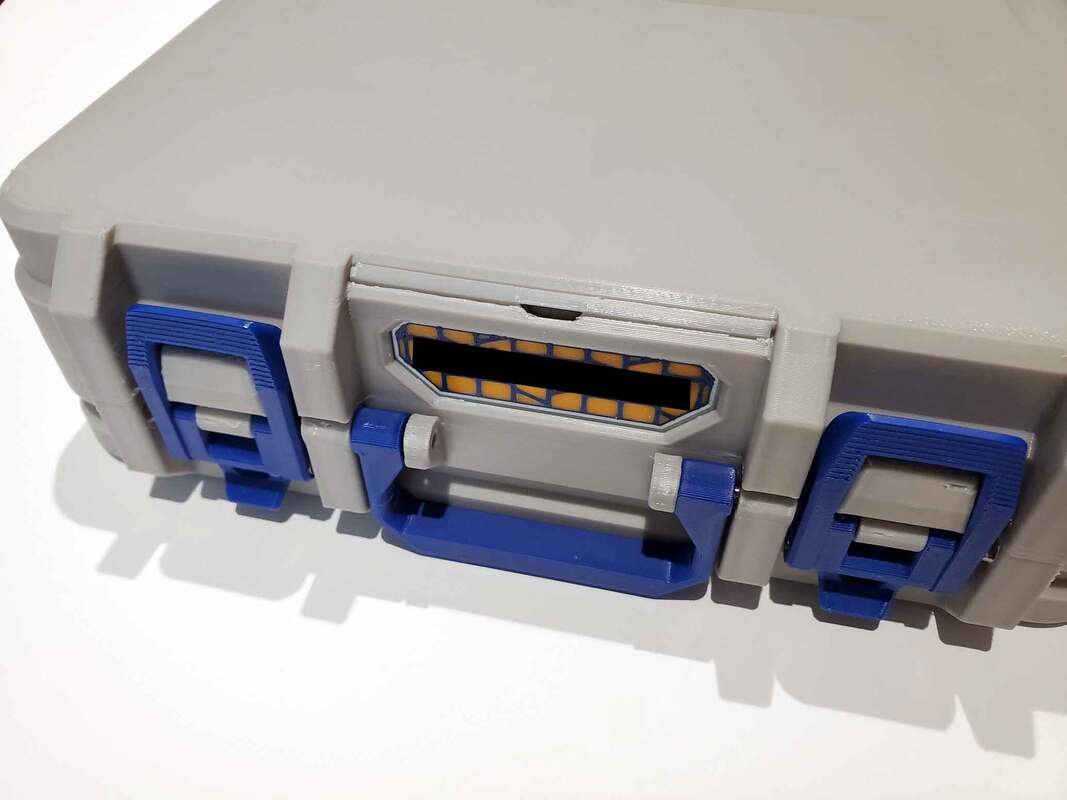
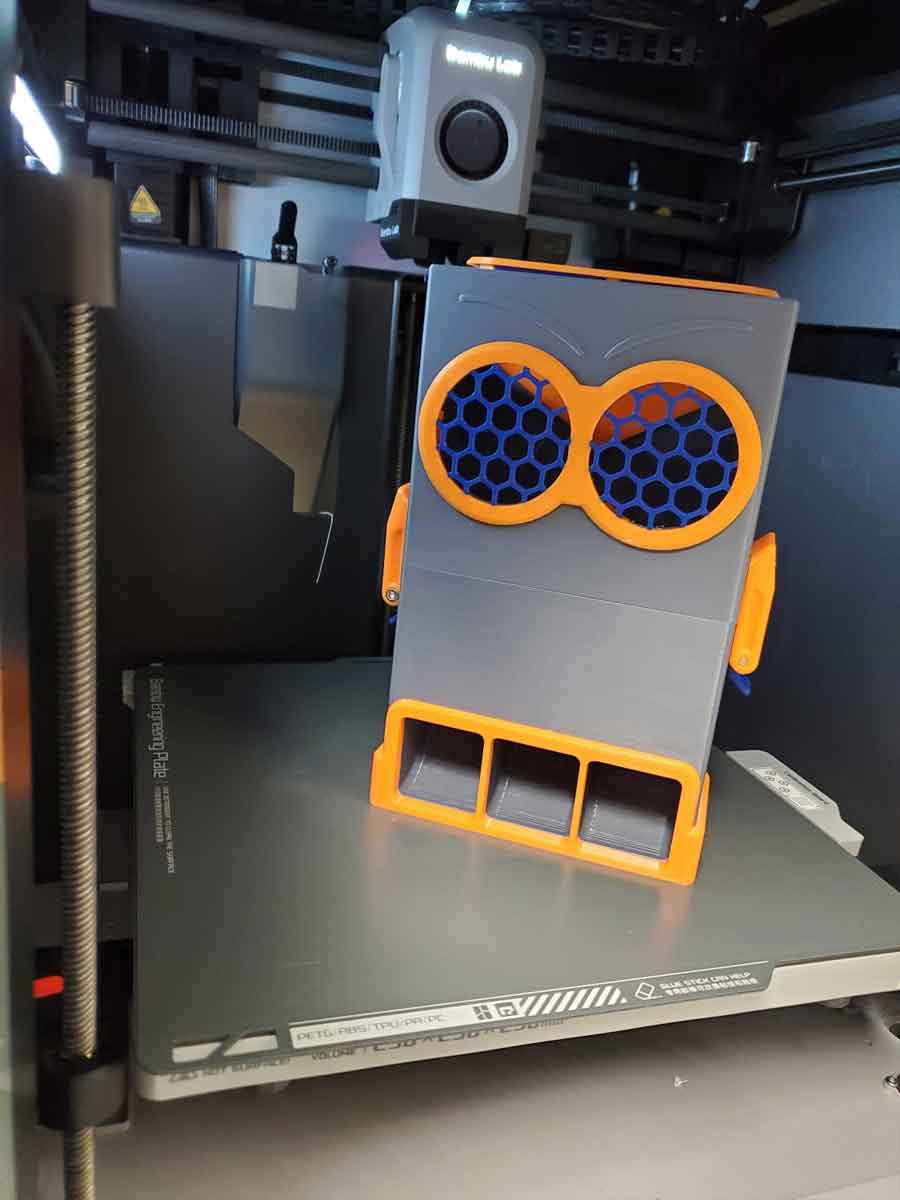
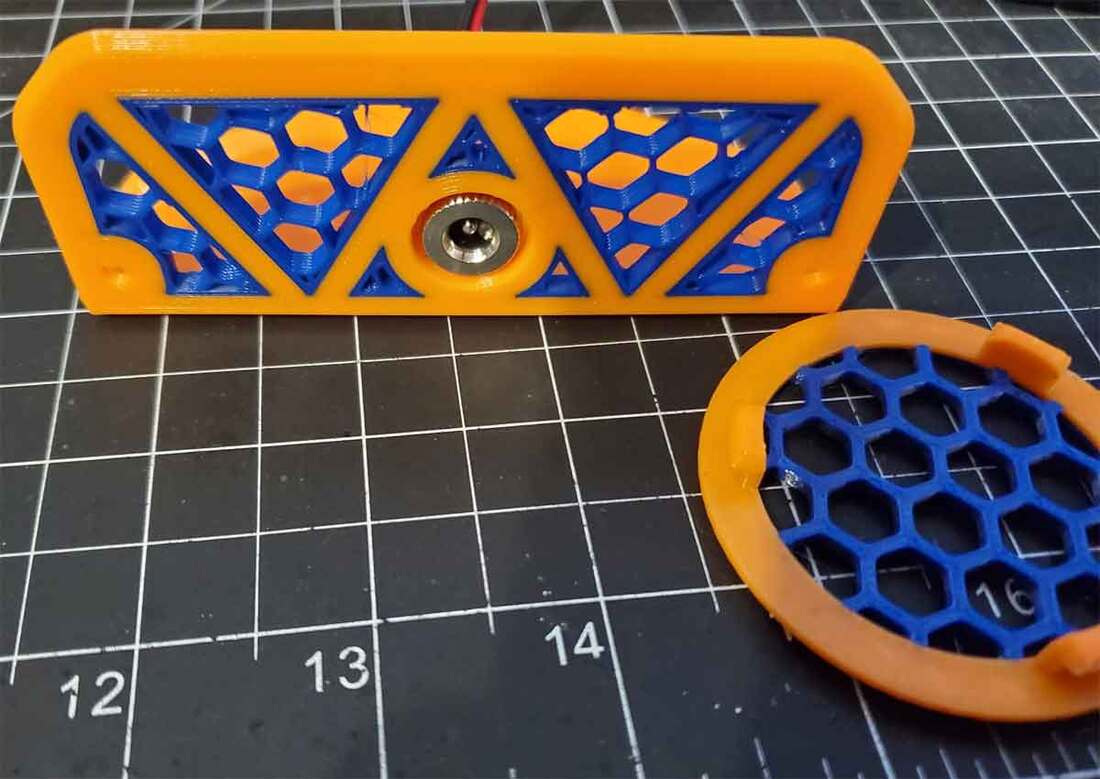
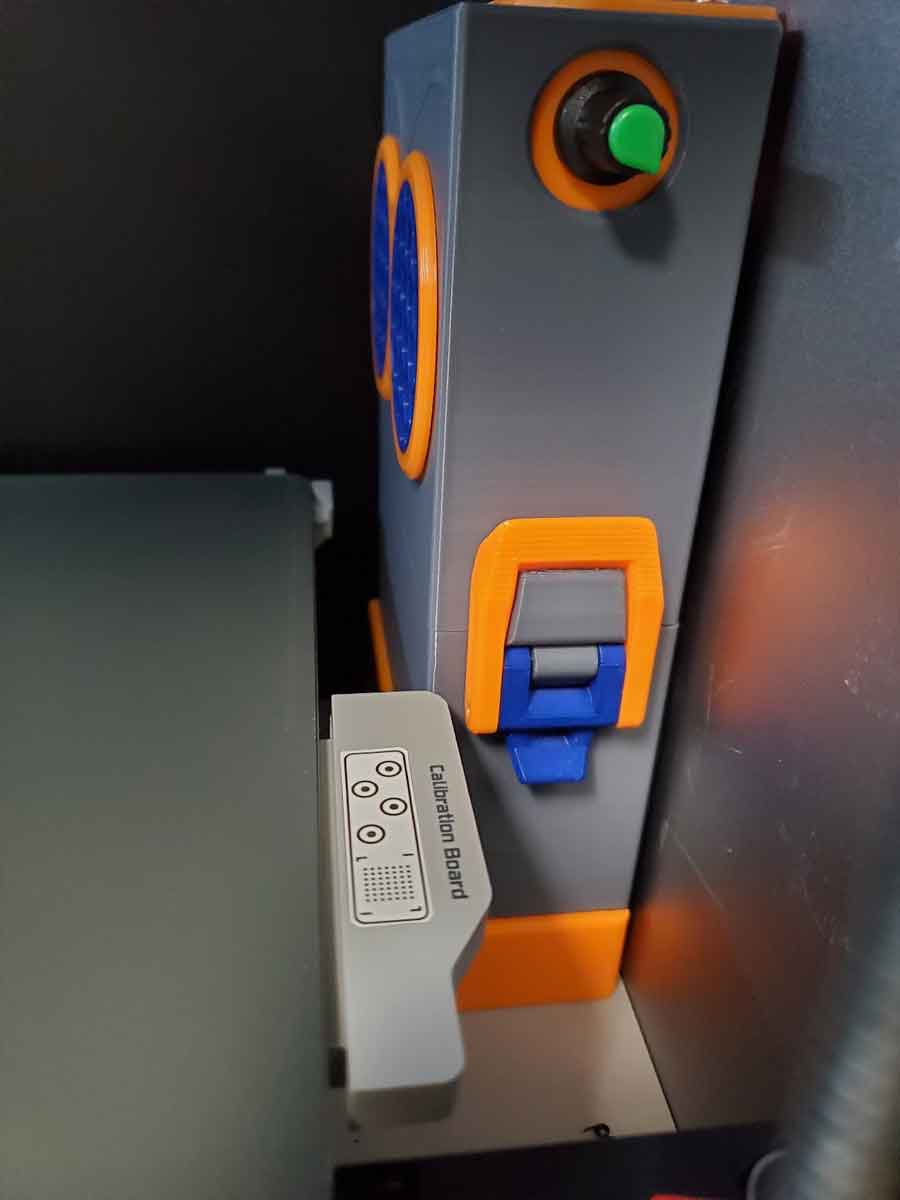
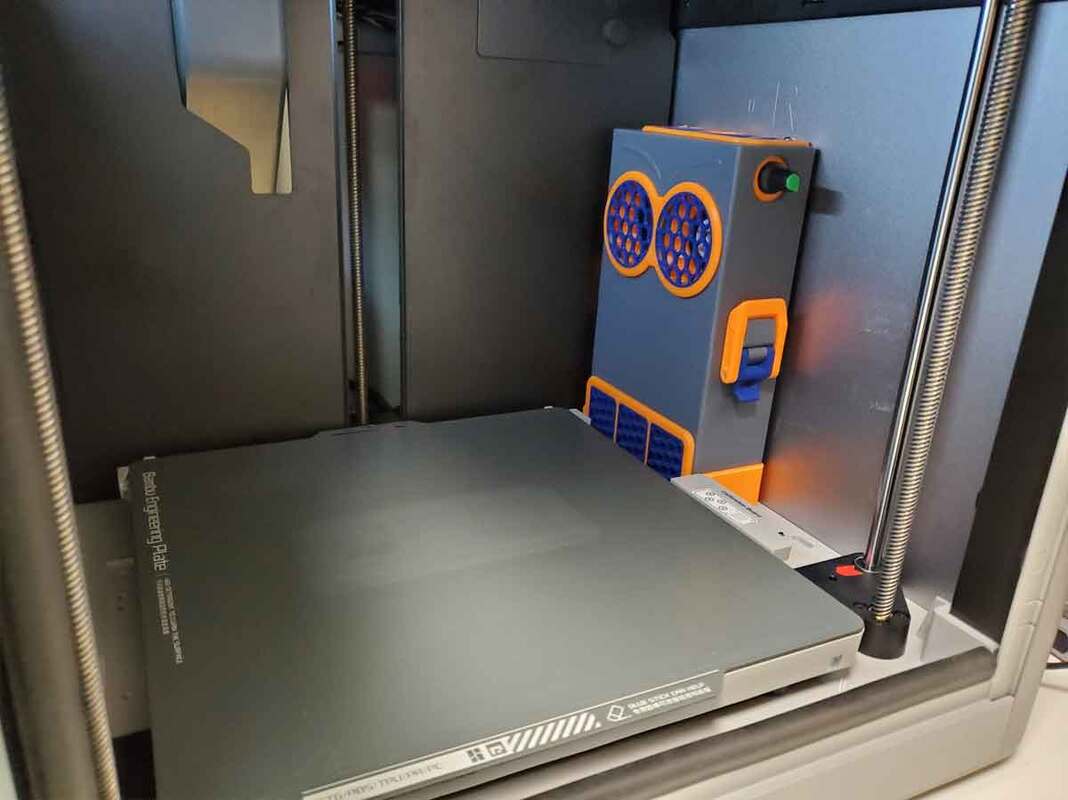
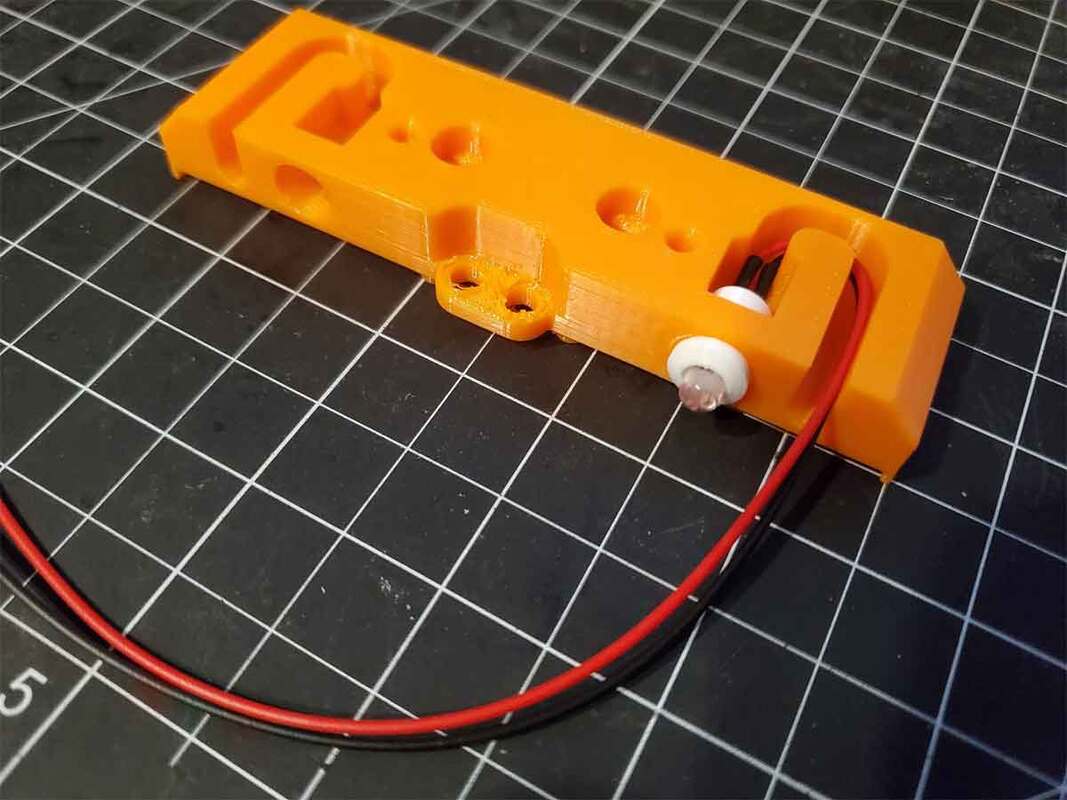
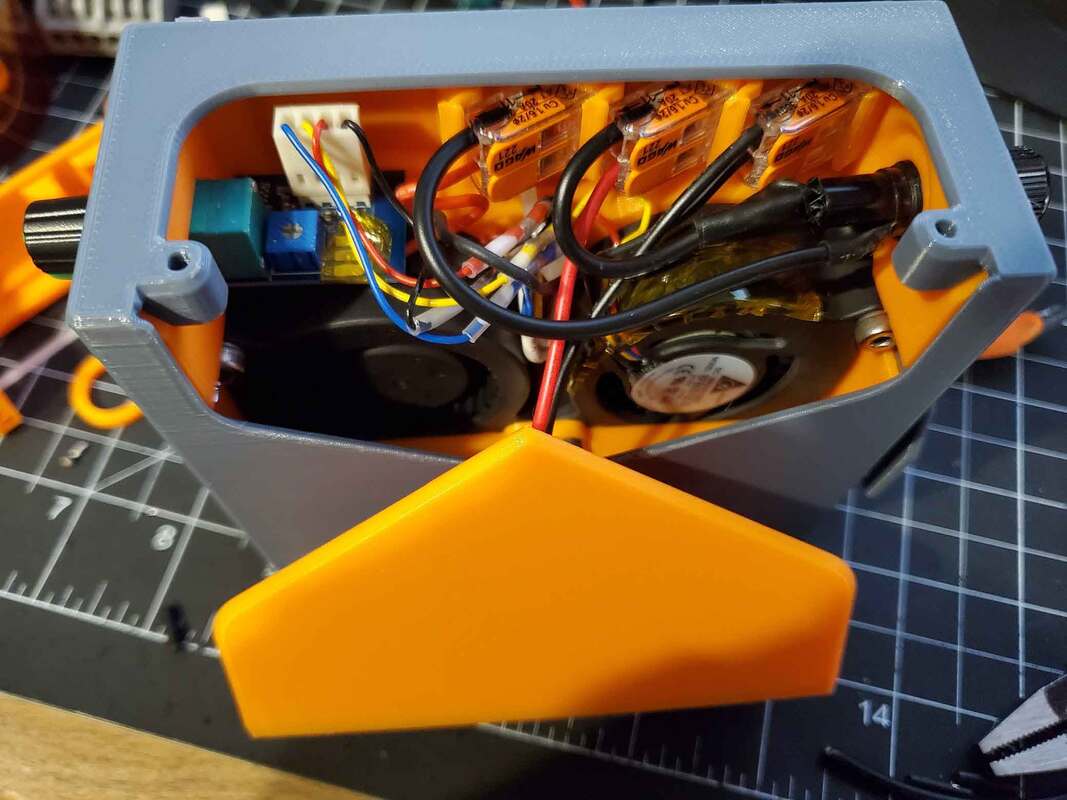
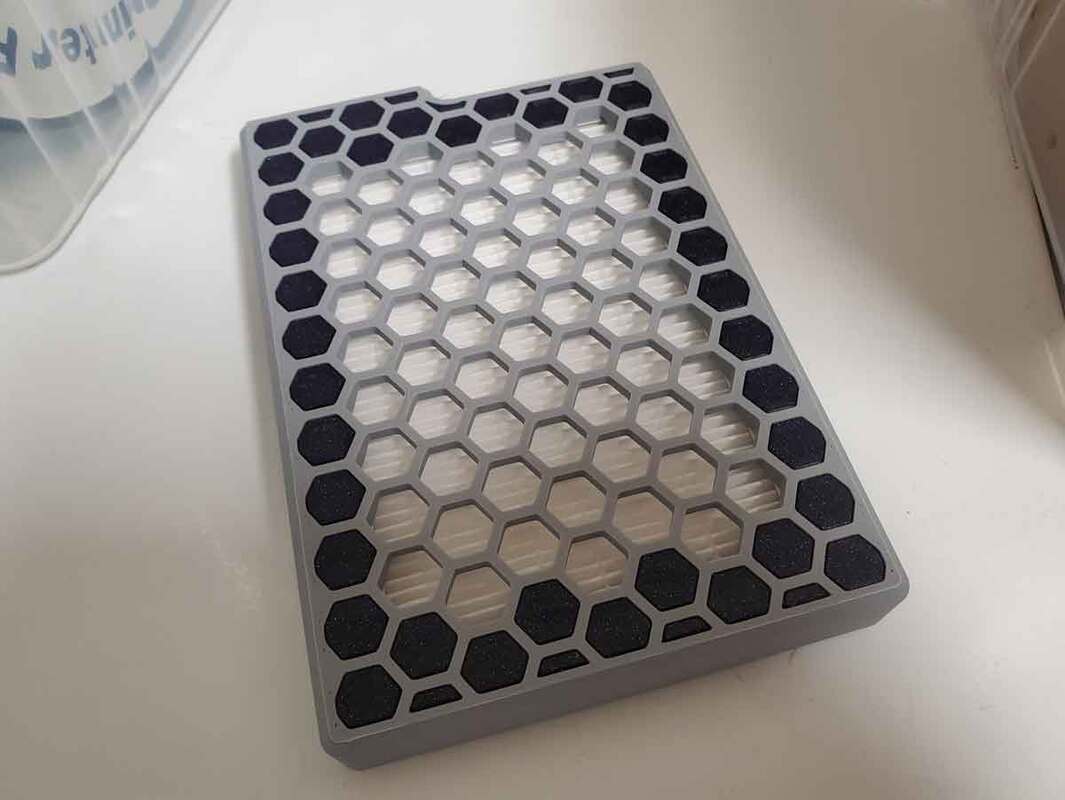
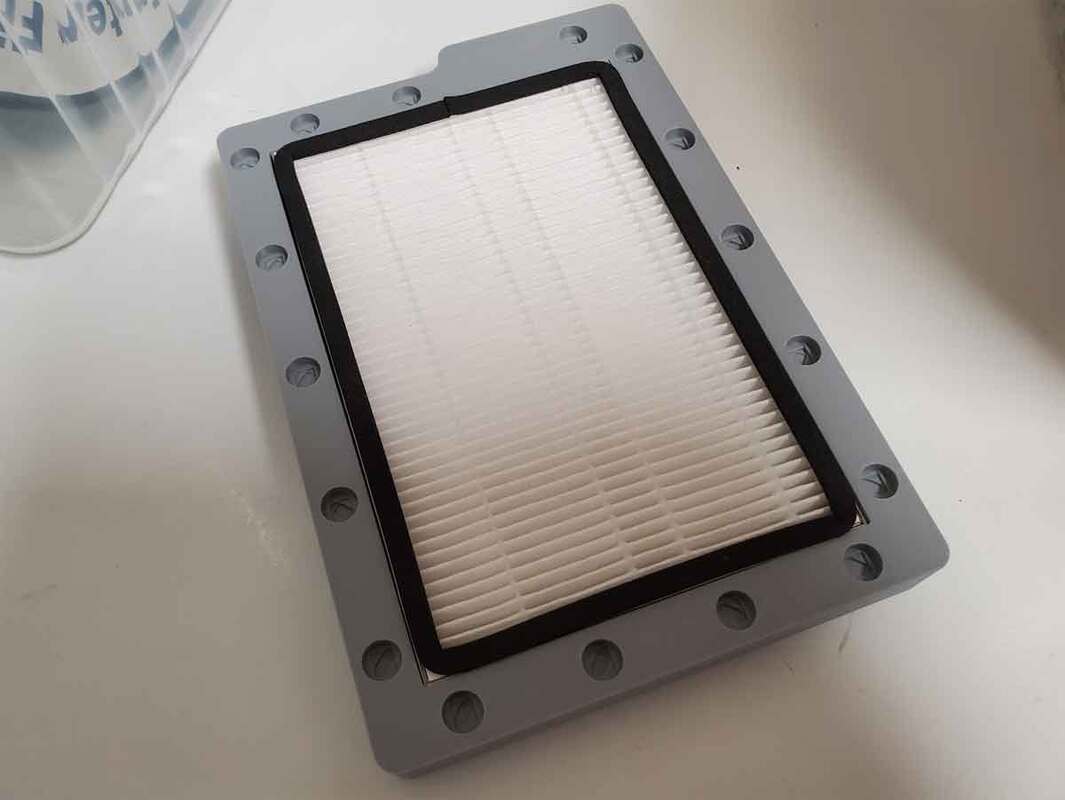
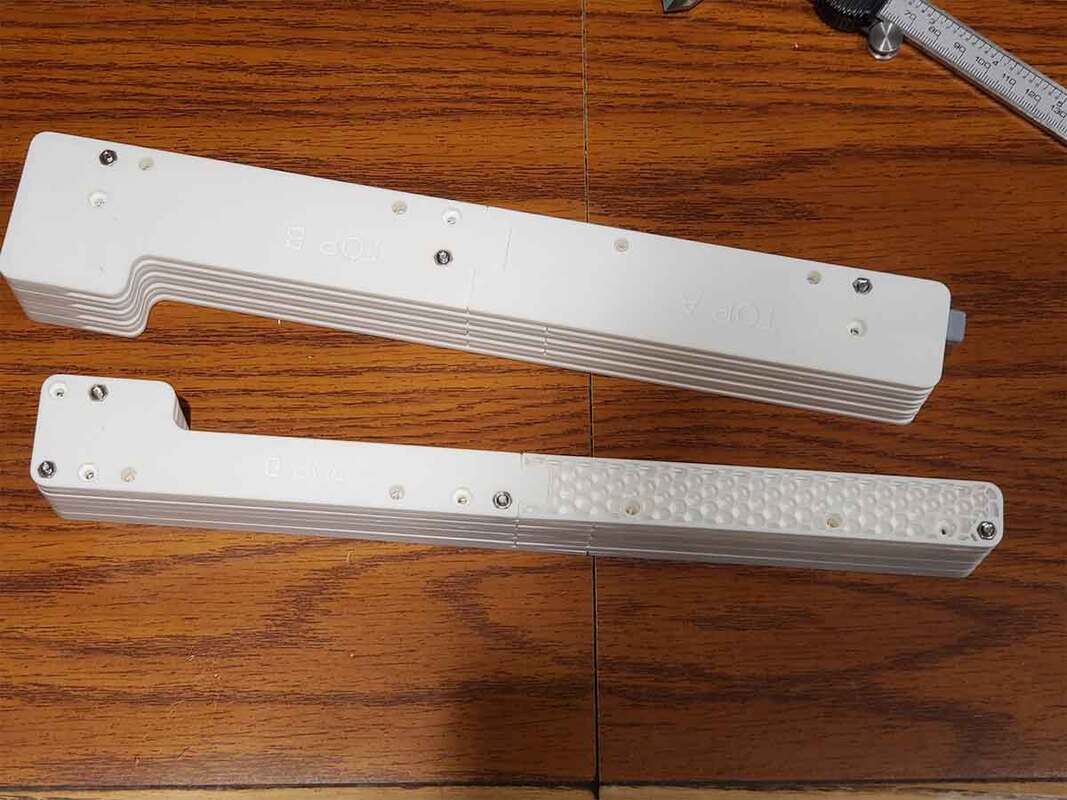
I took some pics of my (far less than perfect) prototype case, this is about as good as it can possibly look :D

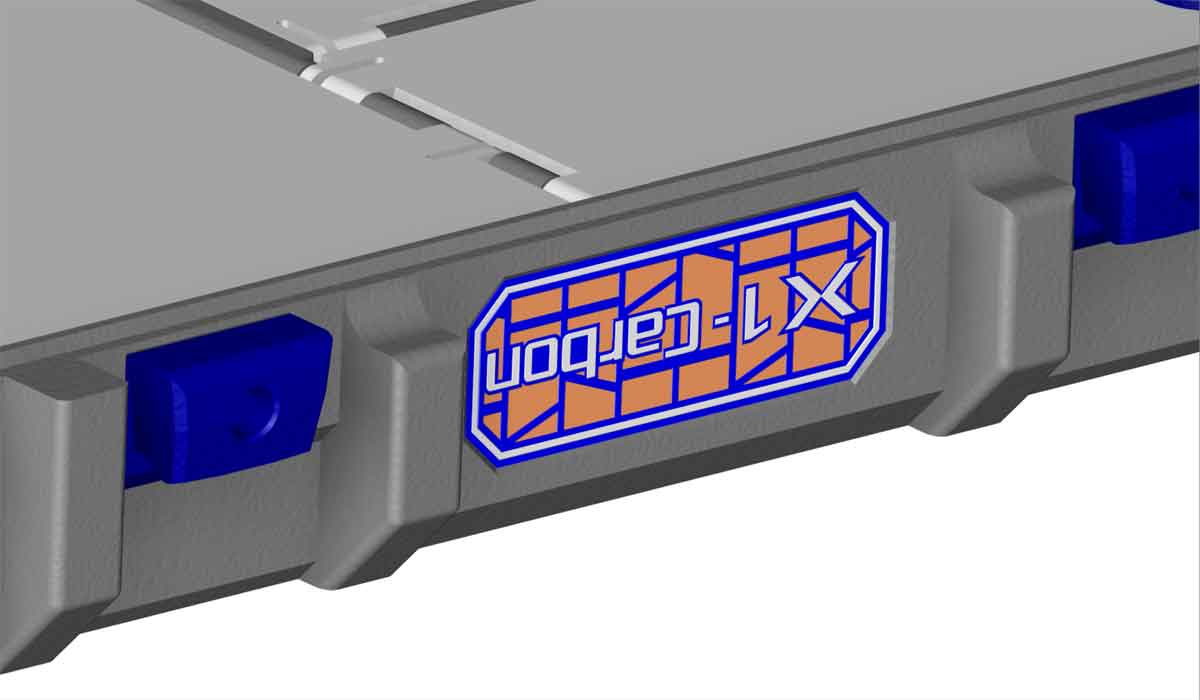
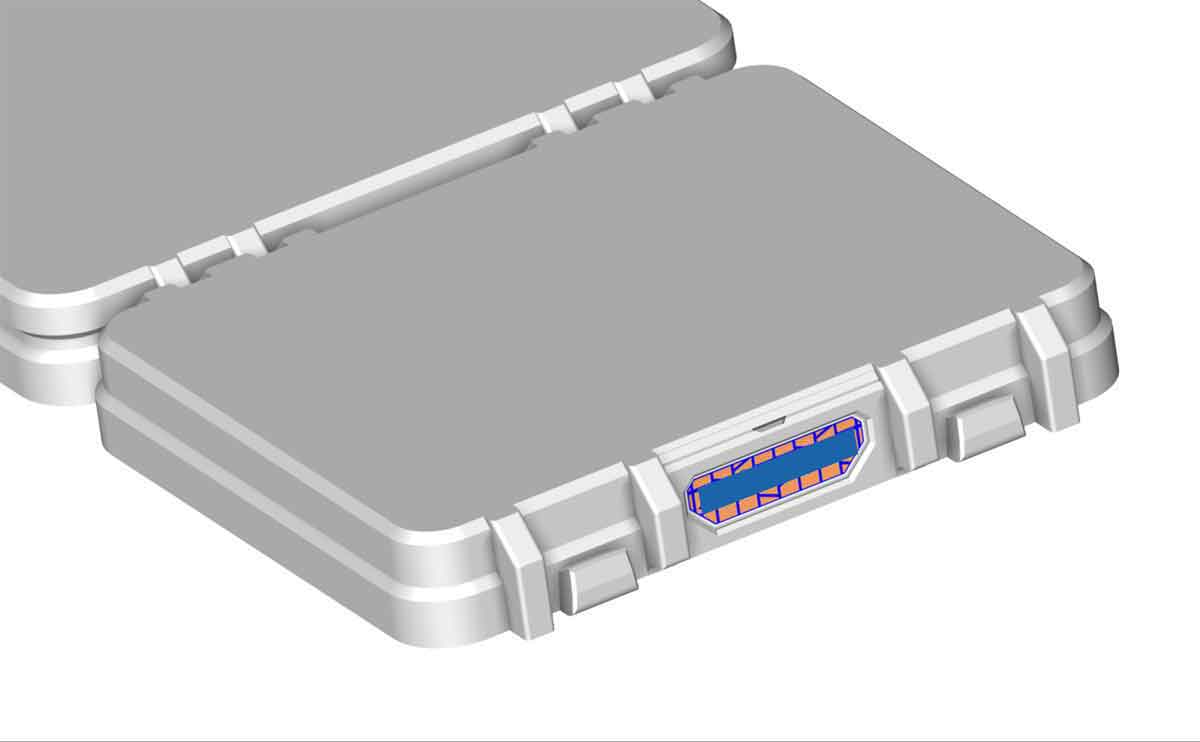
The case will be released without any "Bambu Labs" or "X1 Carbon" stuff on it, (edit) but I need to check if adding those logos to user created models is acceptable to Bambu or not (though I know there are tons of models that use it). In any case, it's gonna take some time to get it posted, as I need to export all the files and write it up.  
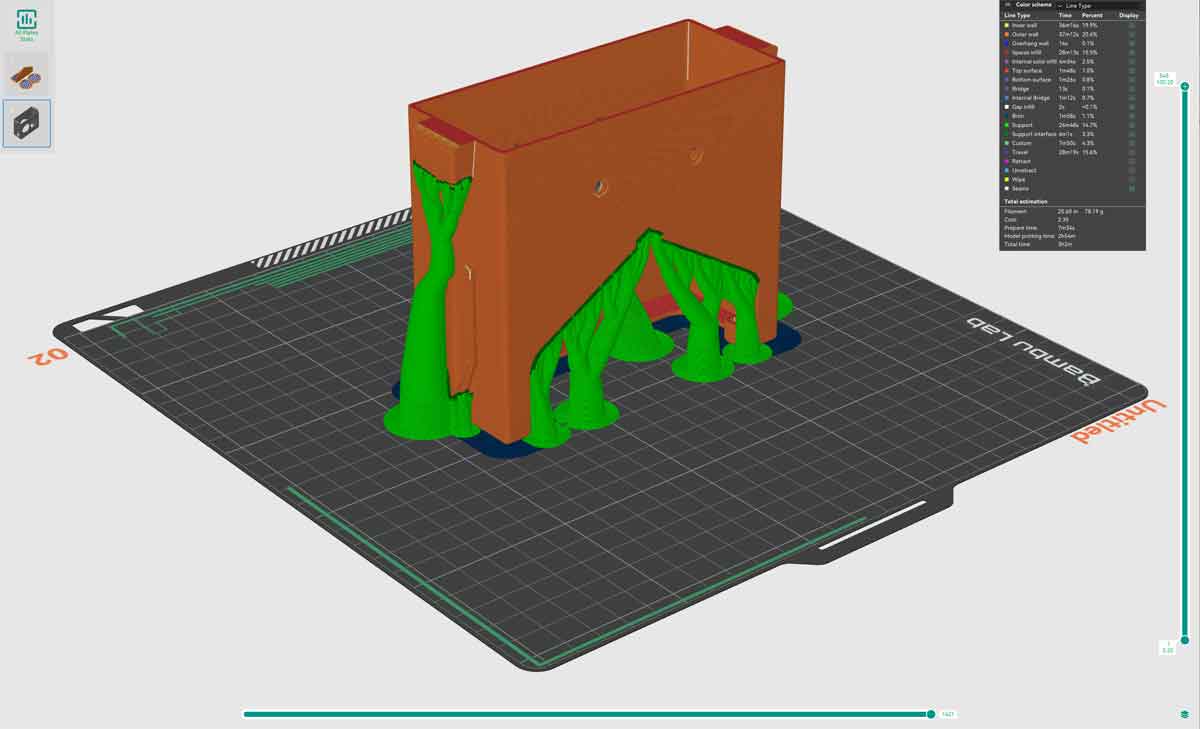
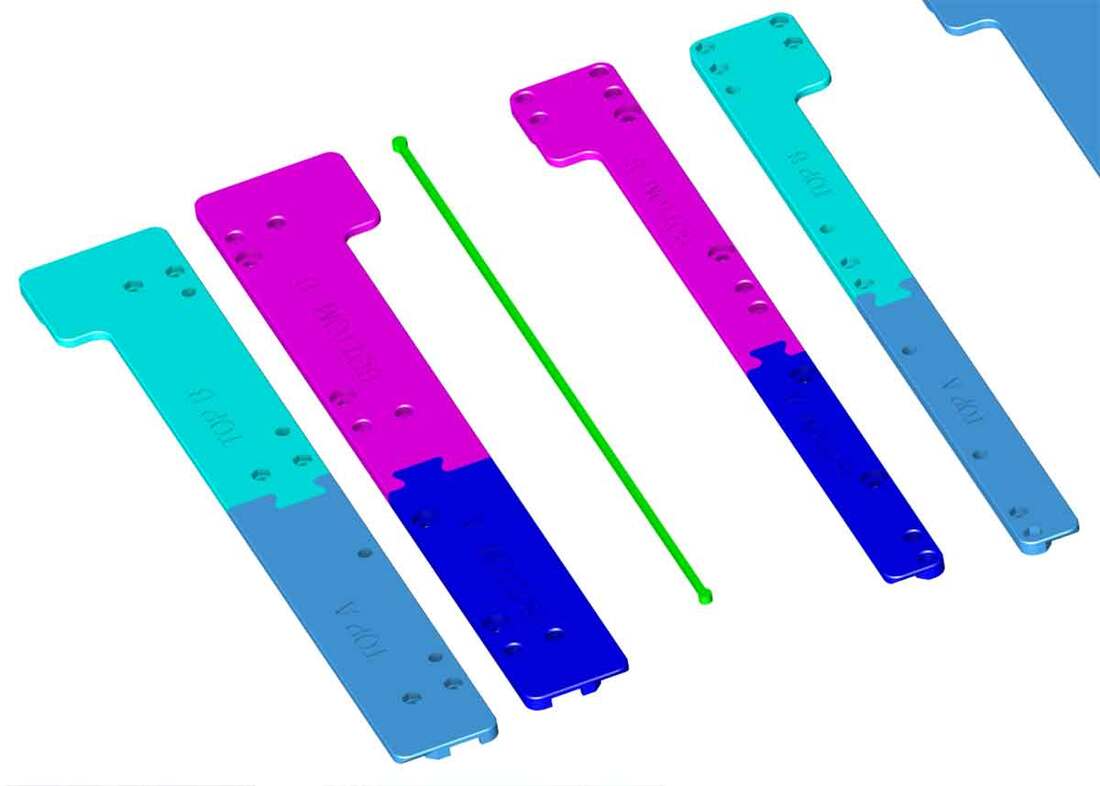
Update 10/6/2023: Well, I had one more idea which will help with printability.  The modification is all designed and ready, but I need to test print it, and then will re-print the top, to verify it all works.  The upside is that there should be fewer supports needed (just one area will need them).

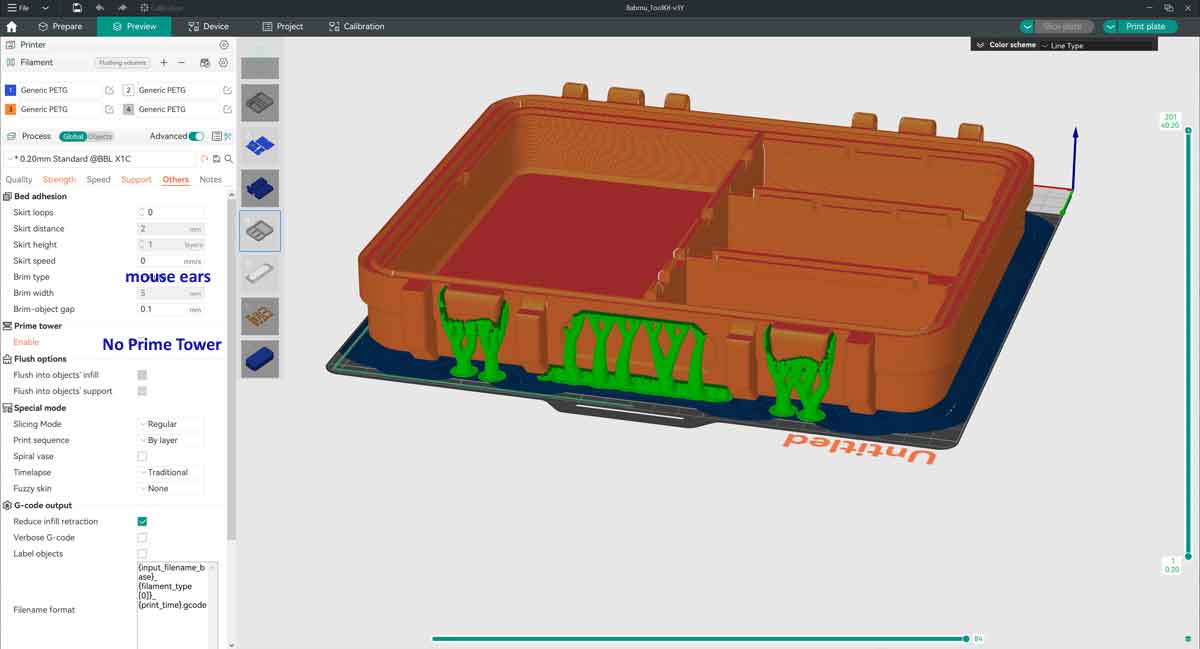
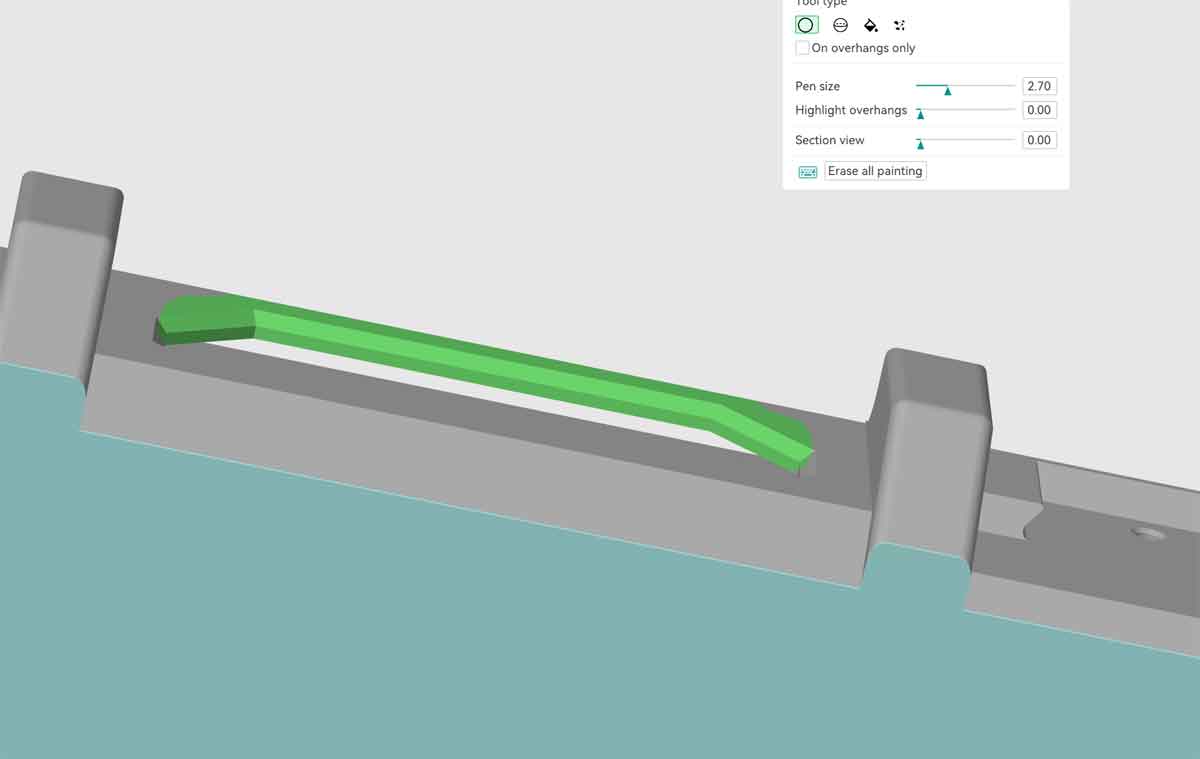
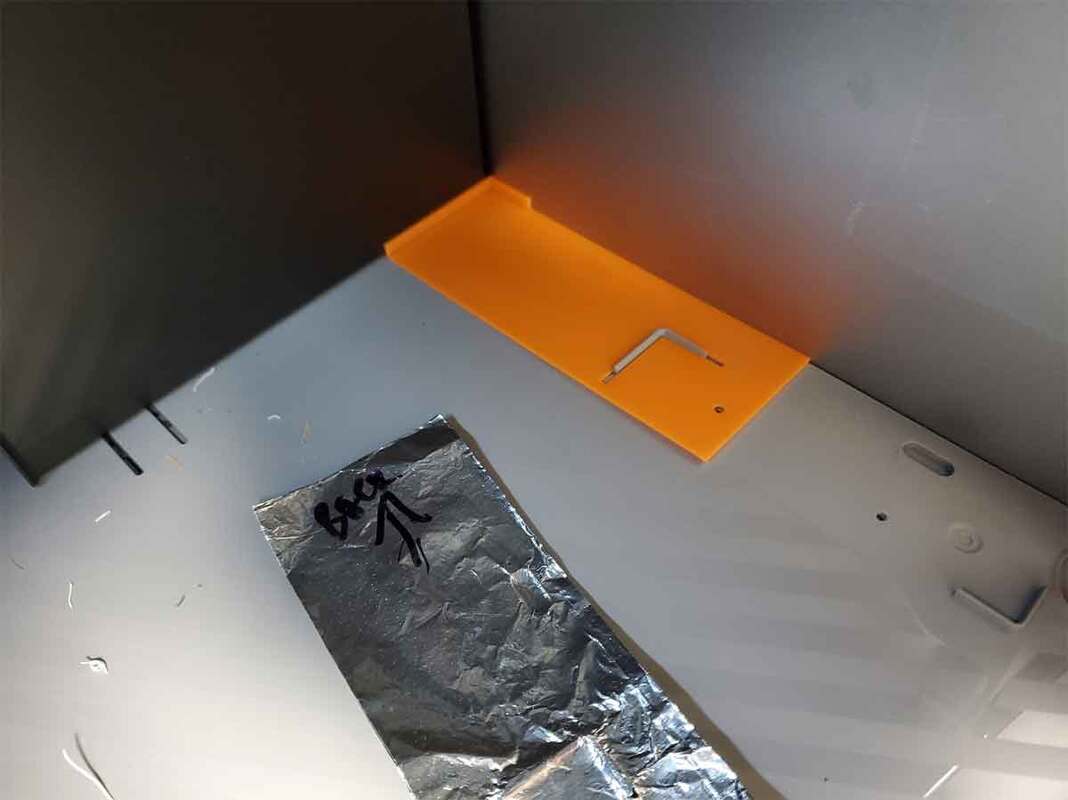
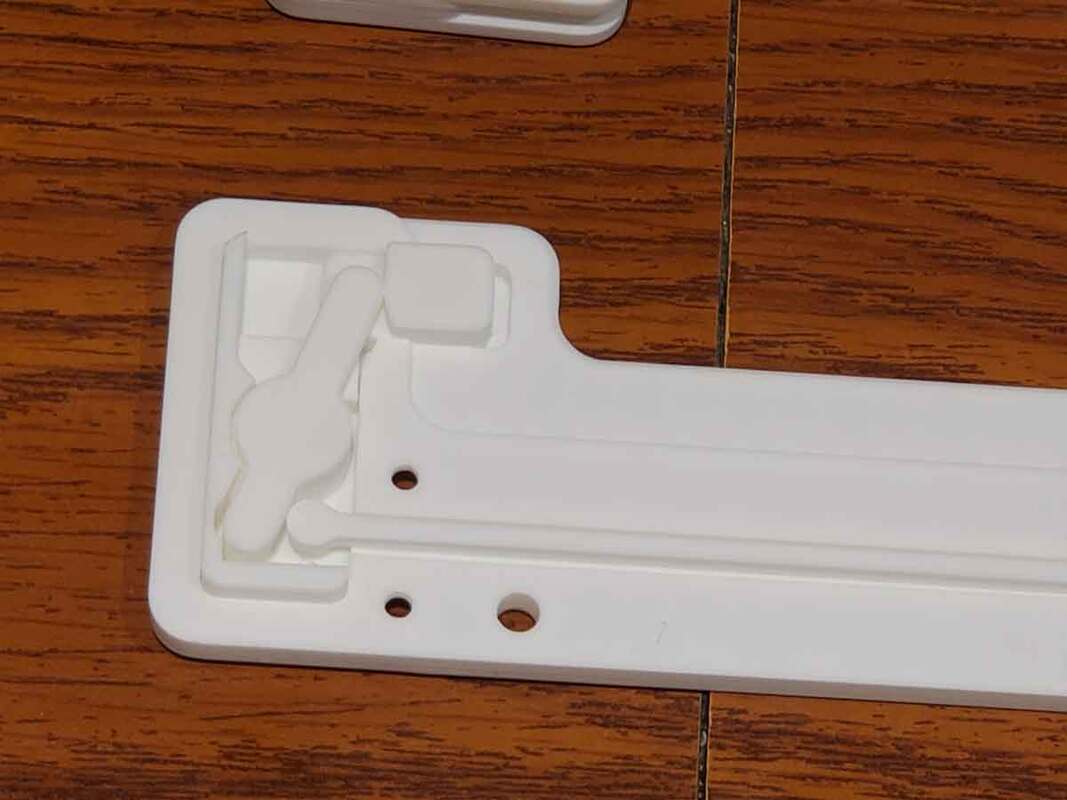
Update 10/9/2023: The design is as done as it ever will be, and the modification has been tested.  The top will still need supports, but only in one very small area (see the first pic below).  It will now require a couple additional M3x10 screws to mount the latch hangers, but the profile is much cleaner on those parts, since they can be printed in a proper orientation.  

I emailed Bambu about their logo policy on the 7th, to ask if they are OK with putting the Bambu logo on this case, however I have not heard back yet (understandable since it's probably not a common question).  I will give them a week, and if they don't reply, then I will just release it without the logos and markings.  I will still keep an eye out for a response though, and will respectfully ask that folks don't remix the logo on this, since I have put a lot of work into this, and would like to do that if possible (only if it's OK with Bambu).  I know that there are tons of designs out there with the Bambu logos, but I don't plan to add it to this without knowing they are OK with it.  I recall seeing a very reasonable logo policy at some point (possibly during the kickstarter), that (as I vaguely recall) probably would have allowed adding the logo to this, but I can no longer find the policy on their website (so don't quote me on that :D).  I'd rather not run afoul of Bambu, or give them a reason to take down the design (as unlikely as that would be), and clarity on their policy would be generally a good thing.
Update 10/12/2023: I emailed Bambu again to ask if they have any policy on using their logo in designs produced by the community and posted to sites like Makerworld and Printables.  I'm gonna give a couple more days to reply, since I really don't want to post the plain models if I can avoid it.  Having the logo helps to define what the box is for, which is a holder of spare parts for a Bambu printer.  I have some other ideas for designs related to Bambu printers as well, so knowing if they are OK with slapping their logo on community designs, is something I'd like to know.  
Update 10/19/2023: Very small update, but after no reply to my emails, I asked on Reddit (in case another maker had some insight, or possibly the Mods (who are Bambu employees), would possibly respond.  There was no leads there unfortunately, but it was suggested to open a case with them, so I have done that.  Depending on what their response is regarding using their logo on freely shared, user created models (in good taste of course), I will either post this without the logos or post it with the logos (which would be much cooler).  I should know something in 3-4 days hopefully.

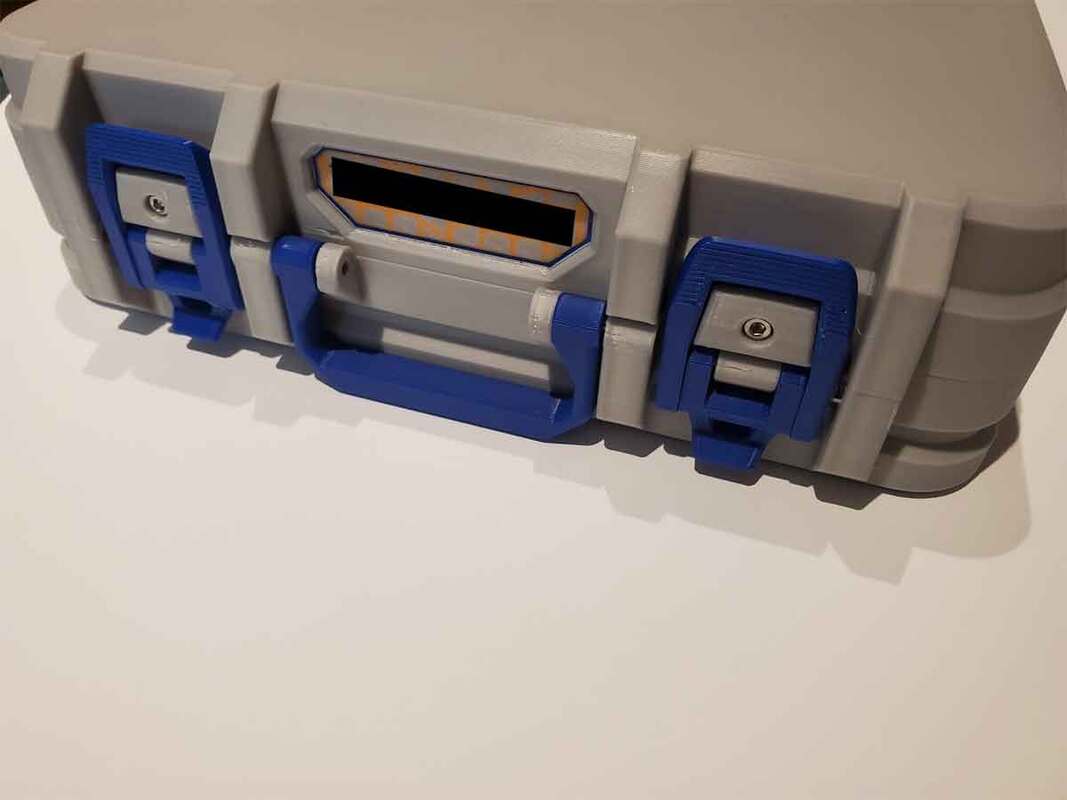
Update 10/22/2023: Bambu support got back and gave me the green light to use the logo on this design, so I will be uploading it later this week in all it's logo adorned glory!  
Update 10/26/2023: I finally finished the build guide, and am working on publishing the parts on Printables and Makerworld.  I will publish to Printables first and then import it over to Makerworld, since it's much simpler that way. 

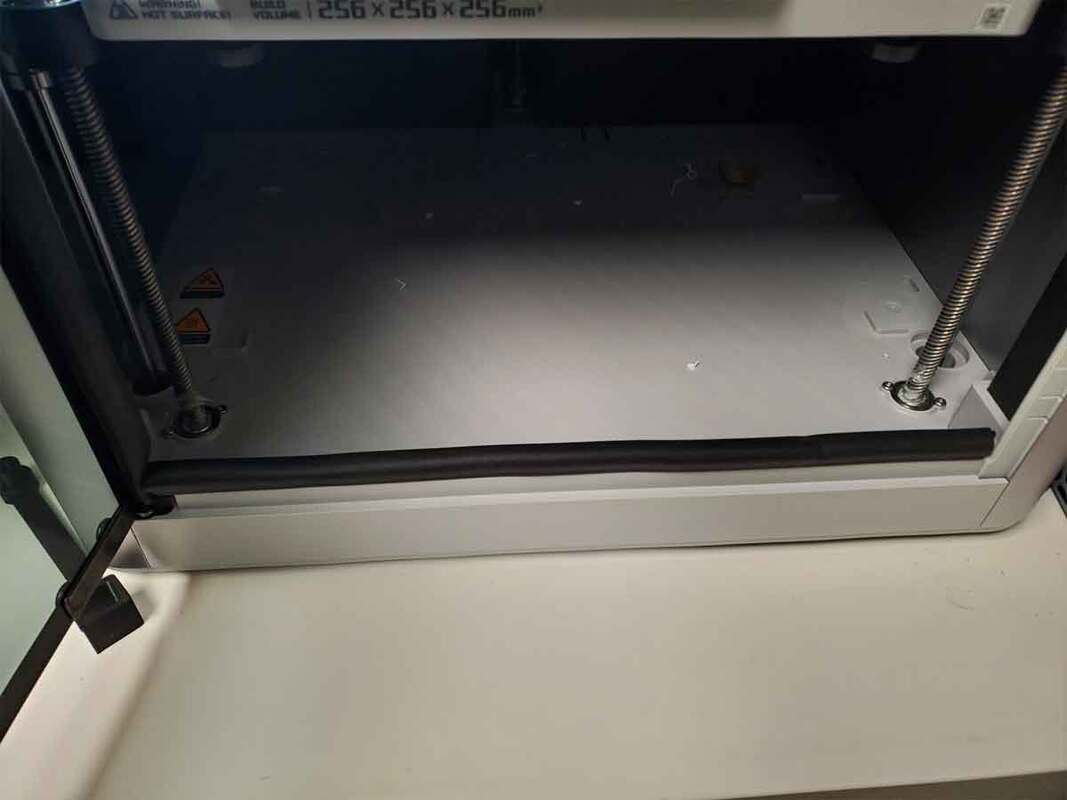
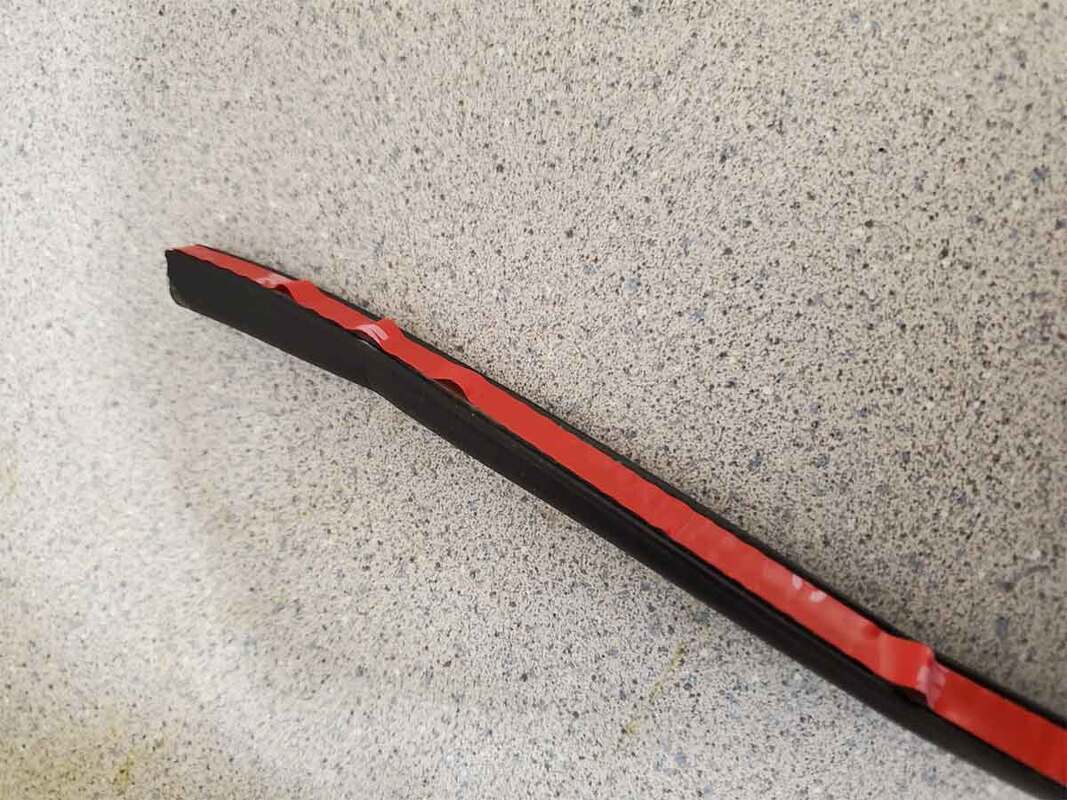
Update 11/11/2023: Well I guess I lied, it hasn't been posted yet because I've been working on some improvements.  The first is a gasket option, and the second will allow printing the whole model without supports.  Part of the second improvement is a new label design, which I'm just waiting for my printed to get freed up to test.  The gasket design is already tested and will be optional, since it requires being able to print TPU.  Once the new label design is tested and I'm happy with it, I'm gonna just say "no more changes", and work to get it read to post.
Update 11/12/2023: FINALLY!  It's published, you can find it here:
https://makerworld.com/en/models/62636​
https://www.printables.com/model/626897-bambu-labs-x1c-spare-parts-case-box-for-stuff

The build guide is also updated.
​
2 Comments

Got Some Stuff, But Not Everything...

9/16/2023

0 Comments

 
I received a few parts from AliExpress, which I need to complete the Marvin the Microparticle Machine Filter, and also the booster fan for the Bambu X1C.  However, I did not get the blowers for the Marvin project yet (tracking shows they should be here any day now).

The booster fan parts however are mostly accounted for, and I may have some extras of what I need lying around to test that project (now I just need to print it :D).

I also received some self adhesive gasket material, which I used to help seal around the door on the X1C.  It's not close to a perfect solution, and I know there are better ways to do this, but for now I think this will be OK.  I had to stick it on with it hanging about half way over the edge of the glass, but least I can no longer see light through the edges of the door.  Installation was a bit more difficult though, since it appears some lube must have wiped against the door sill at the bottom of the printer, so I had to clean that off before the stuff would stick.  The seal is also not likely necessary since there are many other larger holes in the printer which need to be addressed, but I plan to work on that one problem at a time.
Update 9/21/2023: The fans finally arrived, and even better, they fit the design, so no major changes will be needed.  I'm going to install everything and test it, before I can release "Marvin the Microparticle Machine" on Printables.
0 Comments

Bambu X1C has a (Temporary) New Home, But Now I Have AMS Bowden Tube Troubles

9/6/2023

0 Comments

 
Picture
Until I can get the parts to directly duct the X1C outside, I decided to temporarily evict my CR10S Pro from it's comfortable (vented and filtered) enclosure and replace it with the X1C.  That will take care of the annoying odors from printing, but it also required moving the AMS.  My enclosure is large enough to hold both the X1C and the AMS, but I would not be able to open the AMS. 

The AMS can be located a small distance from the printer (Bambu recommends no more than a 3.5m bowden extension), and the distance is not a problem for my temporary setup (it will be about 1m of bowden tube between the AMS and hub).  However the AMS bowden tube itself is a unique design, and an ordinary tube will not work.  The Bambu AMS bowden tube has an inside diameter of 2.5mm (and a normal 4mm outside diameter), while most bowden tubes are around 2mm for the inside diameter (or less).  A normal Bowden tube will cause too much friction, and the filament may not make it past the transition into a narrower tube as it leaves the AMS. 

Of course there is a solution, which is $9.99 plus $7 shipping...  It's more annoying that I could not think of any other spares to pick up while I was paying shipping anyway, but I need the tube to get the AMS back up. 

Update: The Bambu Bowden tube worked perfectly, and the AMS now sits atop the enclosure (for now).

0 Comments

Economical Filament Dry Boxes

9/5/2023

0 Comments

 
Picture
I've been using these plastic storage containers to store filament for a while now, and they work very well for most of my spools.  There are a couple larger spools (also 1kg) which are an uncommon wider design that do not fit these as well (they still work but are tight), but the vast majority of my spools do fit easily.  I've seen these below $20 for a six pack prevously, but they are currently pretty close to that at $21.29 after a $3 coupon.  They're hard to beat at only about $3.50 each.  They also come with a bunch of the black labels, a white pen which has an ink that washes off with water, as well as a measuring cup and some other parts which are not needed for what I use them for.  The only downside is not knowing what to do with all the extra measuring cups :D
0 Comments

My Take on the Bento Box (Work in Progress)

9/2/2023

0 Comments

 
Picture
I was looking at all the remixes for the highly regarded Bento Box, and it got me thinking of what design features I'd like a recirculating filter to have.  The remixes cover most of the things I'd want, but the more I looked at the remixes, the more ideas I had.  I thought I'd just see if I could make my own version of the design, and although it took several hours, I'm pretty happy with it so far.  Although this is a ground up design, it obviously takes a lot of inspiration from the Bento Box and the remixes.  That is, this is nothing new, just a different take on the idea.  The key points which I wanted to achieve with the design are:
  1. Bigger fans, specifically 5020 blowers.  There is one potential monkey in the wrench though, which is that the fans I bought are GDS Time GDB5020 24V blowers, which are open on both sides.  I hope they will work in both orientations, or I will have to re-work this.  Update 9/4/2023: I decided to use some 12V PWM (4wire) 5020 blowers instead, since I can easily control the speed.
  2. A bigger HEPA filter.  I wanted a larger filter, since it should allow better flow.  I already had these on hand from another project (I was working on a nevermore clone, which did not get out of the gate).
  3. A switch and DC jack.  Most implementations of the Bento Box seem to be hard wired, but I thought it would be more convenient to have a DC jack, so the unit could be removed when swapping the filters.  A switch is also handy of course, and there are Bento Box remixes which incorporate one as well.
  4. Fewer compartments, and no magnets.  Although I have never seen a Bento Box first hand, the method of keeping the tiers together is through small magnets.  I have nothing against magnets for holding lids and things, but I just prefer not to use them as a part of a structure, though the way they are used in the Bento Box does make things convenient.  This design uses two compartments, and a pair of draw latches (updated) to hold it together (the latches are a scratch design and are not yet tested).
  5. A groove to help seal the compartments.  Instead of a flush fit between compartments, there is an overlap between them, which should help with keeping the whole thing together and provide some structure.  Sealing is less of a concern with a recirculating filter, but it should help with that as well.
  6. A removable carbon tray.  Some of my other filter designs use a removable carbon filter, and it's handy for keeping the mess down when refilling it.  It's not essential, but a preference and since I was going to the trouble I added it.
  7. Some room for possible additions.  The fans and electronic components are housed in a tray, which should make assembly simple, but it also gives some options for upgrading in the future, since there is a bit of extra room.  Possibly a temp and humidity sensor with an ESP32, or some sort of smart switch would fit?  I'm not planning that currently, but it's cool to have the space.
One item not on that list, which I thought of while making this, was to have it print without supports.  Generally I try to consider printing and this was no different, it's just a complex design.  So unfortunately some supports will be needed, but they should be minimal, and the rough support contact areas will mostly be hidden. 

I'm currently waiting on the fans from China, so I will update with pics as I get it printed and tested.

Update 9/2/2023: I decided to use a normal draw latch design, which will use M3x20 and M3x30 mm screws.  The latch is untested, like this whole thing, so it will be a while before there is another update.

Update 9/3/2023: Just one more quick update.  After seeing the way the design has a "face", I'm thinking of naming it "Marvin the MircoParticle Machine".
Update 9/4/2023: Ran some test prints to optimize the draw latch and confirm the sizing for the filter pocket.  Also ordered some PETG so I can print some tests.  The parts so far are run in PLA but PETG is what I plan to use for the final print.  I also decided to pick up some 12V 4wire PWM 5020 fans since they can more efficiently be controlled.  I picked up a simple PWM controller as well, which will take the place of a switch (though I plan to have models for a switch controlled version as well since it's already modeled).  I'm also considering a few other additions which will not be part of the main design and may come later as a remix or optional update.
Update 9/8/2023: I decided to go ahead and run some parts off, even though I'm waiting on the fans and the PWM controller.  Probably a good thing I did, because I found a few issues with the fit on some parts (too tight) and also a potential problem with where I placed the DC input, and interference with the printer.  There is only one place this can go in the Bambu X1C, and that is on the back right corner, and this does fit.  However I had to move the DC input to the top of the filter, and added some additional cable management.  It was also clear that some sort of mount would be needed, and so I just modified the base to make it into a sort of cradle.  I will probably run some more parts off later this week to test again, but it's not all bad news, I think with some minor changes I can use the prototype with my Voron, or certainly with the CR10S Pro, when it goes back into it's enclosure.  I also forgot to print the mesh in the outlet area, though I think I like it better that way, so I may just leave it open in the final deign.  The first pic shows the design I'm planning to use with my Bambu X1C, the rest are all the prototype which was printed to test fitment of the parts:
9/12/2023: I think I fixed the issues with the first prototype, and I will be printing the updated models this week.  But I'm still waiting on the PWM controller board, and fans, so there will be some more work once they get here.  Below are some pics showing the tree supports necessary for the top part (unfortunately quite a bit of them), and also a pic of the top cover where the PWM controller will be located (on the Bambu version).  There will also be a version of the top which is closed, and will have a simple on-off switch on the right side, as well as a version with a vented top cover, and a PWM knob on the right side.  
Update 9/15/2023: I'm still waiting on parts from AliExpress, but have made a few minor changes in the meantime.  The fitment is improved since several parts were difficult to install previously.  There is also a base which acts as a sort of cradle for the filter, so it should keep it in place, but also make it easy to remove to swap the filters.  Finally, there will be a fuse holder added.  I know that some folks will think that is being too cautious with just a 12v fan, but I've had fuses in my printer filters since I designed the first one for my enclosure, so why stop now :D  And it's a good idea, considering I run the filters quite often.  

I'm also really liking the latches, and already have some ideas to use the same draw latch design in some other projects.
Update 9/22/2023: I was able to test the 4wire 5020 fans work (in parallel) with the PWM controller.  There were some areas which I found needed some fine tuning in the design, and I also added some "quality of life" improvements for assembly.  I added some 2 wire WAGO holders which will take care of the 12v power wires and fuse connections, though there will be some wire splicing required for the fan wires, can't get around that.  Though instead of soldering, I plan to use some heat shrink solder connectors to join the fan wires together into a single fan connection. 

I found that the pre-wired fuseholders I ordered are poorly assembled, so it's almost impossible to remove the nut that is used to secure them.  I also broke one of the poorly soldered wires off one of the holders, and another shattered when I was trying to remove the nut (which was my fault, but still sucks).  So I'd not get the pre-wired fuse holders again, and instead would get the type that require soldering some wires to.  However, I was able to get my pre-wired fuseholders to work (after finally removing the nut), and also threaded the hole they will go into (with an M12x1mm thread).  I also made an allowance for the wires to pass through, in case the pre-wired holders are used.  It's a lot of work for a fuseholder, but I think it's worthwhile for something they will be running for hours.  

Although everything was just temporarily connected together for testing, I was surprised how powerful the fans are.  I did not have the carbon container filled up, but even just blowing through the HEPA filter, they move air pretty well.  I think having the ability to fine tune the airflow using the speed controller is going to be very useful too.  I would not call the fans quiet, though they are not too loud either, and having the ability to turn down the speed, also turns down the noise.  Overall I am really pleased with the performance so far.  

I'm running some further full function parts now, and if all goes well, I hope to have the model built this week, so I can run it for some longer tests in the X1C.
I printed the parts and found there is an interference issue with the floor of the printer (it has a raised L shaped area which would be under the filter).  The fix was easy, but then I decided to change a few other things, and am printing the changes now.  Once I get it printed, I will install it and test it.
Update 9/23/2023:  I worked out the interference issues with the base, and have placed the filter in the printer.  It fits OK, and I ran the Z axis up and down several times, and did not feel like it was going to hit anything, but it "looks" close.  I think I can gain a couple mm by modifying some simple things, so will try that first, but it may mean re-printing the cradle (again - this is the 4th time)... I will get back to this next week and hopefully have the design finalized.
Update 9/29/2023: I made some changes to the design which provide extra clearance inside the printer, but those will require significant parts to be reprinted.  I will probably use the version you see in the pics above with my Voron, but for now still plan on testing it inside the X1C (until I get the updated parts printed out).  I have also received an extension cable for power (since I don't want to cut up my power supply cable).  I also remixed Rob the 3D Printing Dad's Power Cable Guide for the BentoBox, to fit a thicker cable (and also trimmed 2.5mm from the length, so it would fit better in the X1C).  I need to install all that stuff and then run some tests, but so far it has been working sitting outside my printer (in the enclosure).
Update 10/5/2023: The updated parts are now getting some printer time (now that I'm done testing parts for my Bambu Spare Parts Case).  I had planned to get the filter out first, but it was just easier (and more fun) to build the parts case, so that's what I did. 

There will be some extras in the revised design, but I may release it without the extras if the parts don't arrive soon (they will be an easy upgrade though).  I'm probably just gonna print and test enough of the revised design to verify there are no interference issues, since otherwise I'd need to tear apart my perfectly good filter to scavenge the fans (since I have another pair of those "4 wire" fans on order).  The revised design has only a few changes which are mostly under the surface, so what works in the previous design which I printed, will work in the updated one as well.

Update 10/12/2023: I received some of the parts for the final design, which were not a show stopper, but good to have.  Unfortunately the LEDs (RGB 12v) did not ship with the plastic holders, but the seller is going to send them along.  In the meantime, I designed my own 5mm LED holders using the same dimensions, which I will try and use.  I also received some 2 conductor 20AWG zip wire, which I need to properly install the filter in the printer.  I'm hoping to get some printer time this week so I can wrap this project up and finally post it.
Update 10/13/2032: It took a couple hours, but I think I have the assembly instructions and BOM mostly completed.  The instructions are here.  It is really not as hard as it looks to build this, but I wanted to cover as much of it as possible.  The instructions are 90% done, but I still need to test a few things, and I want to add some information on wiring it through the printer enclosure.  Looking at the BOM though, I can see how this will not be for everyone, though many of the parts are things that folks with printers may have around anyway (or good to have at least).
Update 10/19/2023: I have used this a few times and noted that the fans in the filter create a noticeable vibration in the sice of the printer.  I don't think it affects prints, but it's something I'd like to minimize.  I need to think about this a bit, maybe some foam or TPU buffers would help...

Update 10/23/2023: A simple TPU base may help reduce the fan vibrations, at least that's the hope.  The pics show a pad design that the "cradle" sits on.  The pad is going to be printed in TPU, with the dark blue area being printed as infill only (no top or bottom layers).  That should produce a vibration reducing base for the filter to sit on, with enough support if the infill density is high enough.  I'm thinking 20% Hexagonal infill will work (see pics).  I will need to dry some TPU and test this, which should be possible to do later this week.
Update 1/22/2024: Well this sort'a stalled out, which is unfortunate, since I've been using the prototype for months now without problems.  The prototype which I have been running in my X1C is identical to the final design, aside from the chamfers on the top (which are there to maybe lessen the chance of a bed strike if it were not placed fully in the cradle) and the backlight LED's (which were are superfluous anyway).  I really like the fact that I can adjust the speed of the fans using the knob, which I tend to set at around 50-75%.  What's held this back from being posted are a few things, but mostly not having the time to write up a build guide, and the fact that I need to make another one just to do that (since I did not take enough pics of the prototype).  I also did not get around to printing the TPU base, since I was looking for a softer TPU to use for it, and gave up when I could not find any at a reasonable price (soft TPU is expensive).  I then had the idea to make a foam insert since that would be more cost effective, but never got around to trying it.  So it's again the problem of too many projects and not enough time.  This is not dead, it's just on ice until I get the time to write up a decent build guide, build some 3MF's for the multicolor prints, and maybe work on a base with a foam insert (though I may just post that as a remix).  Fortunately, this is a pretty obscure corner of the Interwebs, so I don't think anyone is missing that it's not posted lol.
0 Comments

2nd Try at Makeing a Filter For the Back of the Bambu X1C

9/1/2023

0 Comments

 
Picture
I found some filters, which I have been using in my ducted enclosure, and I think they may work with the X1C as well.  With the ducted enclosure, they simply do a quick filter before the air is vented outside, but they are marketed as HEPA.  These filters are larger than the hole for the chamber fan outlet, but it should be no problem if the filter housing extends lower than the fan outlet (since there is nothing there).  The additional surface area may help with allowing more flow through the filter too. 

The issue with the filters I used for the first try, is that they offer too much resistance (though they are nice filters if used with a powerful enough fan).  The filters I'm using for this 2nd design are thinner, and probably not as efficient, but if no air can pass through a filter, it's not doing anything anyway.  I think the lack of airflow through the first filters I tried is why there was a notable smell when printing PLA as well as ABS, since the air was not getting filtered, but rather backing up and probably just blowing around the filter or not making it through at all.  There is no carbon component to this new filter, though there is a small carbon filter inside the printer (which is not sufficient in my opinion).  So this is not perfect, but I hope it will do. 

This design was much easier to create, since I did not go overboard with the extra details this time.  But it will still have the option of printing with 2 colors to highlight the hexagon inlay pattern.  If it works well enough, I will post it up on Printables.
Update 9/3/2023: This works better, but I can still smell the PLA cookin.  I don't think the built in carbon filter really does much either.  This maybe the best that I can do with the stock fan setup.  I may post this later.  (edit 12/29/2023 - it did not work after additional testing.  There was not enough static pressure to move much air through even this thinner filter).
Picture
0 Comments

Steel Sheet Organizer Remix for the Bambu X1C (Posted)

9/1/2023

0 Comments

 
There is a really cool design for organizing and storing the steel bed sheets on Printables, but it's for a Prusa so it's a bit smaller than required for the Bambu X1C.   The design looks great, but then I found a remix (also for a Prusa), which may improve the mechanism.  There are other remixes designed for the X1C, so why bother making another?  I wanted a few things, which were not available:
  1. Will use the see-saw mechanism from the remix here.
  2. Has to fit the X1C sheets
  3. I want to assemble the sides fully using the M3 nuts and screws, and once they are together, it will have holes for using #8 screws to mount it to the underside of a cabinet.  I don't want to use the mounting screws to hold it all together.
  4. Have split models which will allow printing the parts in fewer batches.

I think the model I am printing now, checks all those boxes, and I also added some text to the bottoms of the split parts to indicate what the are (since it gets confusing with all the parts).  If these work out, I will post it as a remix.
Update 9/3/2023:   

​This is now posted to Printables here:
https://www.printables.com/model/571794-steel-sheet-holder-with-seesaw-eject-button-mechan
​
0 Comments
    Picture

    Stoopid Me

    Welcome to my Stoopid corner of teh Internet.  It's mostly gonna be 3D printing stuff, but I also post some recipes, projects, and the occasional rant here as well.  More Stoopid stuff is updated regularly.

    I recently joined the Amazon Associate program, so some of the links on this site are Amazon affiliate links. This means that, at zero cost to you, I will earn an affiliate commission if you click through the link and finalize a purchase.  This will help to support this site, and pay for more Stoopid Stuff.

    Currently, there are no active authorized sellers of my designs.  If you see my stuff (such as my Dummy 13 Weapons) for sale on Amazon, Etsy or AliExpress, the seller is using my designs without permission.

    If you want to help out with my parts and filament budget, you can also "Buy Me A Coffee" using the link below.
    ​​

    Buy Me A Coffee

    Archives

    March 2025
    February 2025
    January 2025
    December 2024
    November 2024
    October 2024
    September 2024
    August 2024
    July 2024
    June 2024
    May 2024
    April 2024
    March 2024
    February 2024
    January 2024
    December 2023
    November 2023
    October 2023
    September 2023
    August 2023
    July 2023
    June 2023
    May 2023
    April 2023
    March 2023
    February 2023
    January 2023
    November 2022
    October 2022
    September 2022
    August 2022
    July 2022
    April 2022
    February 2022
    January 2022
    December 2021
    November 2021
    October 2021
    September 2021
    August 2021
    July 2021
    June 2021
    May 2021
    April 2021
    March 2021
    February 2021
    January 2021
    December 2020
    November 2020
    October 2020
    September 2020
    August 2020
    July 2020
    June 2020
    May 2020
    April 2020
    March 2020
    February 2020
    January 2020
    December 2019
    November 2019
    October 2019
    September 2019
    August 2019
    July 2019
    June 2019
    May 2019
    April 2019
    March 2019
    February 2019
    January 2019
    December 2018
    November 2018
    October 2018
    September 2018
    August 2018
    July 2018
    June 2018
    May 2018
    April 2018
    March 2018
    February 2018
    November 2017
    September 2017
    August 2017
    June 2017
    December 2016
    October 2016
    September 2016
    July 2016
    March 2016
    February 2016
    September 2015
    August 2015
    June 2015
    May 2015
    April 2015
    March 2015
    February 2015
    January 2015
    December 2014
    November 2014
    October 2014
    September 2014
    July 2014
    June 2014
    May 2014
    April 2014
    March 2014
    February 2014
    November 2013
    August 2013
    July 2013
    June 2013
    May 2013
    April 2013
    March 2013
    January 2013
    December 2012
    November 2012
    October 2012
    September 2012
    August 2012

    Categories

    All

    RSS Feed

Powered by Create your own unique website with customizable templates.