My Stoopid Stuff
  • Home
  • Projects
  • Blog
  • Lec'tronics
  • Links
  • CNC
  • Quick Recipes
  • 3D Printer Tips
  • Voron 2.4

Cool Stocking Stuffers - Boruit V3 Flashlight

10/28/2022

0 Comments

 
Picture
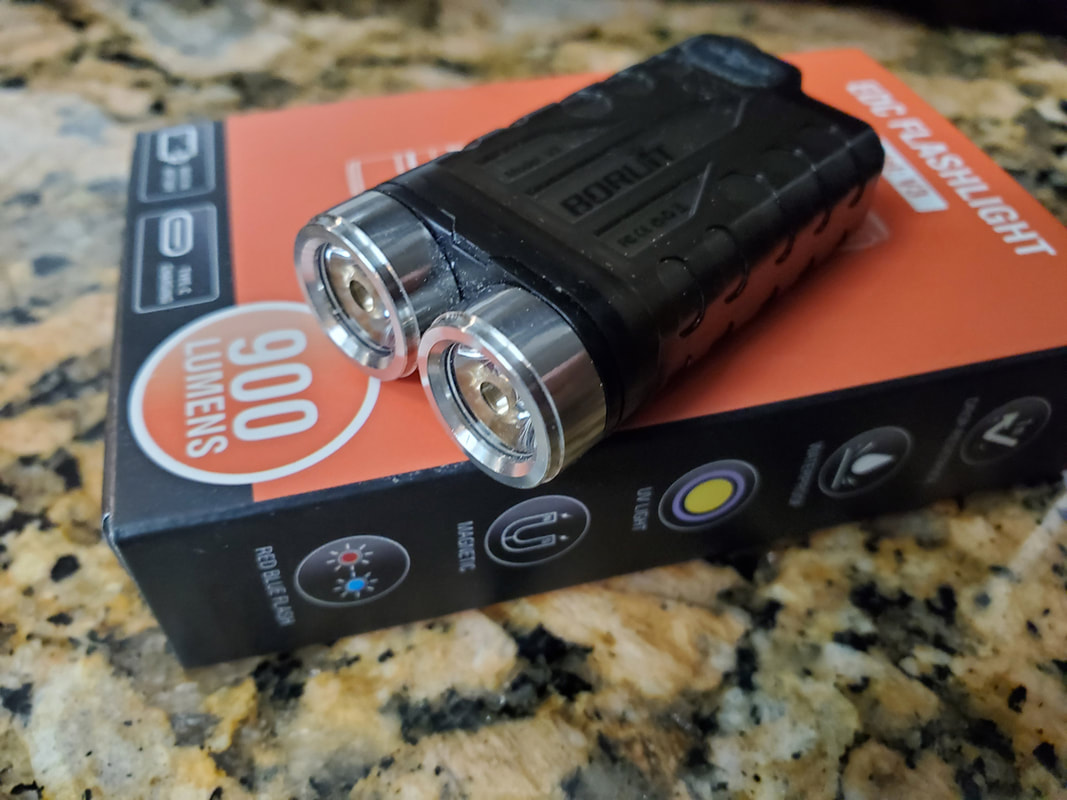
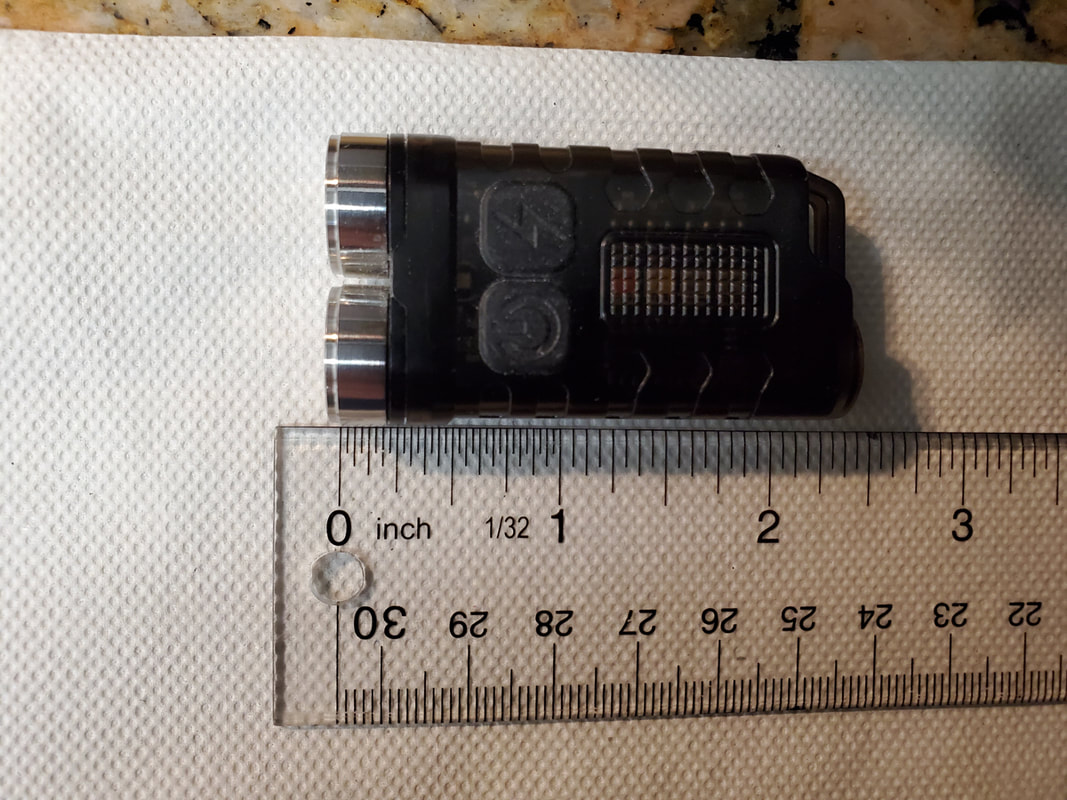
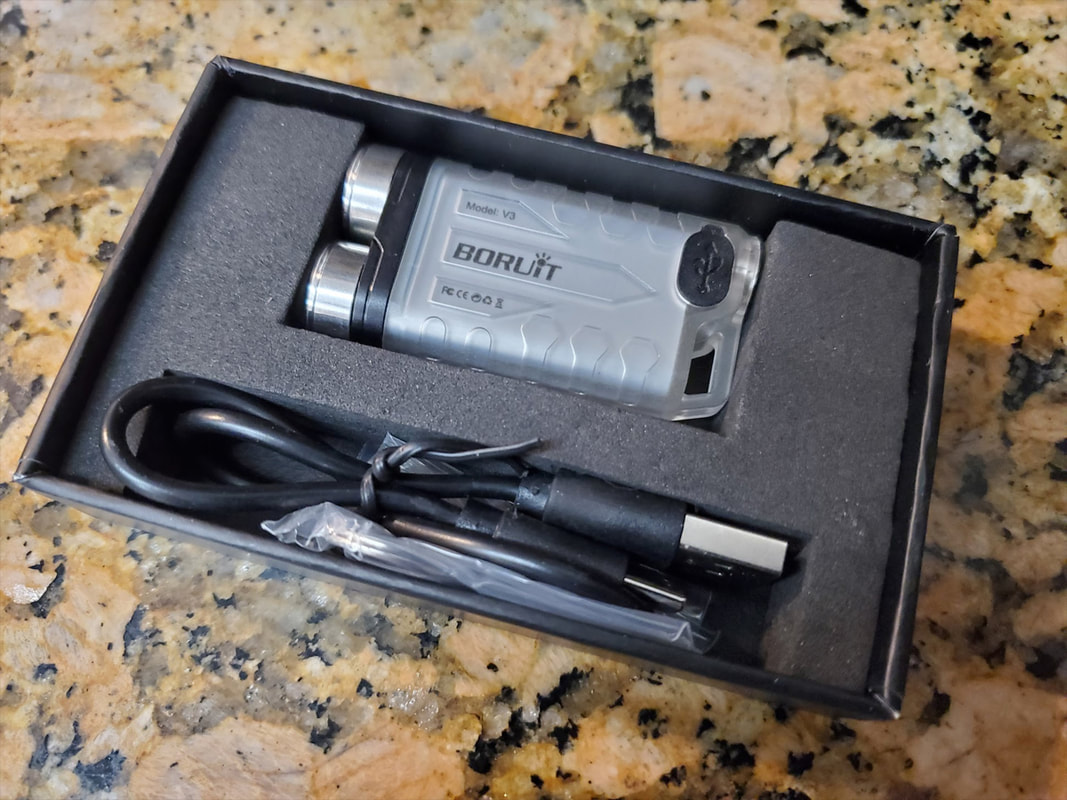
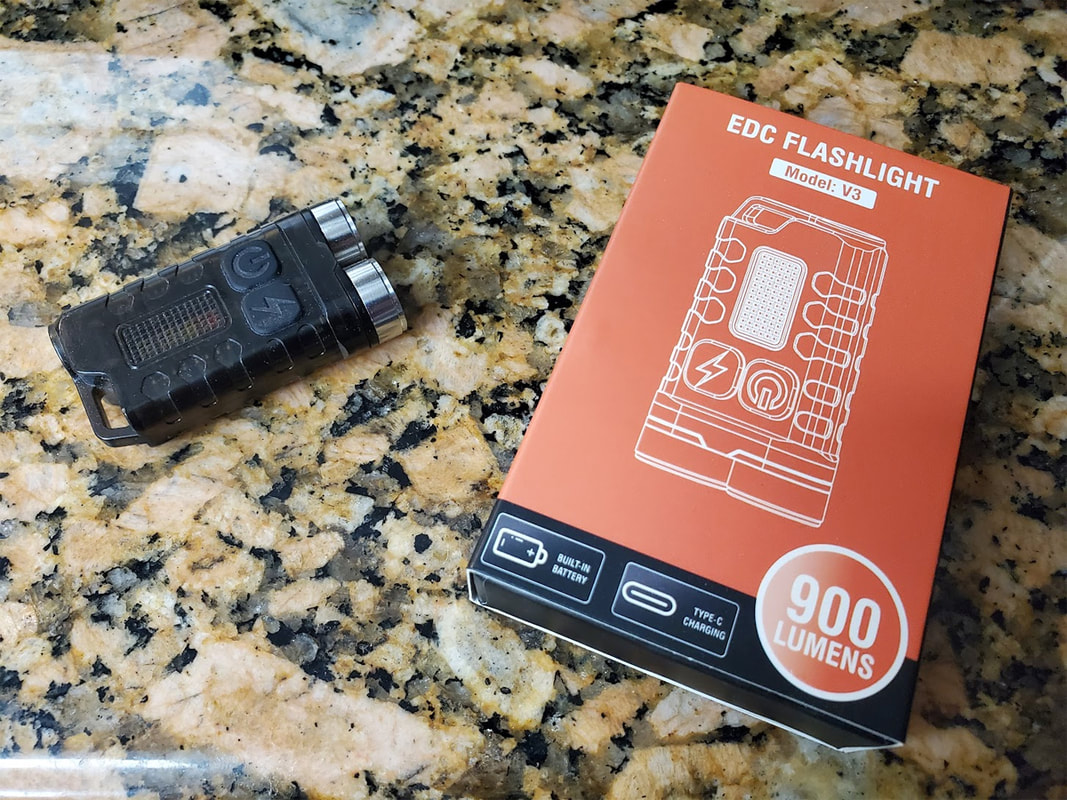
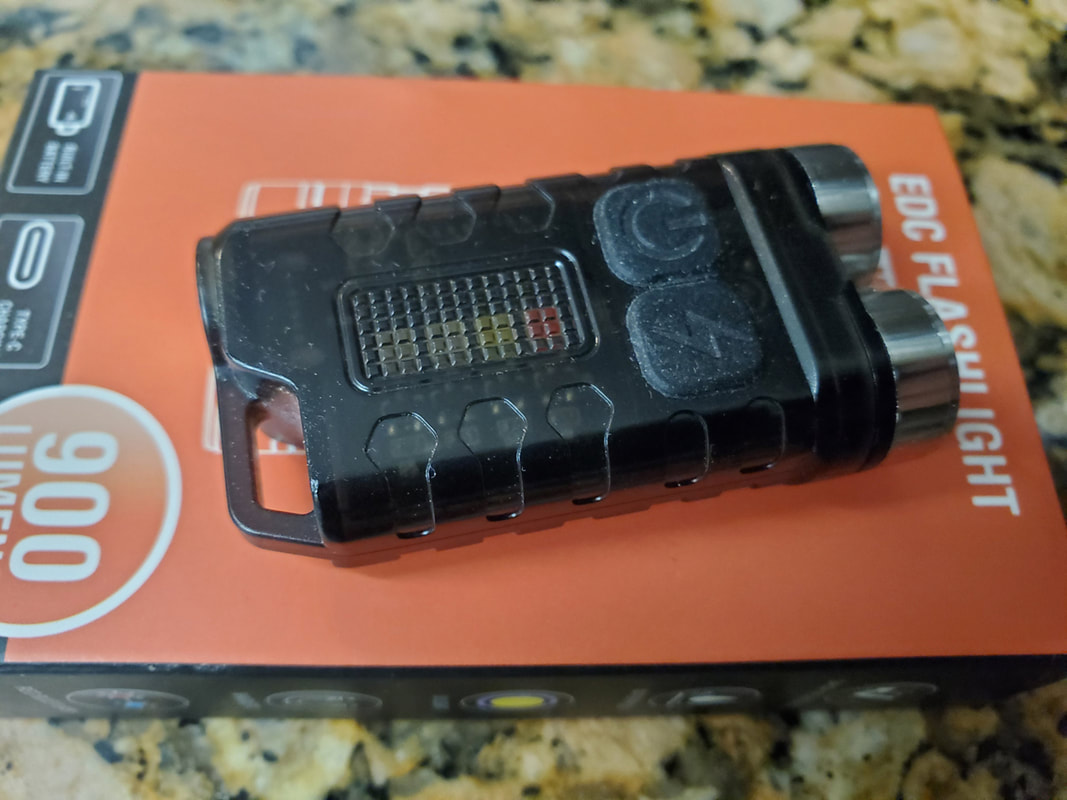
I picked up a couple "Boruit V3" 900 lumen flashlights from AliExpress recently, and was so impressed with them, that I ordered several more as I get ready to assemble some gifts for Christmas.  I'm of course gonna keep a couple of them since they are super handy for being so small.  I've been using the black light shown in some of the pics (pardon the lint) almost daily, and also tested the clear model as well.  Being so small they are easy to keep loose in a pocket even without a keychain, which makes them my most used light.  I may design and print a small clip so it can mount on the bill of a cap though since that would be the only thing to make it more useful.

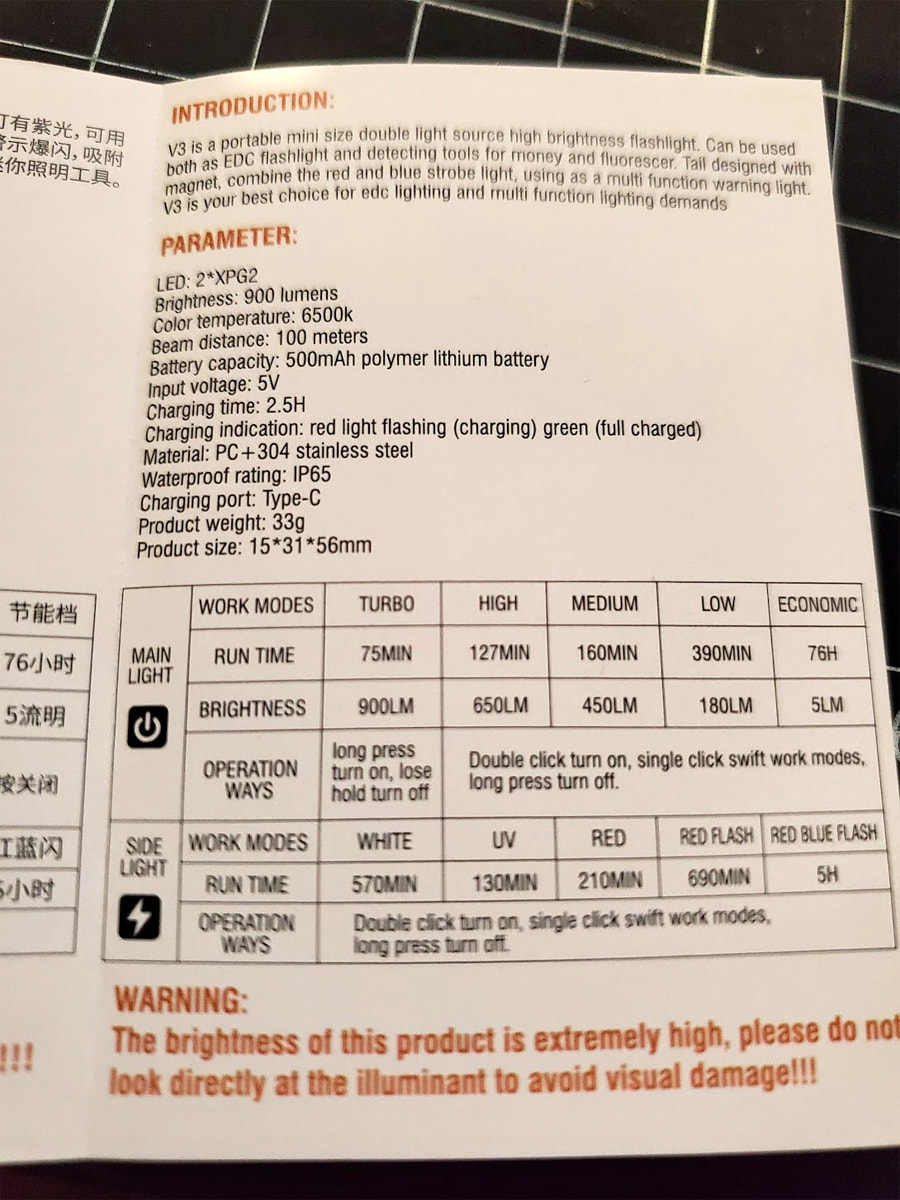
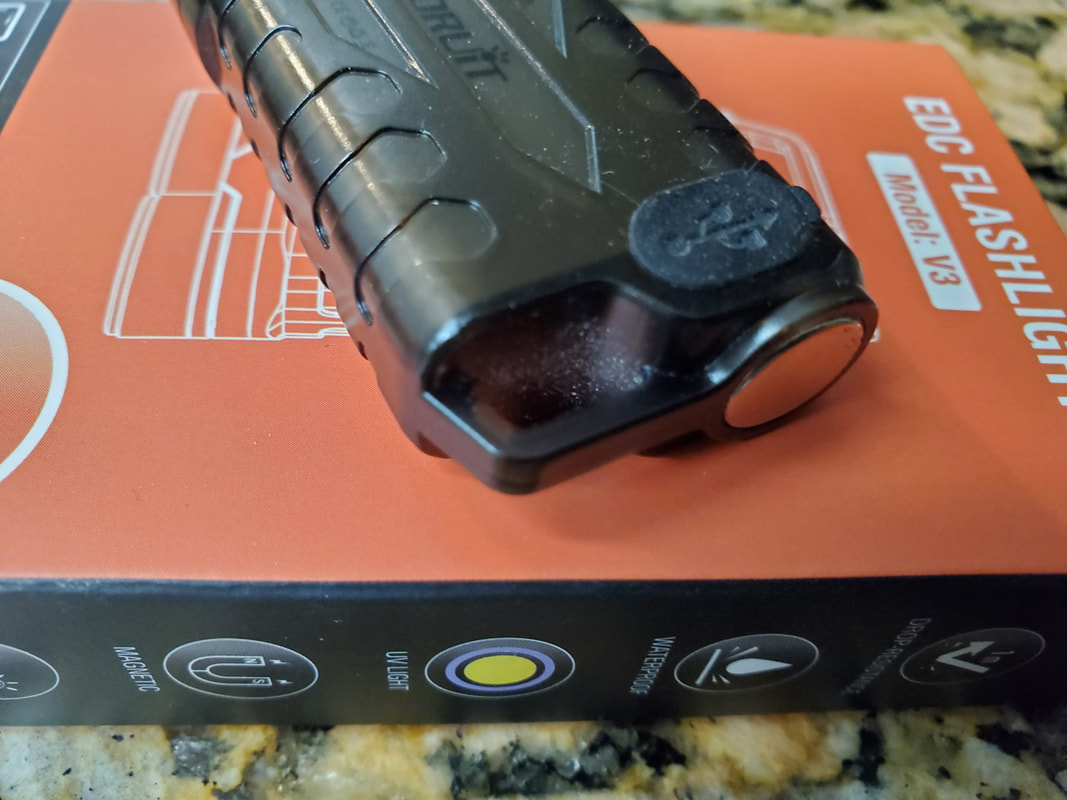
These lights use USB-C to recharge, and include some side LED's (white, UV, red, red flashing and red/blue flashing modes).  The side modes are a lesser used so it's cool that there is a separate (right side) button to control them, while the main LED's have just four modes from high to dim (controlled by the left button).  For some reason the manual claims there are 5 modes on the main LEDs, but there are only 4 (which is plenty).  The UV LED is modest but it does work.  It may struggle to find scorpions with it from more than a half dozen feet, but will work to check out UV security features or printing.  The butt end has a neodymium magnet which tends to grab anything within reach and glom onto other items on a keychain, but is a nice feature.  I have not tested the water resistance, which they claim is IP65, so I'd not plan to dunk it.  The USB port has a rubber cover but I don't know how well it would hold out water.  It should be fine in the rain though. 

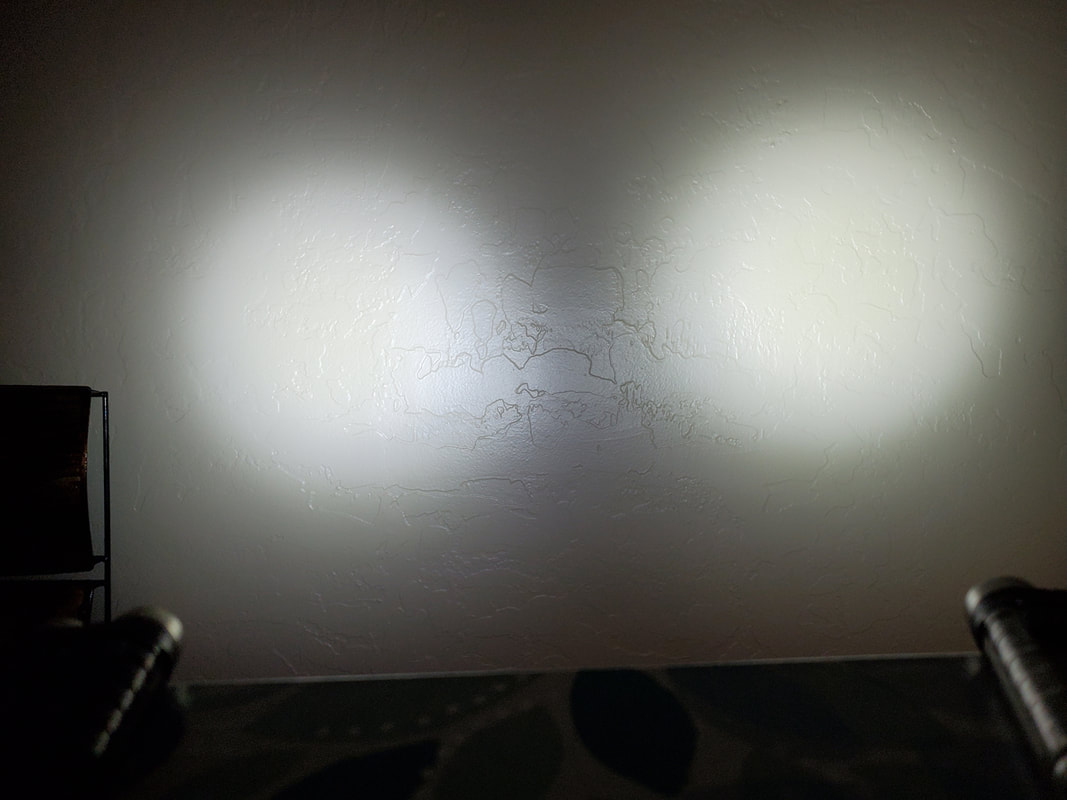
Since buying the first couple lights, I have received a few more which are destined as gifts, and while testing them I noted that (on high) the black version is a bit dimmer than the glow in the dark (GITD) / clear version.  This was consistent across several I tested.  But what was a bit concerning is that the clear version (which seems to be brighter on high) also gets hot after running on high for about 5 minutes.  I never really noted an issue with the black version getting hot while running on high, so I suspect that the GITD/clear versions, which I received may run the LED's at a bit higher current for some reason.  It is almost like the GITD/clear version starts up in a turbo mode compared to the black version.  Unfortunately the 2nd brightest mode on the GITD/clear version is probably 25% less bright than the high mode on the black version (but it stays cool).  Therefore stepping down a notch on the GITD/clear version will not really equal the normal high mode on the black version - but the 2nd brightest mode on the GITD/clear version is plenty usable.  So in a nutshell, if you tend to use a light on high for more than 5 minutes at a time, then the black version is probably a safer bet.  If you want the brightest light but don't mind stepping down to the 2nd brightest mode for normal use, and like the fact the light will glow in the dark, the GITD/clear version would be a better pick.

Runtime is good with at least 80 minutes for the black version on high (and it did not get hot), and the same time for the GITD/clear version on the 2nd highest setting, which also remained cool (they could have run longer but I shut them both off at 80 minutes).

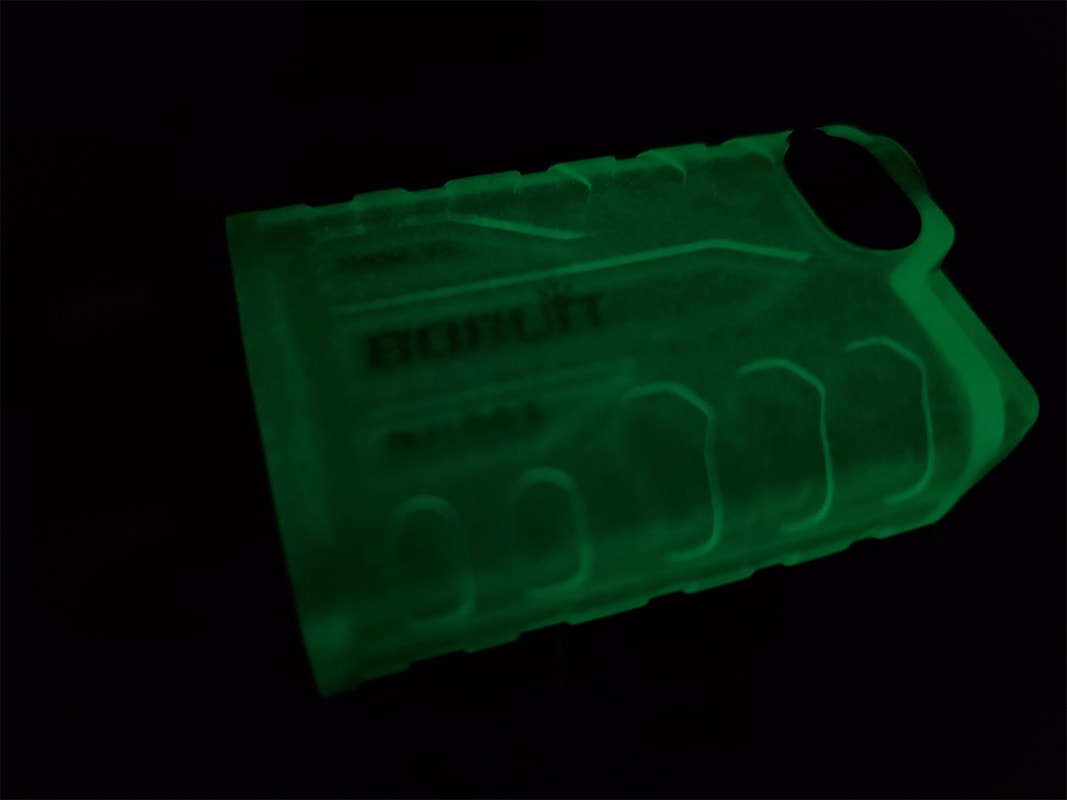
I think both lights have their use, but the one I keep in my pocket is the black version.  I wish it were glow in the dark but that is honestly not something I would use much anyway.  I prefer to just turn on the light and use it without worrying about the light heating up.  Being mostly plastic, I doubt the LEDs will have much in the way of heatsinking, so if using the GITD/clear light, it makes sense to stick to the 2nd highest mode normally and only use the highest mode occasionally.  Below are some pics of the lights including one beam shot of the high modes of the black (left) and GITD/clear lights (right) and one of the GITD/clear light after being charged up with a flashlight for a few seconds so it would glow (I adjusted the image to appear close to how it actually appeared).  Pardon the pocket lint.

If you pick one of these up for Christmas gifts, it would be good to order soon if buying from AliExpress (since it can take several weeks to deliver).  Amazon also sells them but expect to pay more (but you will of course get it sooner).

I have some more lights from AliExpress, which I have received in the past couple days and will post reviews for them as well.
0 Comments

Cool Stocking Stuffers - AliExpress 6 in 1 Multifunction Tool Ballpoint Pen Reviews (Plastic and Metal versions)

10/27/2022

0 Comments

 
Picture
I bought several "6 in 1 metal pen Multifunction Tool Ballpoint Pen(s)" from AliExpress to give as part of several Christmas gifts this year, along with some flashlights which I will post a review on later.  I found out (unfortunately) that there is a metal version of these pens, and a plastic version (which I would term a cheap knock off).  The metal version is all around better but it is unfortunate that most sellers seem to offer the plastic version for almost as much.  Although both versions look very similar there are some differences, such as the clip, and also the fact that the metal version has shiny silver (chome plated metal) threads where the back cap screws on, while the plastic version is just painted plastic threads. 

I checked the accuracy of both pens and found the following:

METAL:
metric scale 0-70mm (measured 70.31mm)
inch scale 0-3in (measured 3.014in)

PLASTIC:
metric scale 0-70mm (measured 70.52mm)
inch scale 0-3in (measured 2.991in)

The bubble level is much easier to view on the metal pen vs the plastic pen, probably due to the metal pen being silver inside the barrel vs the black plastic of the plastic pen.  

The screwdriver on the metal version seems to be actually usable, while the plastic version has a lot of play and uses a magnet to hold the bit in.  It is a bit difficult to extract the bit on the metal version but there is very little play and it feels solid.  The cap that goes over the screwdriver bit (which has the rubber tip) is much easier to replace or remove on the metal version thanks to more precise threading of the metal vs. plastic.   Getting the cap back on the plastic version takes a bit of effort but it does go on. 

I did not test the rubber stylus but there is little difference between the plastic and metal versions so there will not be much difference there.

I initially thought the cross hatched part of the pen which is held between the fingers on the metal version would be less comfortable than the plastic version, but did not find that to be the case.  The texture is smooth, and not bad for writing with.  The plastic version has a similar but less pronounced texture which is just as comfortable to use (possibly slightly better being plastic which will not get cold or hot if left in a car).  It is possible to switch the silver textured part which holds the ink cartridge between the plastic and metal versions as well (so a pen with a metal body could be assembled using the silver plastic cartridge holder from a plastic pen).   

There are some other minor differences between the plastic and metal versions (such as the length of the parts).  Overall the metal version is much higher quality in almost every way.  The only improvement would be to add a magnet to hold the bit (which is held by friction from an o-ring which works really well).

I purchased the metal version here, and the plastic version here.   I have not purchased these from Amazon but these appear to be similar though shorter aluminum (metal) versions at Amazon (which is sold as a pack of 6 pens), and this one appears to be the identical (metal) version to what I bought from AliExpress.  Aside from asking the seller which type they sell (plastic or metal), the biggest visual difference is the clip, which on the plastic version is mounted to the side of the barrel.  While on the metal version, the clip mounts like a washer between the barrel and the threaded end piece which holds the screwdriver.

Below are some pics for comparison (metal is on the left and plastic is on the right).
I did not receive anything for writing this review, just posting some observations on a cool stocking stuffer I found.
0 Comments

OV5640 USB WebCam Review

10/7/2022

0 Comments

 
My search for the perfect "NozzleCam" for my 3D printers continues... but I could be close.  The postman delivered a OV5640 USB Webcam which I previously ordered from AliExpress.  I had a feeling the model I purchased could be a problem, since it has autofocus.  In any case I did some tests with it and it does work with the Raspberry Pi, and the minimum distance where it can focus on an object is about 40mm in front of the lens.  The autofocus is pretty slow, hunting and missing a lot, and I think it will have a problem as a nozzle camera.  Further, the driver does not support disabling the autofocus and manually setting the focus (some of them do).  After testing, I ordered another fixed focus model which will be several weeks to arrive.

​This highest resolution at which this camera supports 30 fps is 1920x1080 (which I think will be fine).  The maximum resolution is 2592x1944 at 15 fps.

​Below is the output of "v4l2-ctl --all --device /dev/video0" the area highlighted in white is where it would show if the camera supports any focus control options (but there are none listed).  It's a bit of a bummer since this driver seems to be the same used for most of the modular type USB webcams I have found, even the 4k models.  Hopefully a fixed focus camera will work better.
Picture
In the pics below, you will see my very poor setup, since I just wanted to test the closest distance the object could be, and still be in focus (about 40mm). The other pics show the module and the cable, which was included.  The module is quite small and compact and gets warm (while the camera gets hot).  I would probably try and heat sink the camera, and possibly the board if using it for a nozzle camera.

I will update this post again, with hopefully a better test setup, when I get the fixed focus camera (which is also an OV6540).
I set up a temporary test on my printer to get a more real world pic of the nozzle with this camera.  It seems to work, and I think if I can get the fixed focus version (which has a slightly narrower field of view), it may work.  If not I will test a 100° camera.  Also yes, this nozzle is very dirty, I am gonna clean it now and fix the boot (to boot).  This is positioned roughly where my old endoscope camera was positioned but in line with the BL-touch probe (so it is far enough away from the nozzle that it should not get overheated hopefully).  The camera will need to be moved up and angled downward more to work properly, if I ran the printer like this the camera would hit the bed before the nozzle (this is only a test).  The image quality is not spectacular, but it will do.
Picture
Yeah I know, fellow OCD'ers, this nozzle is screaming out to be cleaned, don't worry it will be.
0 Comments

Another Skirt Remix For the Voron - LCD Case Mod

10/7/2022

0 Comments

 
Picture
Picture
The LCD Case Mod by "Spaghetti-Bolognese" on Github adds a small button over the E-stop button (among other things).  It looks like the Voron design has changed a bit since that was made however, since the screen now has a bezel which covers the screws.  I wanted the button however, so I remixed the model and used the Voron R2.4 STEP files ​to make two versions.  One fully covers the scree bezel (which was a bit of a hack), and another version is pretty much stock, aside from the button.  Both will require some more supports, and I will not post them until I can test the files.  I plan to print and use the fully covered screen version since I have zapped too many things to count, and previously had to replace the screen on my delta due to zapping the metal screen bezel.

Update 10/8/2022: Printed the base and it looks good, the button operation works well so I think it should be good (but I still need to print the bezel).
Picture
I made a change to the version which covers the metal bezel, it will now print flat, as nature intended.  I also made a slight adjustment to the location of the button which will require reprinting the part shown above... unfortunately I'm used to that sort of thing though.
Picture
I finished the design and have it printed, but it is not yet uploaded.
0 Comments

Working on a Pi Front Panel for the Voron

10/2/2022

4 Comments

 
This started out like a simple idea and has turned into a project.  Turns out that cramming all the stuff I want to cram in this thing is much harder than I thought.  The idea of this is to be able to extend the LED's, the MicroSD and a couple USB 3.0 ports from the Pi to the front panel on the Voron skirt.  I plan to backlight the Raspberry Pi logo, the USB ports, and the status LED's using some "sequin" LED's designed for the Adafruit Lilly Pad.  I had earlier thought about backlighting the SD card symbol but I thought it would not really add much.  Right now all the pretty stuff is done, and I have modeled how the LED's can be attached (they will be glued into some form fitting pockets), but figuring out how the insert will go into the skirt part and not get pulled out or pushed in, is a problem I have yet to solve.  I could just glue it in I guess, but I would like to have some screws as well (if I can figure out where the screws could go).  For now, here are some pics on the progress (the large pic is the current status, the other two were prior versions).  These all look pretty much the same, since most of the work has been done under the hood.
Picture
Picture
Picture
Update 10/7/2022: I decided to make the insert clip into the "frame" of the skirt.  It will have six clips so hopefully it will be secure.  I am now just waiting on parts to get the final dimensions and probably spend way to much time adjusting the model.

Update 5/1/2023: Whew time flies I guess, but there is some news on this design posted here.
4 Comments
    Picture

    Stoopid Me

    Welcome to my Stoopid corner of teh Internet.  It's mostly gonna be 3D printing stuff, but I also post some recipes, projects, and the occasional rant here as well.  More Stoopid stuff is updated regularly.

    I recently joined the Amazon Associate program, so some of the links on this site are Amazon affiliate links. This means that, at zero cost to you, I will earn an affiliate commission if you click through the link and finalize a purchase.  This will help to support this site, and pay for more Stoopid Stuff.

    Currently, there are no active authorized sellers of my designs.  If you see my stuff (such as my Dummy 13 Weapons) for sale on Amazon, Etsy or AliExpress, the seller is using my designs without permission.

    If you want to help out with my parts and filament budget, you can also "Buy Me A Coffee" using the link below.
    ​​

    Buy Me A Coffee

    Archives

    June 2025
    May 2025
    April 2025
    March 2025
    February 2025
    January 2025
    December 2024
    November 2024
    October 2024
    September 2024
    August 2024
    July 2024
    June 2024
    May 2024
    April 2024
    March 2024
    February 2024
    January 2024
    December 2023
    November 2023
    October 2023
    September 2023
    August 2023
    July 2023
    June 2023
    May 2023
    April 2023
    March 2023
    February 2023
    January 2023
    November 2022
    October 2022
    September 2022
    August 2022
    July 2022
    April 2022
    February 2022
    January 2022
    December 2021
    November 2021
    October 2021
    September 2021
    August 2021
    July 2021
    June 2021
    May 2021
    April 2021
    March 2021
    February 2021
    January 2021
    December 2020
    November 2020
    October 2020
    September 2020
    August 2020
    July 2020
    June 2020
    May 2020
    April 2020
    March 2020
    February 2020
    January 2020
    December 2019
    November 2019
    October 2019
    September 2019
    August 2019
    July 2019
    June 2019
    May 2019
    April 2019
    March 2019
    February 2019
    January 2019
    December 2018
    November 2018
    October 2018
    September 2018
    August 2018
    July 2018
    June 2018
    May 2018
    April 2018
    March 2018
    February 2018
    November 2017
    September 2017
    August 2017
    June 2017
    December 2016
    October 2016
    September 2016
    July 2016
    March 2016
    February 2016
    September 2015
    August 2015
    June 2015
    May 2015
    April 2015
    March 2015
    February 2015
    January 2015
    December 2014
    November 2014
    October 2014
    September 2014
    July 2014
    June 2014
    May 2014
    April 2014
    March 2014
    February 2014
    November 2013
    August 2013
    July 2013
    June 2013
    May 2013
    April 2013
    March 2013
    January 2013
    December 2012
    November 2012
    October 2012
    September 2012
    August 2012

    Categories

    All

    RSS Feed

Powered by Create your own unique website with customizable templates.