My Stoopid Stuff
  • Home
  • Projects
  • Blog
  • Lec'tronics
  • Links
  • CNC
  • Quick Recipes
  • 3D Printer Tips

Layer Shifting with the Anycubic Kossel Linear Plus

5/14/2018

0 Comments

 
Picture
Picture
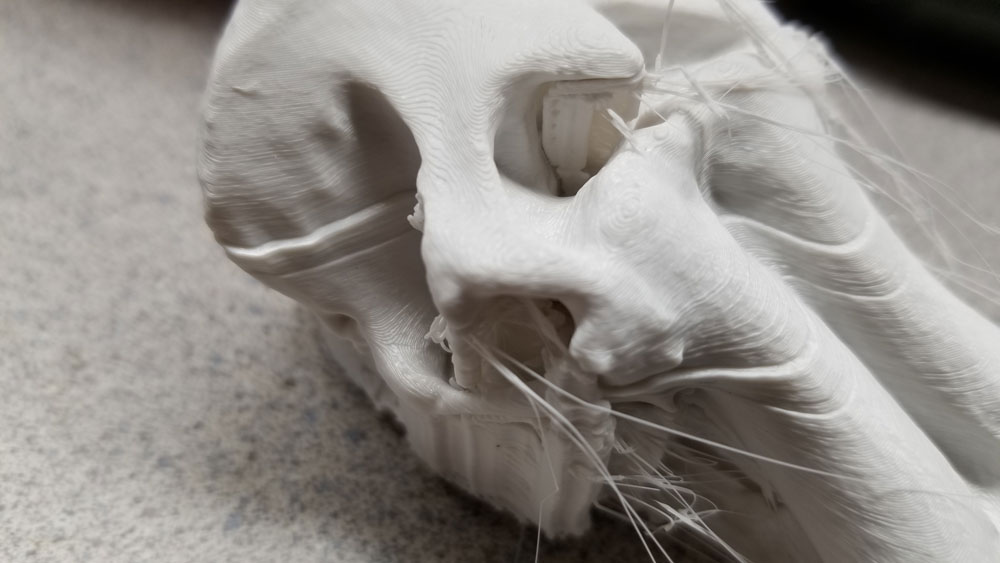
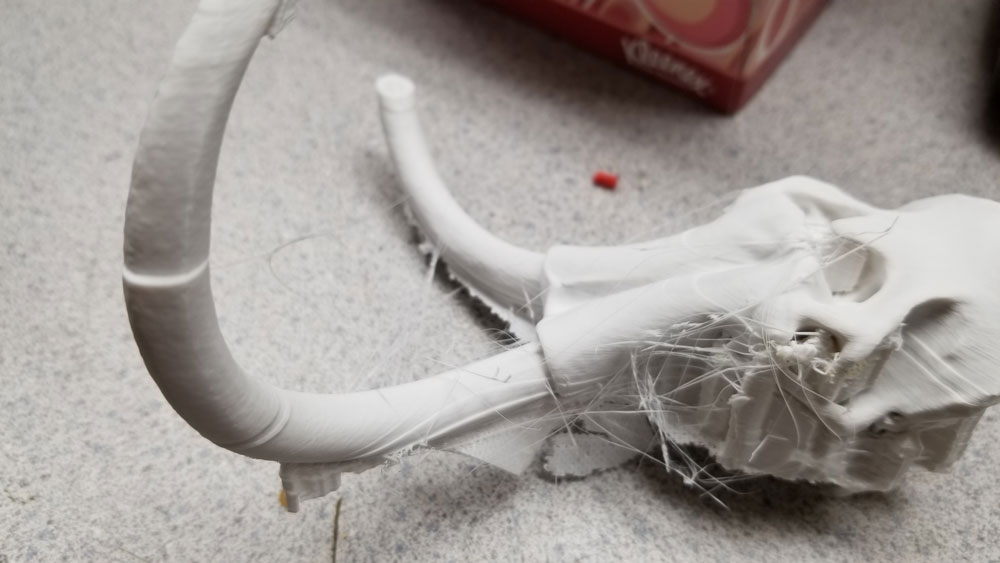
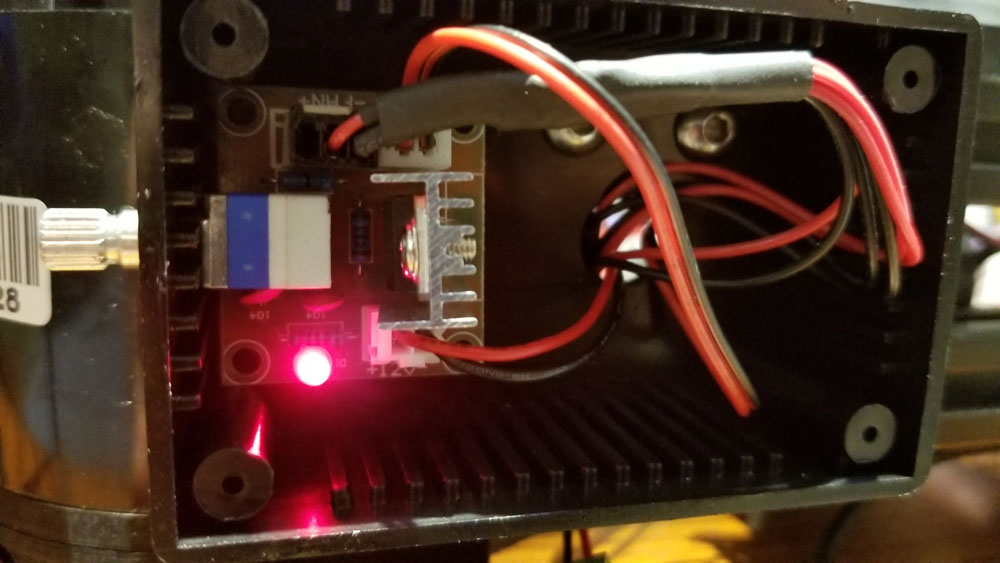
So I tried a larger print than usual today and ran into some really bad layer shifting.  Looking around it seems that is most commonly due to the steppers being supplied with insufficient current.  I check them using the guide here, and found that they are sent in the correct range, 0.83-0.88V, so I just bumped the X and Y reference voltages to 0.88 to match the Z. 

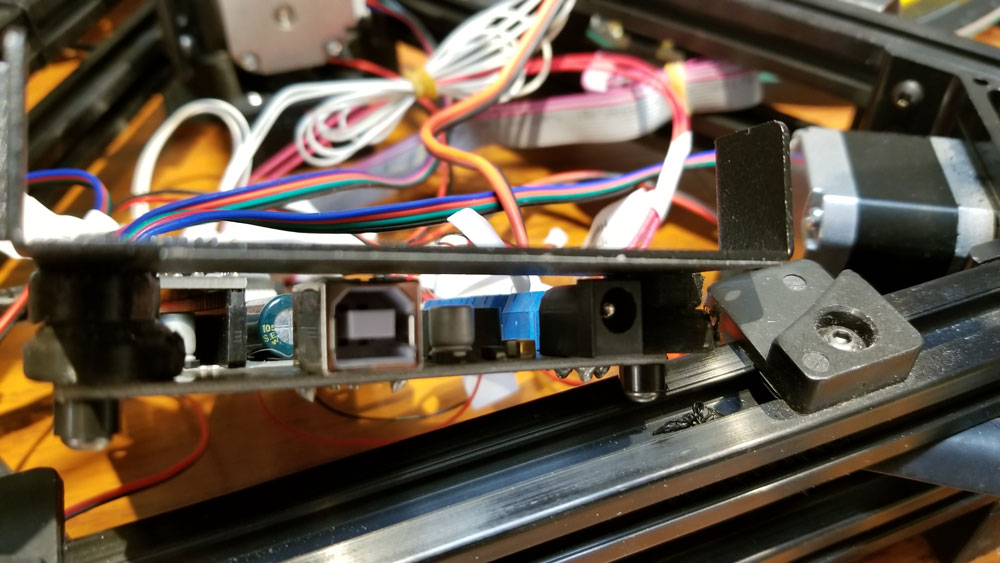
I also put some ferruels on the power, heated bed and hot end power lines in case there was a problem with the wires creeping out or not making a good connection.  One note on the ferrules, I used the black ones on the 12V power input lines since the larger gray ones will not fit in the sockets.  Getting the wires into the black ferruels is a bit more difficult, but they will fit.  Hopefully one of these tweaks will fix the layer shifting, since there are no apparent mechanical issues.

Finally, the PLA I am using above is the Monoprice PLA+ and with supports and a 1mm support interface, the supports are firmly attached to the part, so I am backing the temps down from 200 to 195 for a test.

Update: Still having level shifting, but it is less pronounced.  I am considering bumping it up to 0.92V on the steppers.  May also swap one of them out on suspicion (would start with the Y), since they provided 2 spare on the board.

Update 2:  It swapped around the stepper drivers with some change, but still had shifting so I dropped the reference voltage on the stepper drivers to 0.77V which seems more in line (and they stay a bit cooler) - though I am suspecting this problem may have a couple of causes including the model itself.  I managed to get a pretty acceptable print by re-scaling it to 50% instead of the original 60% (though it also has shifting it is not as pronounced).  I am moving on for now, at least until I get some upgrades planned.
0 Comments

Kossel upgrade and calibration notes

5/8/2018

0 Comments

 
Picture
Couple things I added to the printer recently and some calibration notes.

Upgrades:

  • 240mm x 3mm Round Borosilicate Glass Plate
  • Screw down bet clamps
  • Cork insulation of the heated bed
  • Fan feet and a fan to blow over the stepper drivers with a control box using a LM317 and pot to control the speed.
  • Monitor arm for the OctoPi running TouchUI (may reprint this in ABS if I get those settings figured out)

Planned upgrades:
  • Aluminum corners (possibly) - noticed some dimensional issues with the frame, not bad, but still not great.
  • control and stepper board upgrade

The glass plate is a great upgrade, but can make it difficult for printing ABS, had a hard time getting it to stick, but finally was able to with the following settings:

Monoprice ABS+ Blue
--------------------
Printer Temp      240
Plate Temp      85
Cooling            off
Speed            30/60
Adheasive        Purple Glue Stick full strength
Notes            Z height at -15.82, with Brim

Where the glass plate really shines is with PLA.  I just spritz it with some hairspray every few prints and prints hold tight when it is hot and slide off when it cools.  The settings below are probably conservative for the speed but that's where I am at right now with the printer.

PLA

Monoprice PLA+ Black or White
--------------------
Printer Temp      195-200*
Plate Temp      60
Cooling            on
Speed            40/80
Adheasive        Hairspray
Notes            Z height at -15.72, with Brim
*ran into a problem with supports fusing at 200, so dropped it to 195 on the white PLA.

Calibration:

I was gonna go for the Marlin upgrade but read that I may have difficulty finding the latest firmware for the printer if I decide to go back.  After some more reading I decided to go with a RAMPS board and RE-ARM 32 bit processor.  I also have some TM2206 stepper drivers from some time back and so that will be my next project - getting all that working with Marlin.  I have a Marlin configuration.h also set up and have some additional tweaks from the calibration hexagon explained here.  These are not yet tested since I am still running the Anycubic stock firmware, but hopefully these will work, or I can re-do them to get the values - will need to re-do them anyway if/when I replace the corners eventually.

====================================== NOT TESTED
From the printed 75mm per side hexagon in the Thingiverse link, I have the following measurements:

Delta Radius = 134.4
Delta Rod Length = 271.5
X = 74.950
Y = 75.430
Z = 75.080

Plugged those into the spreadsheet here:
https://docs.google.com/spreadsheets/d/1HcnZ0aDC2wujHhPHVeYFcPekEpY6Y4wLSMfCxJ18e1o/edit#gid=1292102991

Results - to add to the Marlin Configuration.h:

DELTA_DIAGONAL_ROD 271.864
DELTA_DIAGONAL_ROD_TRIM_TOWER {-0.483, 0.657, -0.174}

Additionally I will need to send the following to the printer after flashing (M500 is to save the value):
M665 L271.864
M500
======================================
Extruder Calibration - referenced the following site:

mattshub.com/2017/04/19/extruder-calibration/

Asked printer to extrude 100mm

 G1 E100 F100
 
Measured resultant filament as 98mm actually consumed.

Found the steps per mm using the M105:

Send: M105
Recv: ok T:109.2 /0.0 B:63.5 /0.0 @:0 B@:0
Send: M503
Recv: echo:Steps per unit:
Recv: echo:  M92 X80.00 Y80.00 Z80.00 E96.00

"E96.00" means 96 steps per mm for the Extruder.

100/98 x 96 = 97.96

The new steps per mm for the extruder is 97.96.  Send the following to the printer to set the value in EEPROM (M500 is to save the value) - I could round up or down, but went down:

M92 E97.9
M500

======================================

0 Comments

Getting OctoPi 0.14 working with TouchUI and a webcam

5/7/2018

0 Comments

 
Picture
I recently set up OctoPi which allows me to remotely access and control my 3D printer.  This is probably the coolest upgrade for a 3D printed out there, and it is pretty cheap depending on how much you want to do - the touchscreen was the most expensive part of the setup since I already had a Raspberry Pi sitting around collecting dust.  The setup was pretty straightforward - basically copy the image onto a microSD card, edit a couple config files and boot the PI.  But I had some issues which I will describe below for my own backup in case I need to do it again, and also for anyone else that runs into the same troubles.  I may have screwed something up along the way to cause these problems and they may be fixed in the newer versions of OctoPi (there is a new one that just dropped but I have not updated yet to 0.15.  I am on 0.14 still.

I had 2 major problems, the first was that after loading up OctoPi and fixing the network settings, it would not automatically launch TouchUI.  TouchUI is the plugin for the touchscreen that I was using.  The second was getting the webcam to show up in OctoPrint.  I did not come up with most of this myself, but I found bits and pieces which got it working - pretty sure much of it was from https://github.com/BillyBlaze/OctoPrint-TouchUI

Problem 1: TouchUI was not auto-starting, it was stuck at the RPI login prompt (black screen with just the RPI boot stuff and a login prompt).  I did not see anything about TouchUI loading or even trying to.  Running "chromium-browser" when logged in to the Raspberry Pi did not launch anything.

The problem I found was that the directories for TouchUI were missing:


pi@octopi:~ $ sudo xinit ~/TouchUI-autostart/chromium.xinit


X.Org X Server 1.18.4
Release Date: 2016-07-19
X Protocol Version 11, Revision 0
Build Operating System: Linux 4.4.26-v7+ armv7l Raspbian
Current Operating System: Linux octopi 4.14.31-v7+ #1104 SMP Thu Mar 29 16:52:18 BST 2018 armv7l
Kernel command line: 8250.nr_uarts=0 bcm2708_fb.fbwidth=800 bcm2708_fb.fbheight=480 bcm2708_fb.fbswap=1 vc_mem.mem_base=0x3ec00000 vc_mem.mem_size=0x40000000  dwc_otg.lpm_enable=0 console=ttyS0,115200 console=tty1 root=PARTUUID=6d1620bc-02 rootfstype=ext4 elevator=deadline fsck.repair=yes rootwait
Build Date: 11 November 2016  11:59:59AM
xorg-server 2:1.18.4-2+rpi1 (https://www.debian.org/support)
Current version of pixman: 0.33.3
        Before reporting problems, check http://wiki.x.org
        to make sure that you have the latest version.
Markers: (--) probed, (**) from config file, (==) default setting,
        (++) from command line, (!!) notice, (II) informational,
        (WW) warning, (EE) error, (NI) not implemented, (??) unknown.
(==) Log file: "/var/log/Xorg.0.log", Time: Fri Mar 30 15:44:15 2018
(==) Using system config directory "/usr/share/X11/xorg.conf.d"
xinit: Unable to run program "/home/pi/TouchUI-autostart/chromium.xinit": No such file or directory  <<<<<<<<<<<<
Specify a program on the command line or make sure that /usr/bin
is in your path.

xinit: connection to X server lost

waiting for X server to shut down (II) Server terminated successfully (0). Closing log file.

pi@octopi:~ $ more /home/pi/TouchUI-autostart/chromium.xinit  << confirmed
/home/pi/TouchUI-autostart/chromium.xinit: No such file or directory

In fact there was no "/home/pi/TouchUI-autostart" directory:

pi@octopi:~ $ cd /home/pi/
pi@octopi:~ $ ls
mjpg-streamer  OctoPrint  oprint  scripts


To fix, I re-ran steps 7-10 here:

github.com/BillyBlaze/OctoPrint-TouchUI/wiki/Setup:-Boot-to-Browser-(OctoPi-or-Jessie-Light)

That is:

git clone https://github.com/BillyBlaze/OctoPrint-TouchUI-autostart.git ~/TouchUI-autostart/       
sudo cp ~/TouchUI-autostart/touchui.init /etc/init.d/touchui
sudo chmod +x /etc/init.d/touchui
sudo cp ~/TouchUI-autostart/touchui.default /etc/default/touchui
sudo update-rc.d touchui defaults


then ran:
chromium-browser

(got errors below - which per the how-to from BillyBlaze are OK):

pi@octopi:~ $      chromium-browser
bootstrap_helper: /usr/lib/chromium-browser/nacl_helper: Cannot open ELF file!  errno=2
[1:1:0330/154102.649795:ERROR:nacl_fork_delegate_linux.cc(315)] Bad NaCl helper startup ack (0 bytes)
[928:928:0330/154102.722478:ERROR:browser_main_loop.cc(495)] Failed to put Xlib into threaded mode.
[928:928:0330/154102.805867:ERROR:browser_main_loop.cc(272)] Gtk: cannot open display:


rebooted and it worked - that is it loaded TouchUI after booting up:
reboot

----------------------------------------------------------------------------------------------

Problem 2: The webcam was not showing up in OctoPrint under the "control" tab.  I confirmed it was working using VLC. I am using a older model Freetalk camera (http://freetalk.me/skype-camera/freetalkr-everyman-hd.html) so it will likely be different for other cameras with other resolutions.

First I set up the camera settings in the octopi.txt file:

su root
root@octopi:/home/pi# sudo nano /boot/octopi.txt


Uncomment (remove the #) for the box for:
camera="auto"

Uncomment (remove the #) for the box for the following and change the setting for the camera resolution:
camera_usb_options="-r 1280x720 -f 25"


After that, the webcam still had issues, was not showing up in TouchUI unless I set the IP of the Octopi as the URL for the stream.  Problem was, I was using DHCP so the IP would change and I would prefer not to hard code it.  I tried using the loopback or localhost but that did not work either.  Decided the simplest thing to do was to run it with a static IP outside my routers DHCP pool or addresses.

To set a static IP for the WiFi on the OctoPi:

su root
nano /boot/octopi-network.txt


was:
## WPA/WPA2 secured
iface wlan0-octopi inet manual
    wpa-ssid "Bananas-are-fun-fruit"
    wpa-psk "haha-not-gonna-put-it-here"


Changed to:
    ## WPA/WPA2 secured
iface wlan0-octopi inet static
    wpa-ssid "Bananas-are-fun-fruit"
    wpa-psk "haha-not-gonna-put-it-here"
    address   192.168.1.123
    netmask   255.255.255.0
    broadcast 192.168.1.255
    gateway   192.168.1.1


And set the address for the webcam stream in the GUI for OctoPrint (settings > Webcam and Timelapse) as follows:

http://192.168.1.123:8080/?action=stream

and used 16:9 as the aspect ratio.  Now it works and I can view the camera under the control tab in OctoPrint, and also from TouchUI's camera screen.


0 Comments
    Picture

    Stoopid Me

    Welcome to my Stoopid corner of teh Internet.  It's mostly gonna be 3D printing stuff, but I also post some recipes, projects, and the occasional rant here as well.  More Stoopid stuff is updated regularly.

    I recently joined the Amazon Associate program, so some of the links on this site are Amazon affiliate links. This means that, at zero cost to you, I will earn an affiliate commission if you click through the link and finalize a purchase.  This will help to support this site, and pay for more Stoopid Stuff.

    Archives

    March 2023
    February 2023
    January 2023
    November 2022
    October 2022
    September 2022
    August 2022
    July 2022
    April 2022
    February 2022
    January 2022
    December 2021
    November 2021
    October 2021
    September 2021
    August 2021
    July 2021
    June 2021
    May 2021
    April 2021
    March 2021
    February 2021
    January 2021
    December 2020
    November 2020
    October 2020
    September 2020
    August 2020
    July 2020
    June 2020
    May 2020
    April 2020
    March 2020
    February 2020
    January 2020
    December 2019
    November 2019
    October 2019
    September 2019
    August 2019
    July 2019
    June 2019
    May 2019
    April 2019
    March 2019
    February 2019
    January 2019
    December 2018
    November 2018
    October 2018
    September 2018
    August 2018
    July 2018
    June 2018
    May 2018
    April 2018
    March 2018
    February 2018
    November 2017
    September 2017
    August 2017
    June 2017
    December 2016
    October 2016
    September 2016
    July 2016
    March 2016
    February 2016
    September 2015
    August 2015
    June 2015
    May 2015
    April 2015
    March 2015
    February 2015
    January 2015
    December 2014
    November 2014
    October 2014
    September 2014
    July 2014
    June 2014
    May 2014
    April 2014
    March 2014
    February 2014
    November 2013
    August 2013
    July 2013
    June 2013
    May 2013
    April 2013
    March 2013
    January 2013
    December 2012
    November 2012
    October 2012
    September 2012
    August 2012

    Categories

    All

    RSS Feed

      Contact Form (Name is optional)

    Submit
Powered by Create your own unique website with customizable templates.