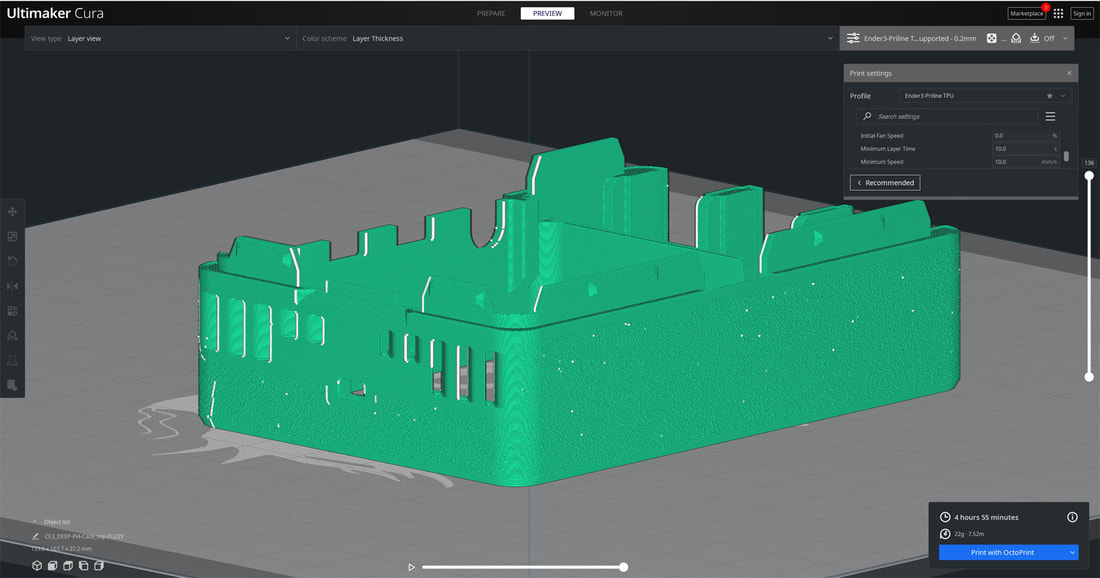
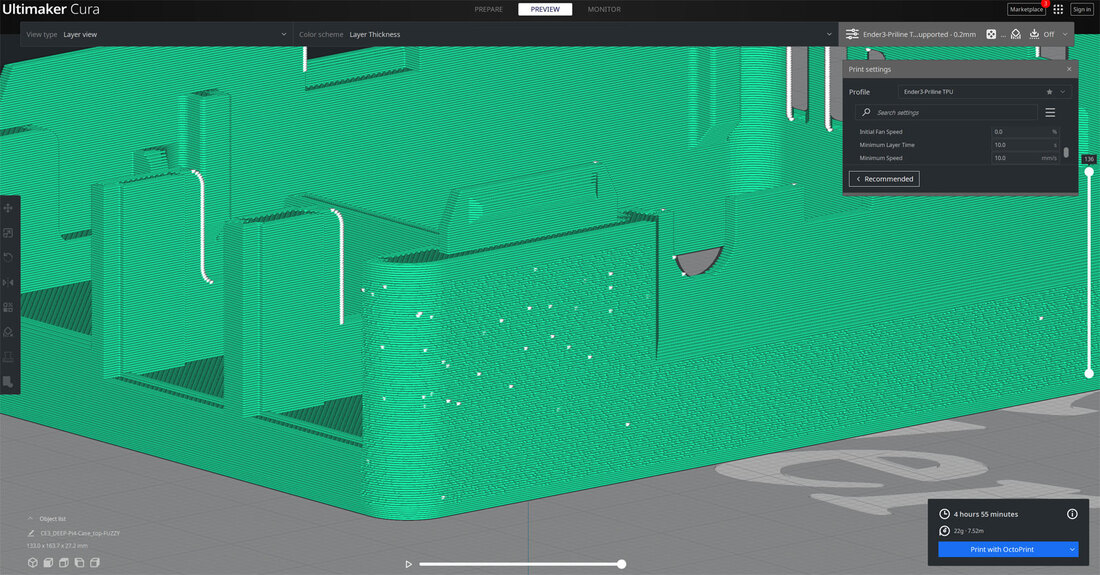
I recently saw a post on Reddit where /u/ncarson9 make a card deck with fuzzy skin, but inset a logo into it which was printed normally. The effect was really cool and they also posted their settings which I'm gonna try and use for a custom fuzzy skin texture on Sneaks new Pi4 Case. This required a bit of modeling to get a shell which the fuzzy skin is applied to, and then merged with the original case top model, so it's not a simple process unfortunately. I have not printed it yet but the preview looks promising.
I'm planning to use the same settings as provided in the linked Reddit thread by /u/ncarson9 @ Reddit:
Fuzzy Skin
Thickness 0.1
Density 1.25
Skin Point Distance 0.2
Layer Height 0.2mm
Additionally, I set the z-seam location to "Random" on the inset part for the fuzzy skin texture. The rest of the model was printed normally and I left the z-seam to "user specified" which was placed on the back with sharpest corner set.
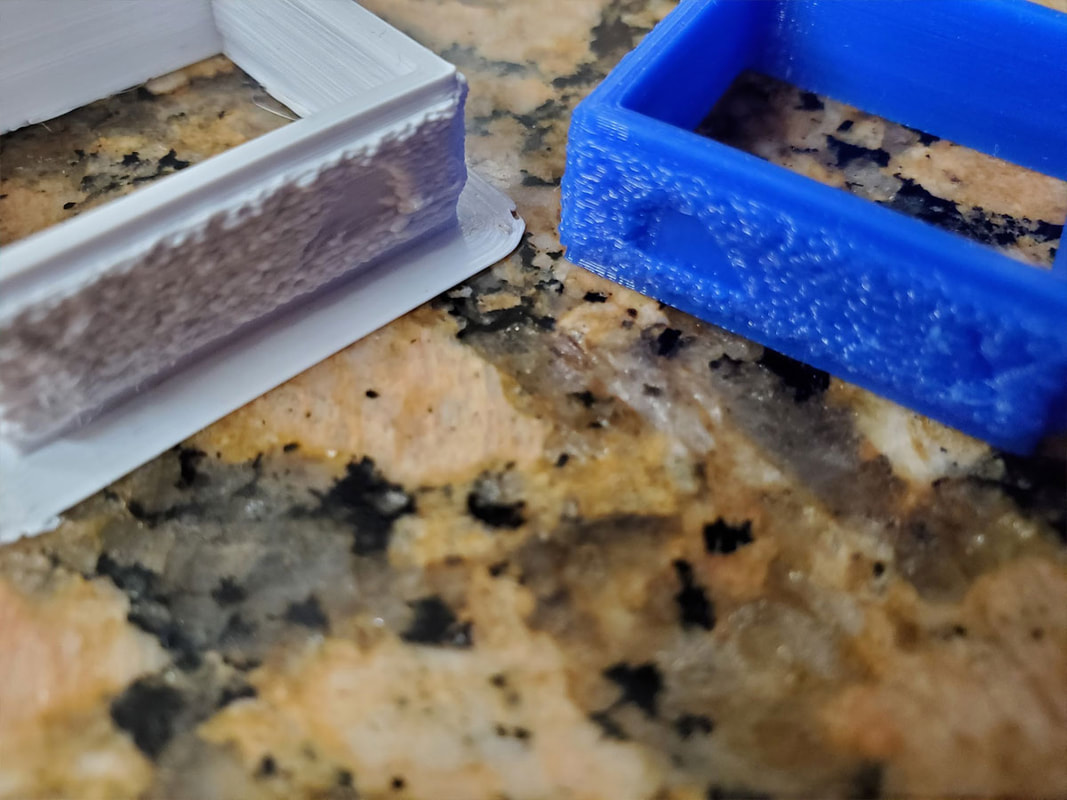
Update 1/9/2022 - The print did not turn out as well as I had hoped, but it did sort'a work. It had some areas that appeared to be fuzzy skin which were printed where it should have been printed normally. Other areas had an exaggerated fuzzy skin compared to later printed areas (which is why I suspect the filament may be wet) I downloaded the gcode and previewed it in Cura and it looked OK, so I don't know what occurred there. I'm gonna try again though, and have run the PLA through the dehydrator just in case it's wet, and also will slow the print down to 20mm/s (it was printed at 36mm/s). It may also be related to jerk possibly but I am not sure I will change that setting yet.
Update 1/10/2022 - My 2nd attempt at this was less of a failure (I think the PLA was a bit wet the first time). However the effect I ended up with does not look great. It may be the PLA, or it may be that I need to use more aggressive settings for fuzzy skin, or some problem with my printer (Ender3 with Titan Areo and custom cooler parts).
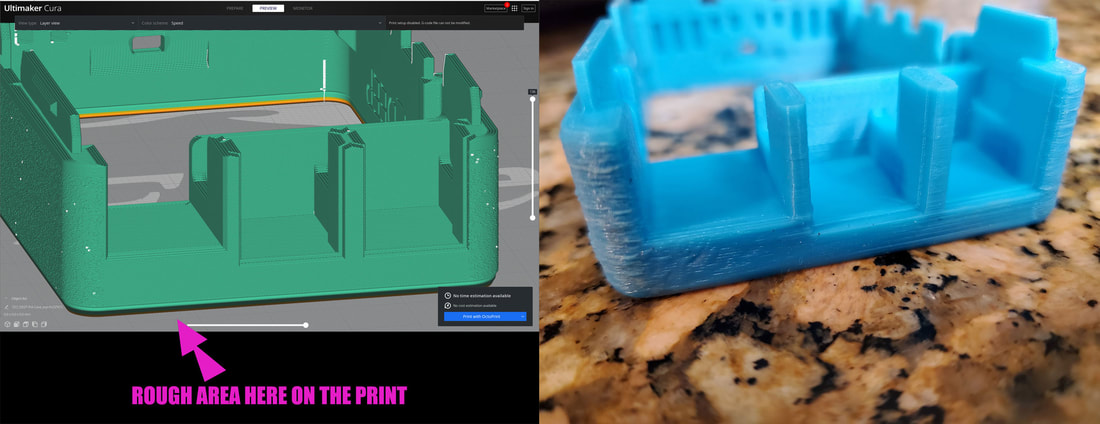
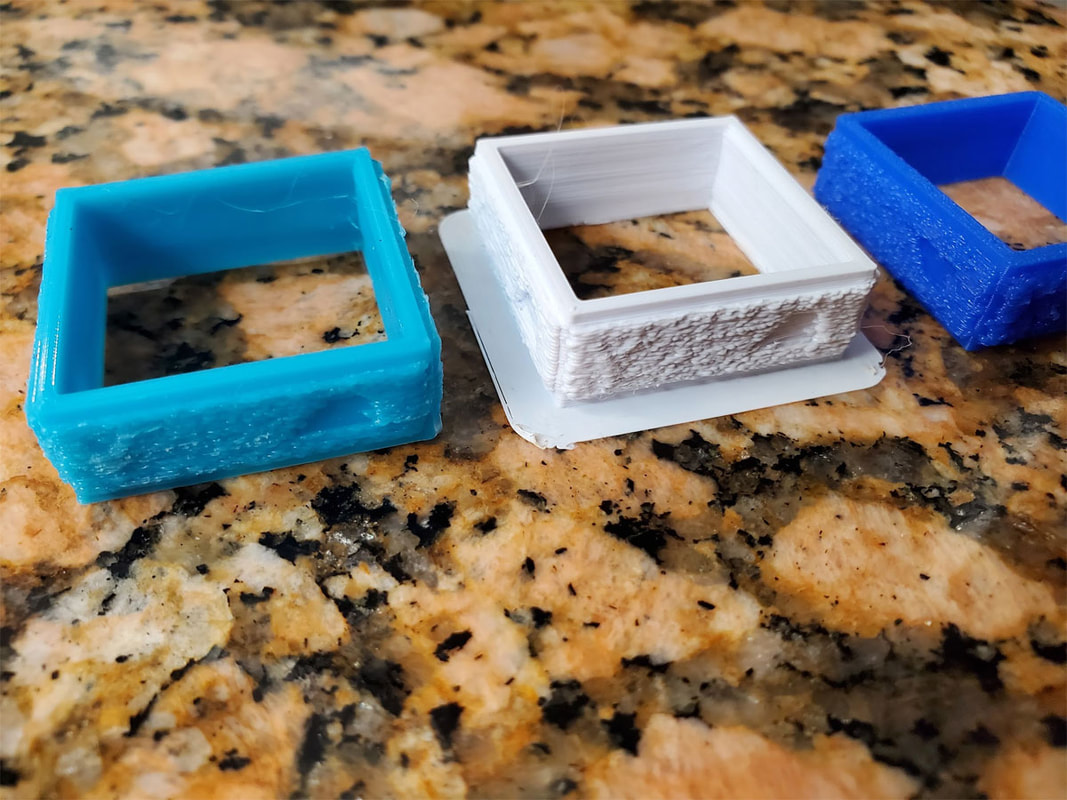
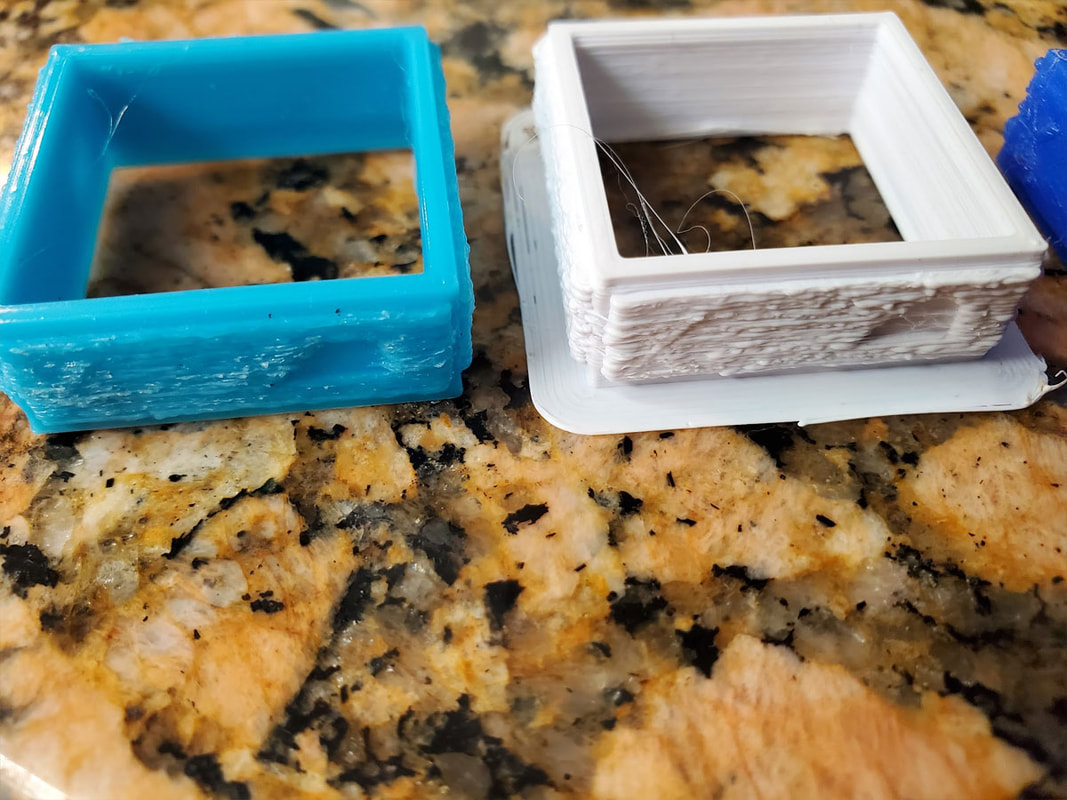
There was also the same problem of a rough texture in an are that should have been sliced normally (see below). I'm not gonna give up on this idea though, since it could be really handy on some prints, but I think I should not have jumped in and tried it on a model I actually need to get done. I'm gonna keep testing but will try it on some test models (like a simple cube with different fuzzy skin settings on each side). I know that people get some really great results with fuzzy skin, so this is either a problem with my printer, filament or settings.
I'm gonna try testing fuzzy skin settings further on my CR10S Pro next time, with a different filament (but it is tied up with lithophane projects for a while). I think I will just print one more case top without any fuzzy skin to make sure the rough area I saw on two fuzzy skin tests is not going to show up regardless (in case it has to do with cooling or something). That's it for now though.
 |  |  |
Well I lied, that's not it for now. I couldn't just let this be, so I made a 30x30x10mm test cube to try four different settings of fuzzy skin (one per wall). I'm also running a different PLA to see if that will help with the result. These are all using the same "density" value but I may change that next.
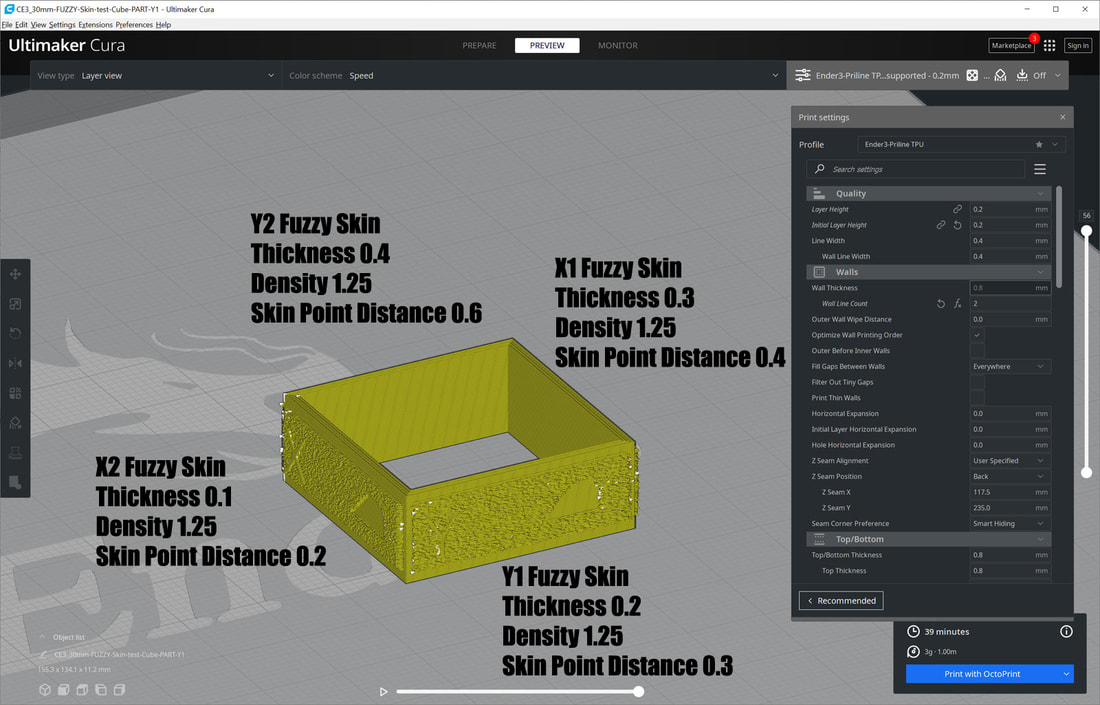
Update 1/13/2022 - The test cube was helpful to sort out the best looking settings which are very close to the ones from Reddit (and these are probably gonna be specific to the material and maybe the printer). I'm using these currently:
Fuzzy Skin
Thickness 0.2
Density 1.5
Skin Point Distance 0.3
Layer Height 0.2mm
Fuzzy Skin
Thickness 0.2
Density 1.5
Skin Point Distance 0.3
Layer Height 0.2mm
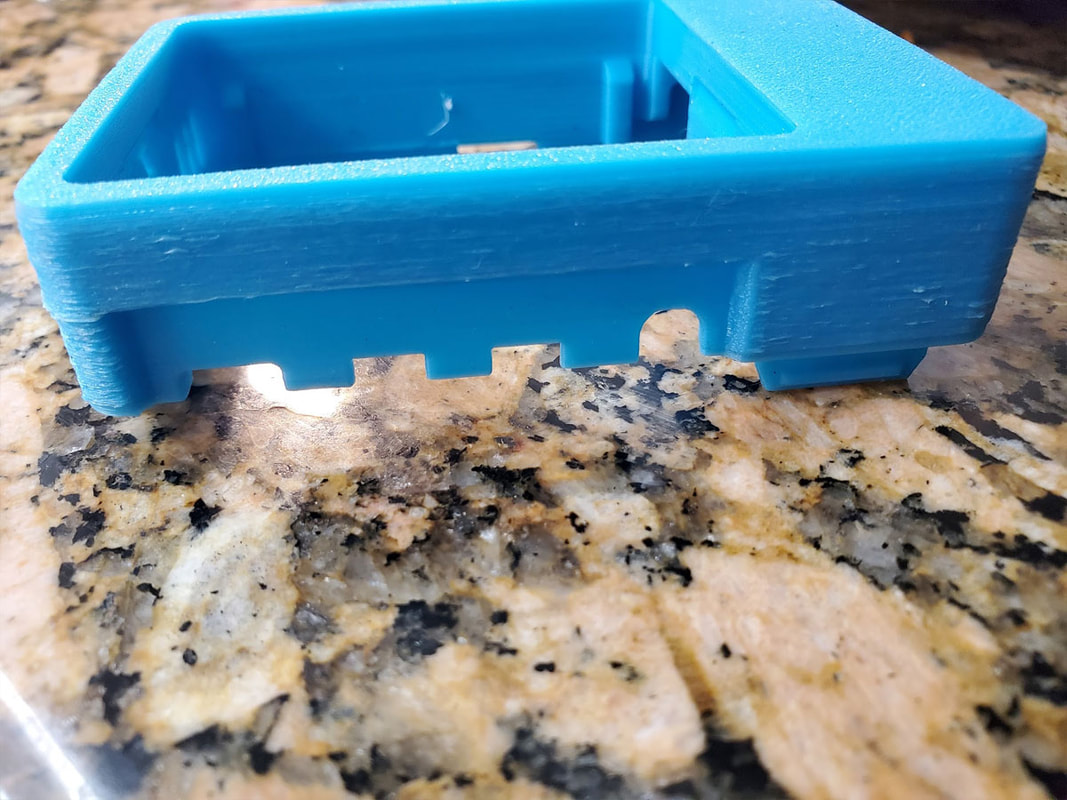
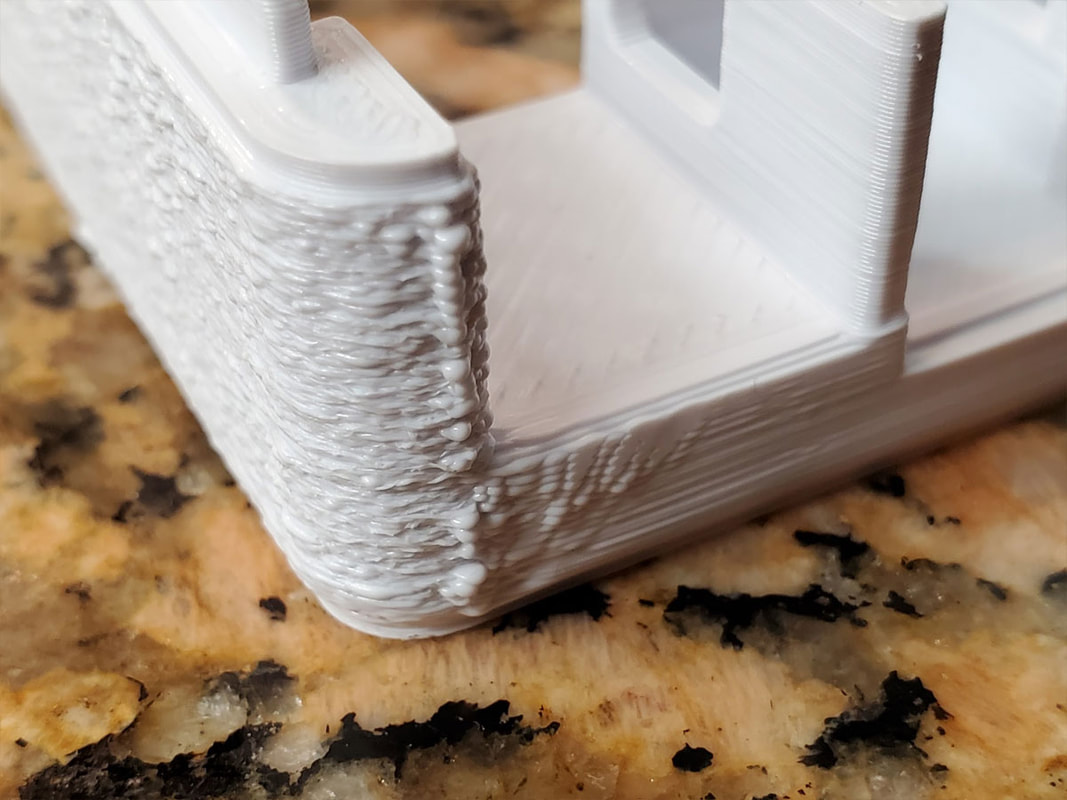
But I'm still not happy with the prints using the fuzzy skin. I noticed again after three tests of the top of the case, that the fuzzy skin runs over the edge on the front left side (nearest the ports). Whether this has to do with orientation or not, I see a bit of it on all the sides. There is also some blobbing at the corners, which could be flow or retraction related. It's not bad looking overall though, and I think it may work if I can somehow get the settings pinned down.
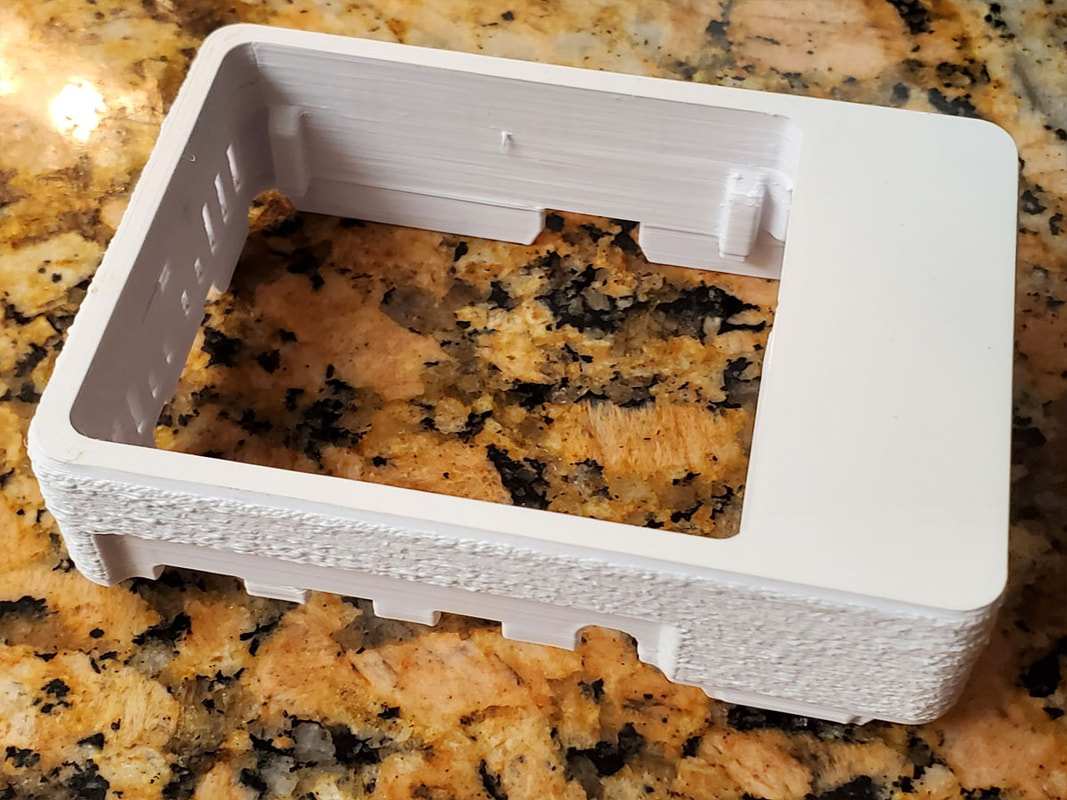

One To try something else, I decided to change the overlay model I'm using to apply the fuzzy skin texture. I have raised it 0.1mm off the surface of the rest of the model, in case the issue was with the slicer deciding which skin to print (fuzzy or normal), and I have also changed the slicer settings to reduce jerk and acceleration (Jerk = 4.0 and acceleration = 300mm^2/s). I'm also using the latest version of Cura (4.13.0) which was just released (however I did not see anything about improvements to fuzzy skin so it may not matter). That case top (4th) is on the printer now, and if it does not make a difference, I may put the idea of using fuzzy skin aside for a while, until I have more time to work on it.
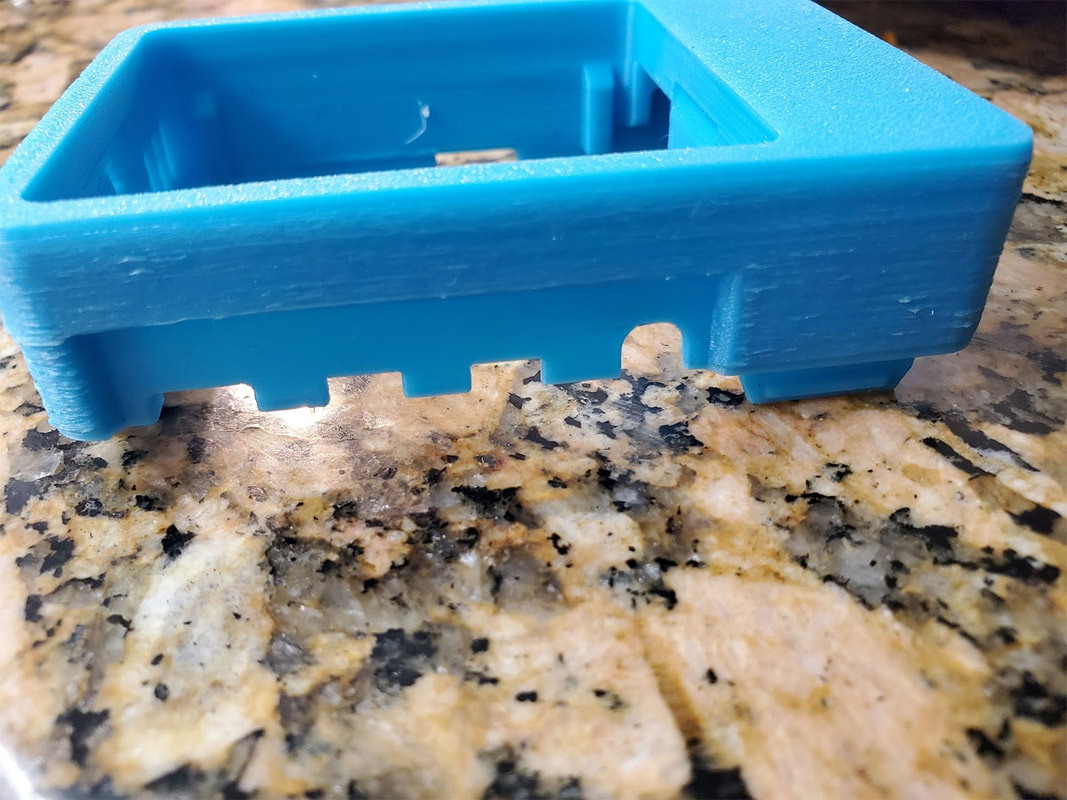
Update 1/13/2022 (#2) - Well it did the same thing on the left front of the case as is shown in the above pics, overran the area where fuzzy skin should have been applied. I have tried two printers, Cura 4.12.1 and 4.13.1, and have changed the model, calibrated flow, and tried various settings including speed, acceleration and jerk with no effect, so I think I'm calling it quits for now on this particular way to use Fuzzy Skin. It's probably some ringing which I don't normally see but the fuzzy skin is bringing out, so I will need to look into that before I continue with this idea.
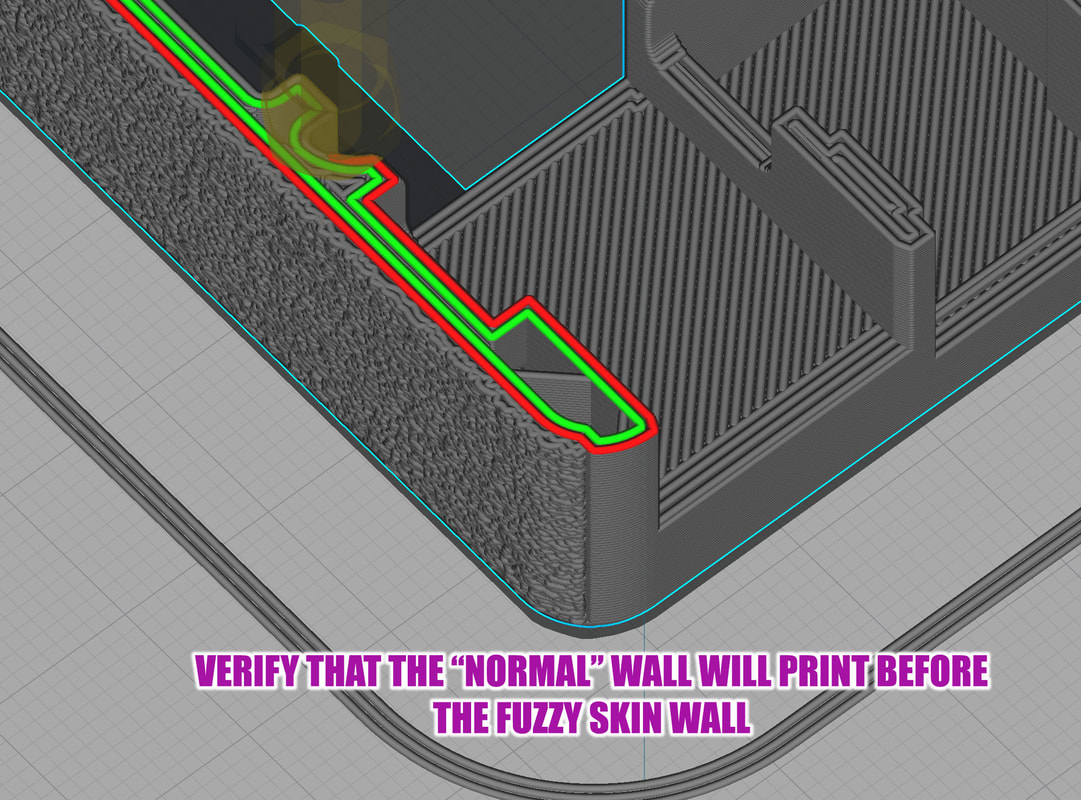
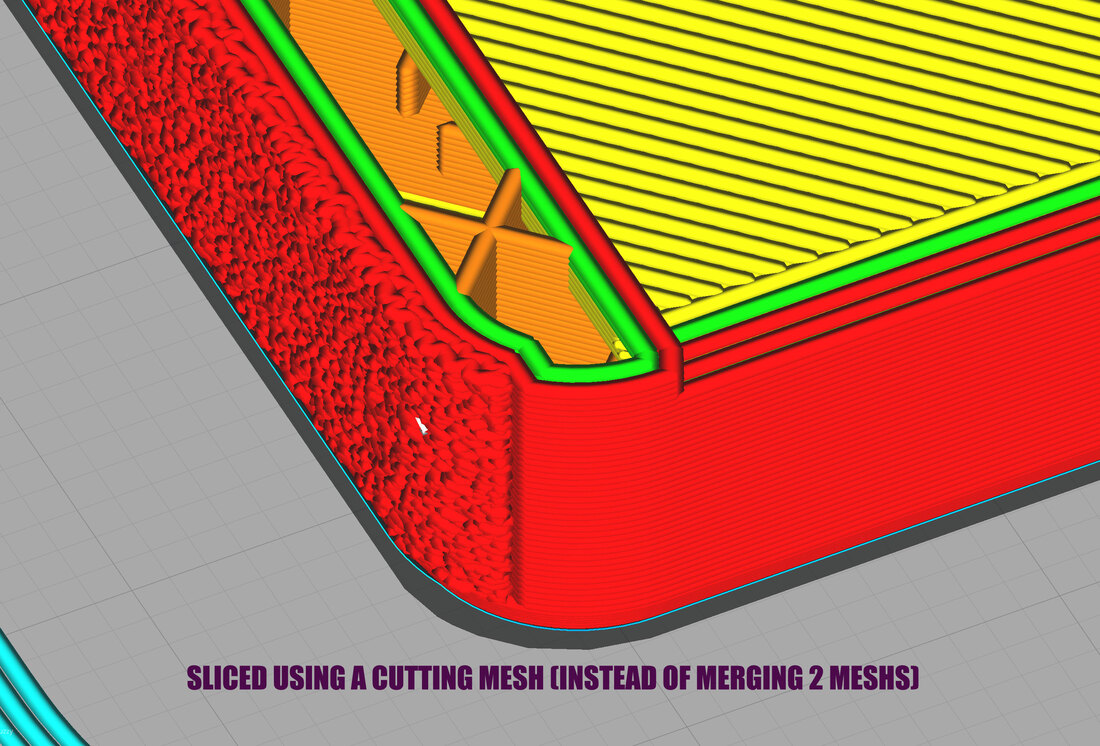
Update 1/14/2022 - Well I couldn't leave this alone, its just too cool a feature not to try one more thing. I re-read the thread on reddit since the results in that post are really good. I noticed this time that a "cutting mesh" was used. I have been trying to simply overlay one mesh on the model and have not tried the cutting mesh (have never used it). I just re-sliced using the cutting mesh and it looks a bit different so I think this one may be a winner. From the pic below, it looks like the fuzzy skin is almost being treated like another part with a separate wall being printed for the normal areas, that should eliminate the possibility of ringing where the fuzzy skin interfaces with an area or normal skin. I'm running one more test print and will know in 6 hours lol.
Update 1/15/2022 - the first test using the cutting mesh was not great since I forgot to revert some settings, but I re-printed it using my normal settings and it looks better. It's still something I need to experiment with, but so far these settings seem like a decent start to use with the "Cutting Mesh". The cutting mesh is the part used to intersect the model, in areas where other settings (like fuzzy skin) can be applied.
CUTTING MESH settings for fuzzy skin:
Optimize Wall Printing Order (YES)
Z-Seam Alignment (Random)
Flow (decreased by 1%)
Print Speed (same)
Fuzzy Skin (YES)
Fuzzy Skin Outside Only (YES)
Fuzzy Skin Thickness (0.2mm)
Fuzzy Skin Density (1.5)
Fuzzy Skin Point Distance (0.3mm)
This leaves a bumpy fuzzy skin texture which is what I was going for, but I did end up knocking it down a bit with some sandpaper since fuzzy skin also can leave some rough spots which feel uncomfortable when handing the printed model. A light sanding knocks those down and makes it look a bit better too I think.
Something I noticed when previewing the slicer was that at one point the fuzzy skin was printing before the normal skin areas of the model, but after some change (I think it may have been adding "Optomize Wall Printing Order (YES)" to the cutting mesh, it sliced with the normal wall printed first, and then the fuzzy skin. I think printing the normal wall first is best since it will avoid dragging excess material deposited from the fuzzy skin across the normal areas.
Update 1/13/2022 (#2) - Well it did the same thing on the left front of the case as is shown in the above pics, overran the area where fuzzy skin should have been applied. I have tried two printers, Cura 4.12.1 and 4.13.1, and have changed the model, calibrated flow, and tried various settings including speed, acceleration and jerk with no effect, so I think I'm calling it quits for now on this particular way to use Fuzzy Skin. It's probably some ringing which I don't normally see but the fuzzy skin is bringing out, so I will need to look into that before I continue with this idea.
Update 1/14/2022 - Well I couldn't leave this alone, its just too cool a feature not to try one more thing. I re-read the thread on reddit since the results in that post are really good. I noticed this time that a "cutting mesh" was used. I have been trying to simply overlay one mesh on the model and have not tried the cutting mesh (have never used it). I just re-sliced using the cutting mesh and it looks a bit different so I think this one may be a winner. From the pic below, it looks like the fuzzy skin is almost being treated like another part with a separate wall being printed for the normal areas, that should eliminate the possibility of ringing where the fuzzy skin interfaces with an area or normal skin. I'm running one more test print and will know in 6 hours lol.
Update 1/15/2022 - the first test using the cutting mesh was not great since I forgot to revert some settings, but I re-printed it using my normal settings and it looks better. It's still something I need to experiment with, but so far these settings seem like a decent start to use with the "Cutting Mesh". The cutting mesh is the part used to intersect the model, in areas where other settings (like fuzzy skin) can be applied.
CUTTING MESH settings for fuzzy skin:
Optimize Wall Printing Order (YES)
Z-Seam Alignment (Random)
Flow (decreased by 1%)
Print Speed (same)
Fuzzy Skin (YES)
Fuzzy Skin Outside Only (YES)
Fuzzy Skin Thickness (0.2mm)
Fuzzy Skin Density (1.5)
Fuzzy Skin Point Distance (0.3mm)
This leaves a bumpy fuzzy skin texture which is what I was going for, but I did end up knocking it down a bit with some sandpaper since fuzzy skin also can leave some rough spots which feel uncomfortable when handing the printed model. A light sanding knocks those down and makes it look a bit better too I think.
Something I noticed when previewing the slicer was that at one point the fuzzy skin was printing before the normal skin areas of the model, but after some change (I think it may have been adding "Optomize Wall Printing Order (YES)" to the cutting mesh, it sliced with the normal wall printed first, and then the fuzzy skin. I think printing the normal wall first is best since it will avoid dragging excess material deposited from the fuzzy skin across the normal areas.
Update 2/11/2022 - I found a major problem with my BMG extruder (a grub screw was missing from one gear), so some of this testing is suspect and I plan to try again soon, but the problem is at least fixed now.


 RSS Feed
