I finally got to the point where I could almost see the end of the tunnel with my Voron build, and then started down the rabbit hole of how to get my Mellow Fly SB-2040 (version 1) hooked up. I thought I was starting to figure it out, and then stumbled on this thread on their Github. In addition to the issue in that thread and possible fix (hook up an external 5V buck converter), it was also interesting to realize there is a version 2 of this board. I could not bring up the schematic but the CAD file shows some changes in the area where the buck components are located (so it would make sense if they updated the buck converter design).
The buck converter is required to provide a 5V source on the board, and it's output is what the processors (after being stepped down again to 3.3V) and the LED's use, since they cannot take 24V directly. Since the board takes 24V as input, it has to first drop that down to 5V using a buck converter, and then though a less efficient linear regulator to drop 5V to 3.3V for the Pi. When a voltage is dropped using a buck converter, some of the energy is wasted (heat), but buck converters are still the efficient way to lower a higher voltage to a lower one, when there is a significant difference between the two.
I am not an electronics expert, and barely a hobbyist, but several things I've read make me question if the buck converter is implemented well on the V1 board. I decided to see if I could compare a reference design to what is used on the V1. I found something even better than a reference design though, and used TI's (really cool and free) webench tool to spec out a BOM and reference design using the same TI TPS5430DDAR (datasheet here). Using the webench, I set the input voltage range between 23-25V (and I also tried 20-30V and even 10.8-13.2V), and generated several BOMs and schematics. Despite the input voltage range being different on several runs, the component values I stayed mostly the similar, except for the input capacitor value, which changed depending on the input voltage.
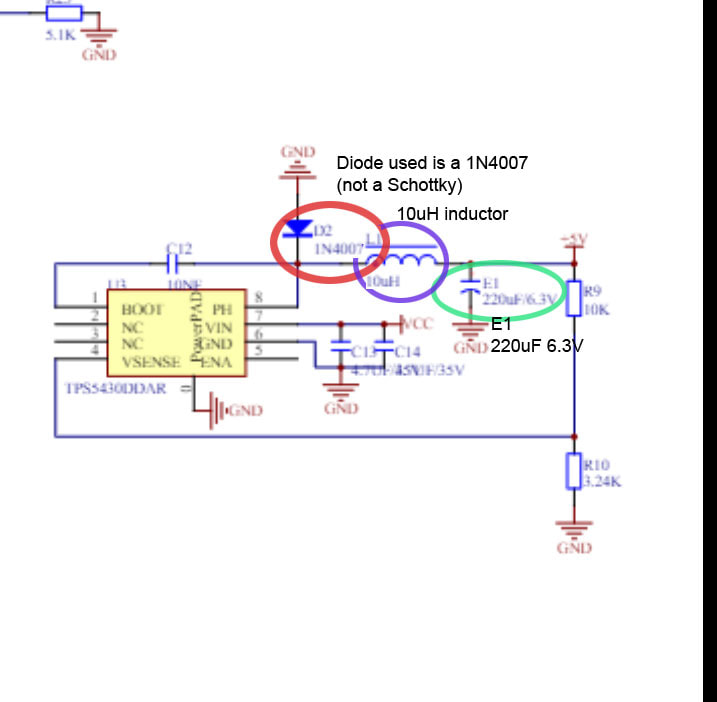
When I compared the values from the webench tool to the Schematic for the SB-2040 Version 1, I saw that the Fly SB-2040 V1 designer used different values for several of the key components (compared to the webench). There may be a reasonable explanation for this, which I just don't understand, so I'm not calling this out as a problem, just something interesting. The input capacitor looks to be 4.7uF on the SB-2040 V1, which is the same as what I found when running the webench tool with a input range of 22-26V (which is good). However the diode, inductor and output capacitor value or type were different than what was specified in the webench tool.
For example, when I ran webench using 22v-26v input (that is probably too tight a range but I was looking for the best case), and compared them to the SB-2040 V1 schematic, I noticed these differences:
D1
Webench shows a Schottky diode, while the SB-2040 V1 uses a standard diode (IN4007)
L1
Webench shows a 15uH inductor, while the SB-2040 V1 uses as 10uH inductor
Cout / E1
Webench shows a 330uF 6.3V capacitor, while the SB-2040 V1 uses a 220uF 6.3V capacitor
Like I said, I am not expert, but this does make me wonder, and so I plan to check the board with a thermal camera to see if the buck converter looks to be heating up (I read that may happen). If it does appear to be heating excessively, I will either re-consider using this board, or possibly try swapping some of the components with values which better fit the values from the webench tool. I'm also wondering (in case of an issue) if swapping the slower standard diode with a schottky diode may be worth trying first. Aside from that, if there is a problem I may just switch to a different CANBUS board, since for the price it may not be worth the effort of swapping several components (since I suck at soldering small stuff).
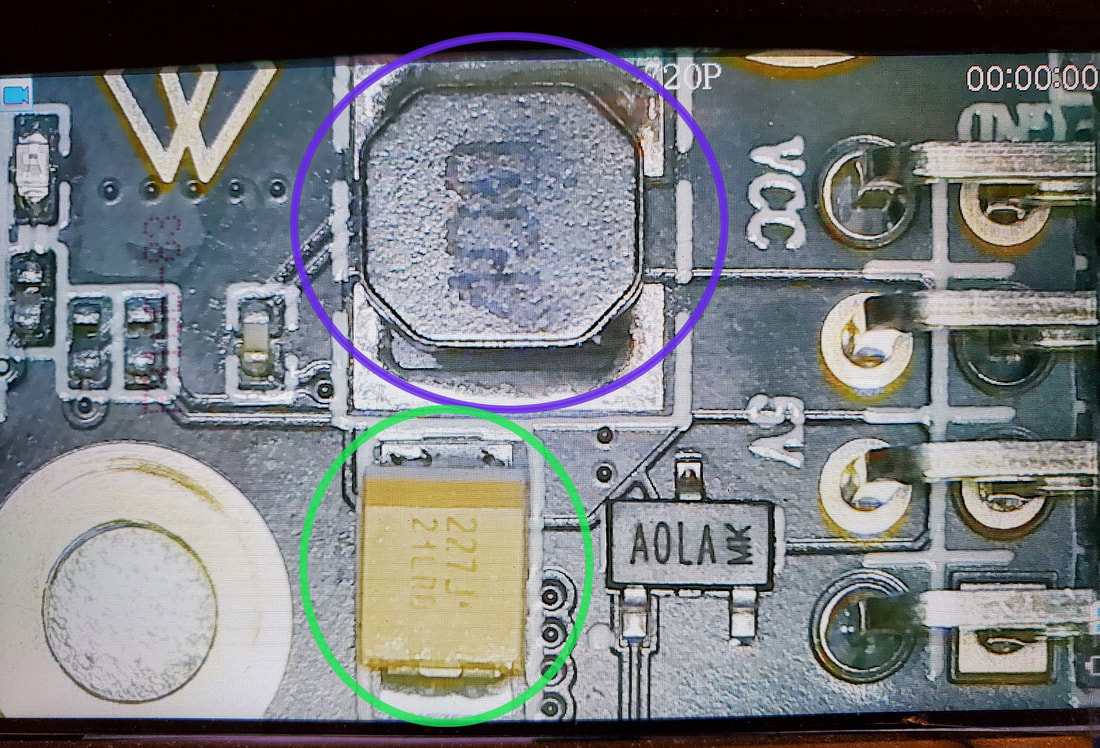
I did not trace the parts in the pics out below, but the highlighted parts look to be the Diode (red), Inductor (purple) and 220uF Capacitor (green). The TI TPS5430 is in the orange color box.
Update - I went looking to see if I could find some components to maybe have on hand if I want to try some swaps, and noticed that if I increased the temp in the webench, still using 22-26V as input, I did get a BOM using a 220uF output capacitor. The diode and inductor were still possible candidates to swap. I cannot seem to find a Schottky diode in a SOD123 package with similar specs though, the highest current version I can find is 3A, which is also the max of the 5430. Finding a 15uH inductor that would fit looks like it will be a pain as well.
It looks like the version 2 uses a different buck converter so that is a possibility to swap the board, or maybe the BTT CANBUS board which looks similar (designed for the Stealthburner). Given the well known issue of heat and my new understanding of the root of the problem thanks to rbrtwtrs at Github, I don't really think it's worthwhile to use the V1 board, and will look for another option, the heat gremlin is one thing I'd rather not have to deal with.
Update 2 - I read of other issues with the SB-2040 implementation such as possible driver issues with SK6812 LEDs (I guess some LED strings being sold for the Stealthburner use SK6812 LEDs and not the standard WS2812 LEDs, and some folks have had issues). The driver issue could be fixed though, as it's software. Due to the heating issue, which seems well understood in the community to be related to the buck converter on the V1, I've decided not to continue with the Mellow Fly SB-2040 Version 1 board. I ordered a BTT EBB SB2209, which will be here in two weeks (around the second week of May). I could not find anyone selling the SB-2040 Version 2, which looks like it could have saved me some time, but I feel a bit like BTT may be a safer bet anyway, since I have not read of many serious issues with it, and it seems more polished.
The buck converter is required to provide a 5V source on the board, and it's output is what the processors (after being stepped down again to 3.3V) and the LED's use, since they cannot take 24V directly. Since the board takes 24V as input, it has to first drop that down to 5V using a buck converter, and then though a less efficient linear regulator to drop 5V to 3.3V for the Pi. When a voltage is dropped using a buck converter, some of the energy is wasted (heat), but buck converters are still the efficient way to lower a higher voltage to a lower one, when there is a significant difference between the two.
I am not an electronics expert, and barely a hobbyist, but several things I've read make me question if the buck converter is implemented well on the V1 board. I decided to see if I could compare a reference design to what is used on the V1. I found something even better than a reference design though, and used TI's (really cool and free) webench tool to spec out a BOM and reference design using the same TI TPS5430DDAR (datasheet here). Using the webench, I set the input voltage range between 23-25V (and I also tried 20-30V and even 10.8-13.2V), and generated several BOMs and schematics. Despite the input voltage range being different on several runs, the component values I stayed mostly the similar, except for the input capacitor value, which changed depending on the input voltage.
When I compared the values from the webench tool to the Schematic for the SB-2040 Version 1, I saw that the Fly SB-2040 V1 designer used different values for several of the key components (compared to the webench). There may be a reasonable explanation for this, which I just don't understand, so I'm not calling this out as a problem, just something interesting. The input capacitor looks to be 4.7uF on the SB-2040 V1, which is the same as what I found when running the webench tool with a input range of 22-26V (which is good). However the diode, inductor and output capacitor value or type were different than what was specified in the webench tool.
For example, when I ran webench using 22v-26v input (that is probably too tight a range but I was looking for the best case), and compared them to the SB-2040 V1 schematic, I noticed these differences:
D1
Webench shows a Schottky diode, while the SB-2040 V1 uses a standard diode (IN4007)
L1
Webench shows a 15uH inductor, while the SB-2040 V1 uses as 10uH inductor
Cout / E1
Webench shows a 330uF 6.3V capacitor, while the SB-2040 V1 uses a 220uF 6.3V capacitor
Like I said, I am not expert, but this does make me wonder, and so I plan to check the board with a thermal camera to see if the buck converter looks to be heating up (I read that may happen). If it does appear to be heating excessively, I will either re-consider using this board, or possibly try swapping some of the components with values which better fit the values from the webench tool. I'm also wondering (in case of an issue) if swapping the slower standard diode with a schottky diode may be worth trying first. Aside from that, if there is a problem I may just switch to a different CANBUS board, since for the price it may not be worth the effort of swapping several components (since I suck at soldering small stuff).
I did not trace the parts in the pics out below, but the highlighted parts look to be the Diode (red), Inductor (purple) and 220uF Capacitor (green). The TI TPS5430 is in the orange color box.
Update - I went looking to see if I could find some components to maybe have on hand if I want to try some swaps, and noticed that if I increased the temp in the webench, still using 22-26V as input, I did get a BOM using a 220uF output capacitor. The diode and inductor were still possible candidates to swap. I cannot seem to find a Schottky diode in a SOD123 package with similar specs though, the highest current version I can find is 3A, which is also the max of the 5430. Finding a 15uH inductor that would fit looks like it will be a pain as well.
It looks like the version 2 uses a different buck converter so that is a possibility to swap the board, or maybe the BTT CANBUS board which looks similar (designed for the Stealthburner). Given the well known issue of heat and my new understanding of the root of the problem thanks to rbrtwtrs at Github, I don't really think it's worthwhile to use the V1 board, and will look for another option, the heat gremlin is one thing I'd rather not have to deal with.
Update 2 - I read of other issues with the SB-2040 implementation such as possible driver issues with SK6812 LEDs (I guess some LED strings being sold for the Stealthburner use SK6812 LEDs and not the standard WS2812 LEDs, and some folks have had issues). The driver issue could be fixed though, as it's software. Due to the heating issue, which seems well understood in the community to be related to the buck converter on the V1, I've decided not to continue with the Mellow Fly SB-2040 Version 1 board. I ordered a BTT EBB SB2209, which will be here in two weeks (around the second week of May). I could not find anyone selling the SB-2040 Version 2, which looks like it could have saved me some time, but I feel a bit like BTT may be a safer bet anyway, since I have not read of many serious issues with it, and it seems more polished.


 RSS Feed
