UPDATE 9/17/2022: I removed the files from thingiverse, and plan to re-work the design since I noticed that my camera has rotated during printing. I do not recommend using the design since the camera could slip in the mount which could pose a risk if it got too close to the nozzle somehow. I will update this post when the new design is ready, I am gonna try and use this camera but it is on the way from China so I won't know if the focal length will work or not (if not I plan to try adding a lens).
I had to make some changes to the design to lower the camera, since it was not catching the action too well where it was before. My wring is still a mess but I'm working on some cable management.
It's not much to look at now, but you should see it in action :D It looks like the endoscope camera will work pretty well (UPDATE 2/5/2022 - it worked well for a month but then died, and has since been replaced with the same model. I will update if the 2nd one also has any problems). I have it set up with the MultiCam Plugin for Octopring (which allows toggling between cameras using the buttons on the "control" tab within Octoprint):

This is not really a guide, but just some observations on how to get this working (multiple cameras in Octoprint).
To do this, several things were required. First a working Octoprint install on a Rpi (4 is preferred due to the load from the extra cameras). Also a good power supply or a powered USB hub that is compatible with the Pi. An SSH terminal app on a PC such as Putty (https://www.microsoft.com/en-us/p/putty-unofficial/9n8pdn6ks0f8?activetab=pivot:overviewtab)
I first had to get the mpeg stream to work from the new endoscope camera, and to do that I follwed this guide:
https://community.octoprint.org/t/setting-up-multiple-webcams-in-octopi-the-right-way/32669
Some basics on this process first though. To access the pi, the Putty program will be used, just open it and put the IP of the Pi in (leave the port as 22 - which is for ssh). Then log into the pi with username "pi" and the default password is "Raspberry" but please change it to something else using the "passwd" command (follow the prompts and don't loose the password). Note that the password here will not be the same as the one used for Octoprint, they are different so changing one does not affect the other.
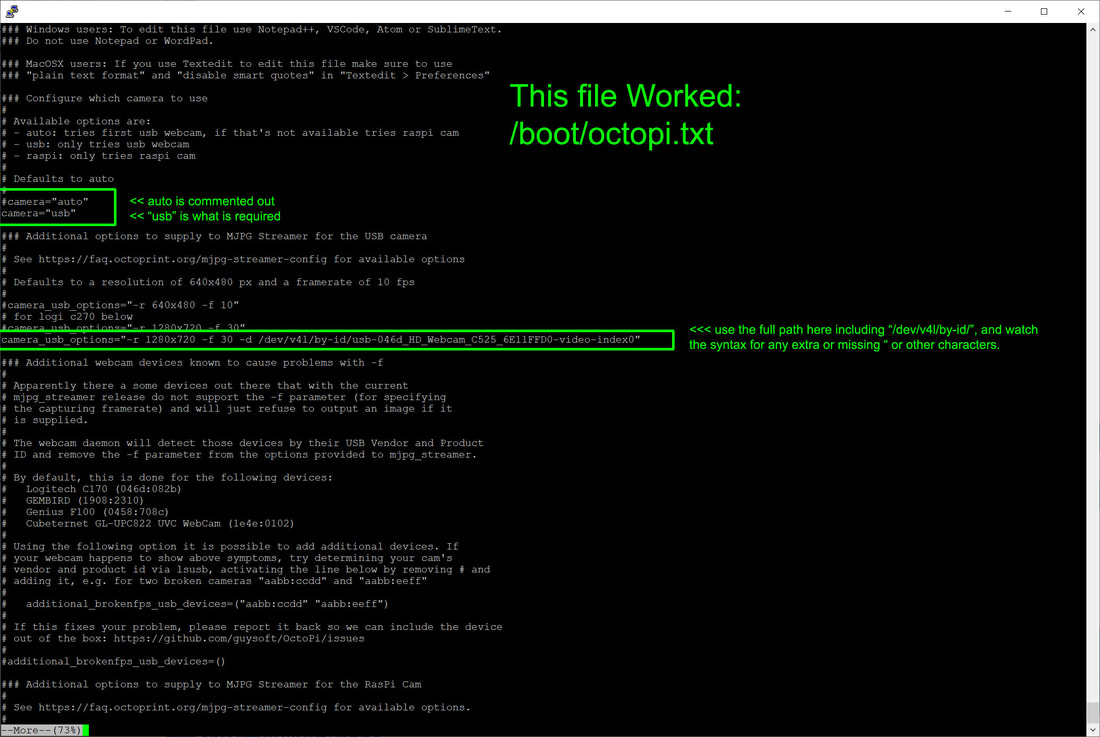
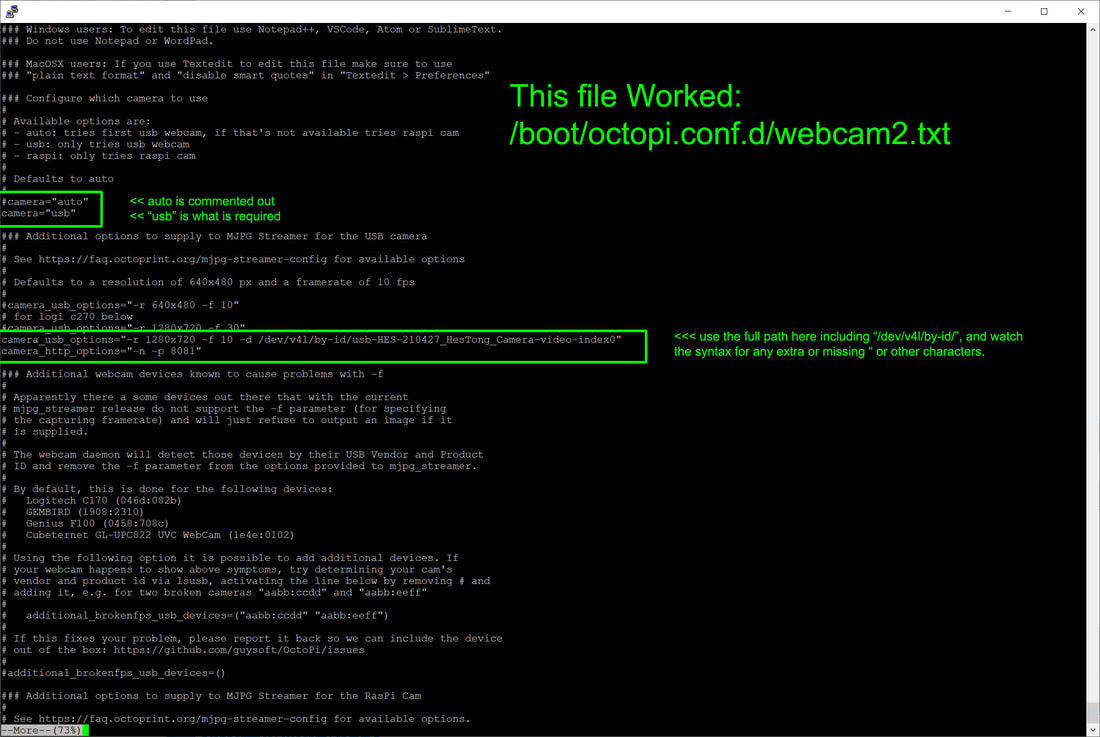
Next, I just followed the guide linked above, but as usual I ran into a problem (s). When I set up the files /boot/octopi.txt and /boot/octopi.conf.d/webcam2.txt for the webcams, I made some typo's and failed to close some quotes or left double quotes. That jammed everything up so if you find things don't work, look over those really closely. I included screencaps of the working files below for reference (these were after fixing the typos):
To do this, several things were required. First a working Octoprint install on a Rpi (4 is preferred due to the load from the extra cameras). Also a good power supply or a powered USB hub that is compatible with the Pi. An SSH terminal app on a PC such as Putty (https://www.microsoft.com/en-us/p/putty-unofficial/9n8pdn6ks0f8?activetab=pivot:overviewtab)
I first had to get the mpeg stream to work from the new endoscope camera, and to do that I follwed this guide:
https://community.octoprint.org/t/setting-up-multiple-webcams-in-octopi-the-right-way/32669
Some basics on this process first though. To access the pi, the Putty program will be used, just open it and put the IP of the Pi in (leave the port as 22 - which is for ssh). Then log into the pi with username "pi" and the default password is "Raspberry" but please change it to something else using the "passwd" command (follow the prompts and don't loose the password). Note that the password here will not be the same as the one used for Octoprint, they are different so changing one does not affect the other.
Next, I just followed the guide linked above, but as usual I ran into a problem (s). When I set up the files /boot/octopi.txt and /boot/octopi.conf.d/webcam2.txt for the webcams, I made some typo's and failed to close some quotes or left double quotes. That jammed everything up so if you find things don't work, look over those really closely. I included screencaps of the working files below for reference (these were after fixing the typos):
 |  |
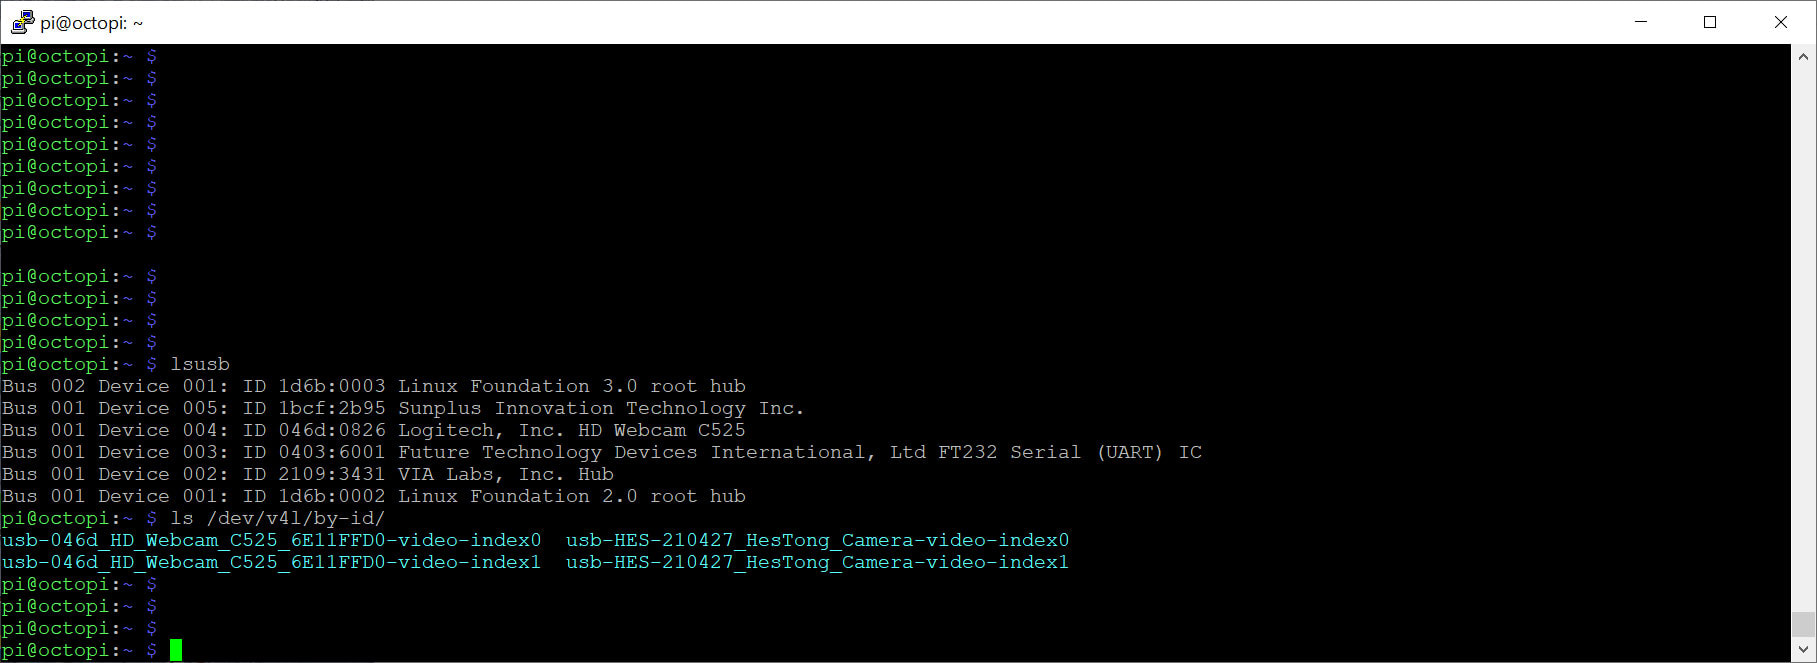
This is covered in the guide, but if you need to see if your USB camera is detected you can use "lsusb", and you can find the "long name" of the USB cameras using "ls /dev/v4l/by-id/". Below are screencaps of what mine look like (you can see I have a Logitech C525 and the Endoscope is the "Sunplus" device:
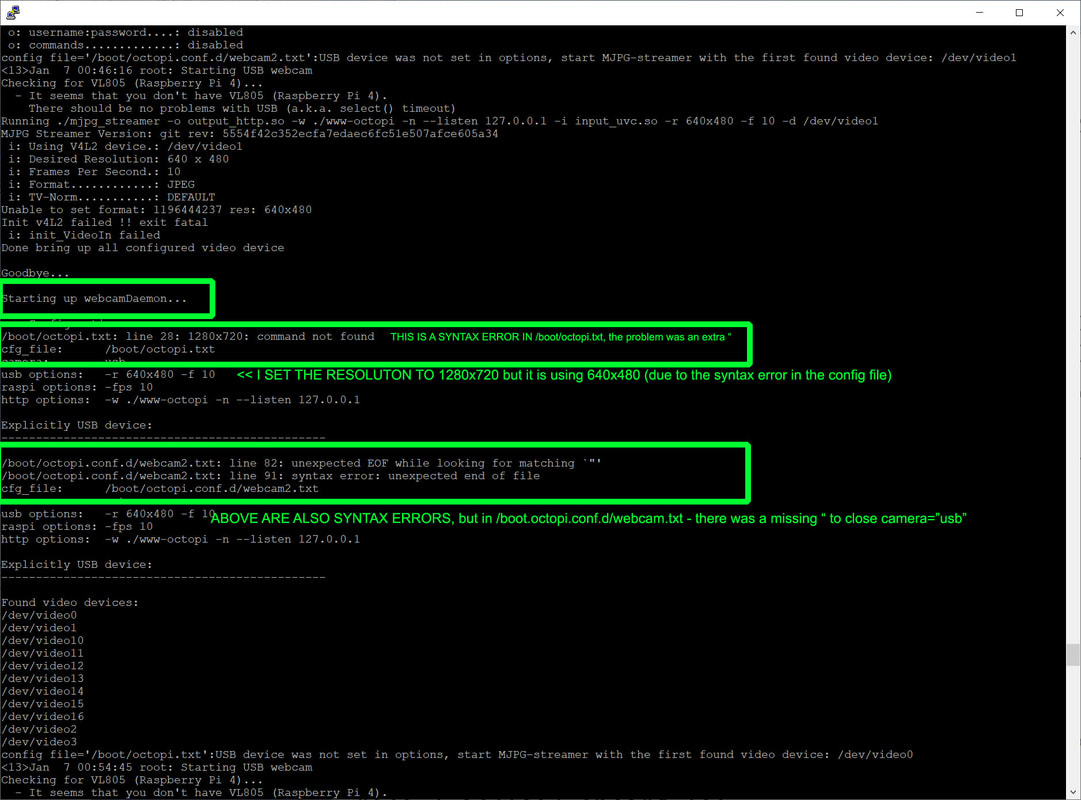
If there are problems with things not working, checking in the webcamd log can point the way to what happened (more is a command to show file's contents on the command line):
more /var/log/webcamd.log
Note that this log will keep growing every time the webcamd process is started so you need to go to the bottom to find the logs since the last re-start of the process. They will start with "Starting up webcamDaemon..." and end with "Goodbye...".
As an example, I had some syntax errors (missing ") in my config files. Look for things like this in the /var/log/webcamd.log (don't forget to scroll down to the bottom for the latest logs):
Additionally, if you see no syntax errors and it looks like it is not using your desired resolution but 640x480 instead, you can run this to see if the resolution is supported:
v4l2-ctl --list-formats-ext
If you make changes to the config files, then you need to restart the webcamd service every time (using "sudo service webcamd restart"), for the changes to take effect.
When both cameras are working the /var/log/webcamd.log will look like this:
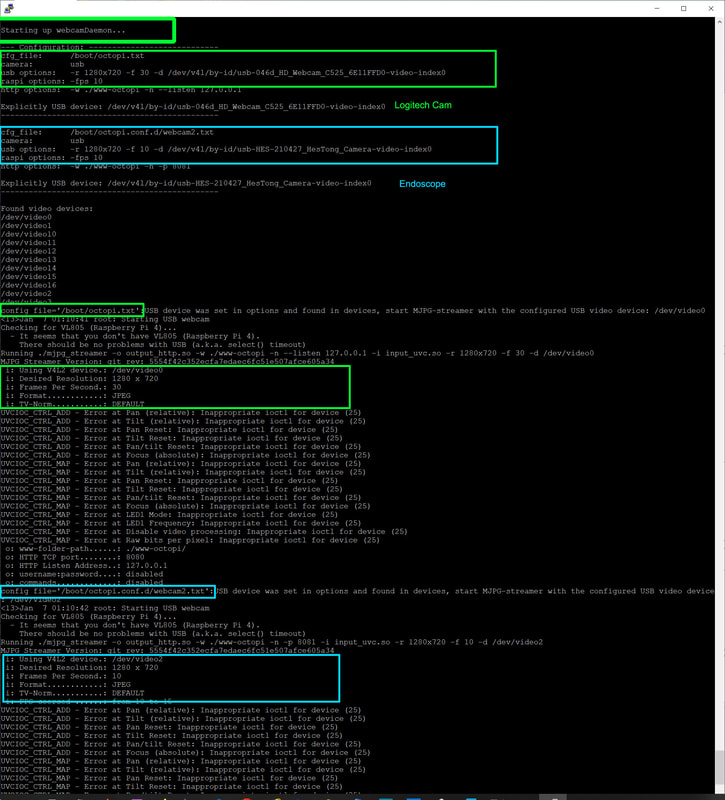
Note that the notice that ":USB device was set in options and found in devices, start MJPG-streamer with the configured USB video device: /dev/video2" was not a problem, the above was a working example for both cameras, and I was able to stream using the endoscope camera using "http://192.168.0.22:8081/?action=stream".
Now that was working, I thought I would be set and could just put "http://192.168.0.22:8081/?action=stream" in the URL field for the Multicam plugin and it would be smooth sailing... Haha, few things ever work like that for me.
Even so, I tried setting the second (endoscope) camera up with "http://192.168.0.22:8081/?action=stream" as the URL, and it failed, even though I can open http://192.168.0.22:8081/?action=stream in a browser and see the stream.
I realized at that point that I needed to set up the Haproxy according to the last part of the guide here (https://community.octoprint.org/t/setting-up-multiple-webcams-in-octopi-the-right-way/32669), so that's what I did, and it now works as it should (I can use the Multicam plugin to toggle between the cameras). Below is my current working Multicam config:
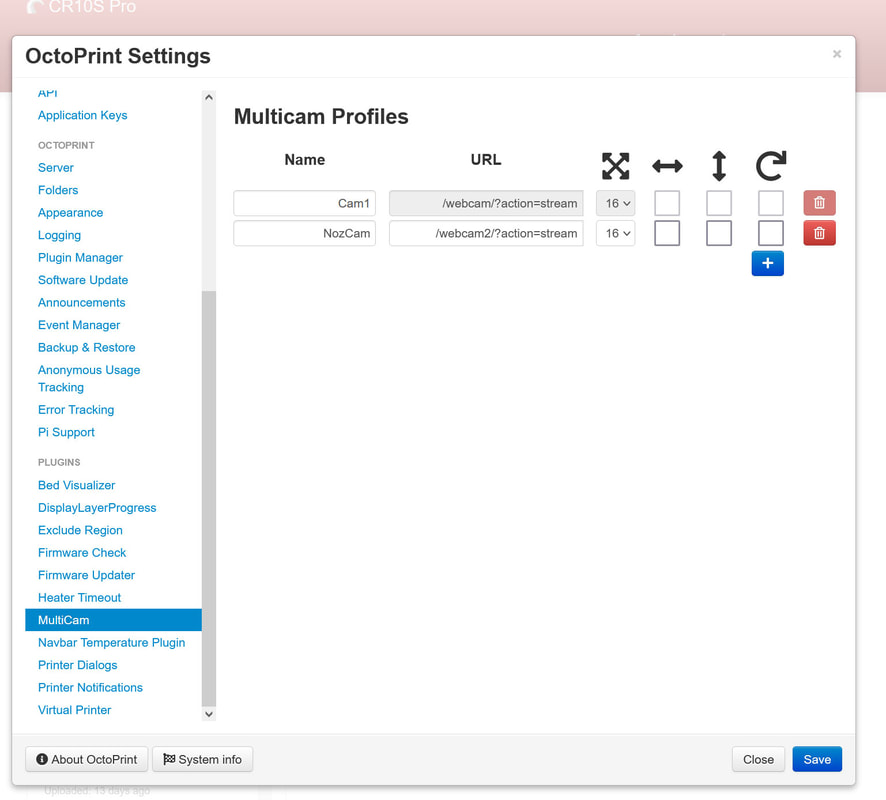
One thing to keep in mind is that the multicam plugin does not show multiple cameras on one screen within the Octoprint UI, it only provides buttons to toggle which camera is used. It can therefore be handy to just open another browser and stream the other camera (using http://192.168.0.22:8081/?action=stream for example - with your Pi's IP).
I also noticed a bonus - the Multicam plugin also added a button for each camera in Cura (I did not have to configure this):
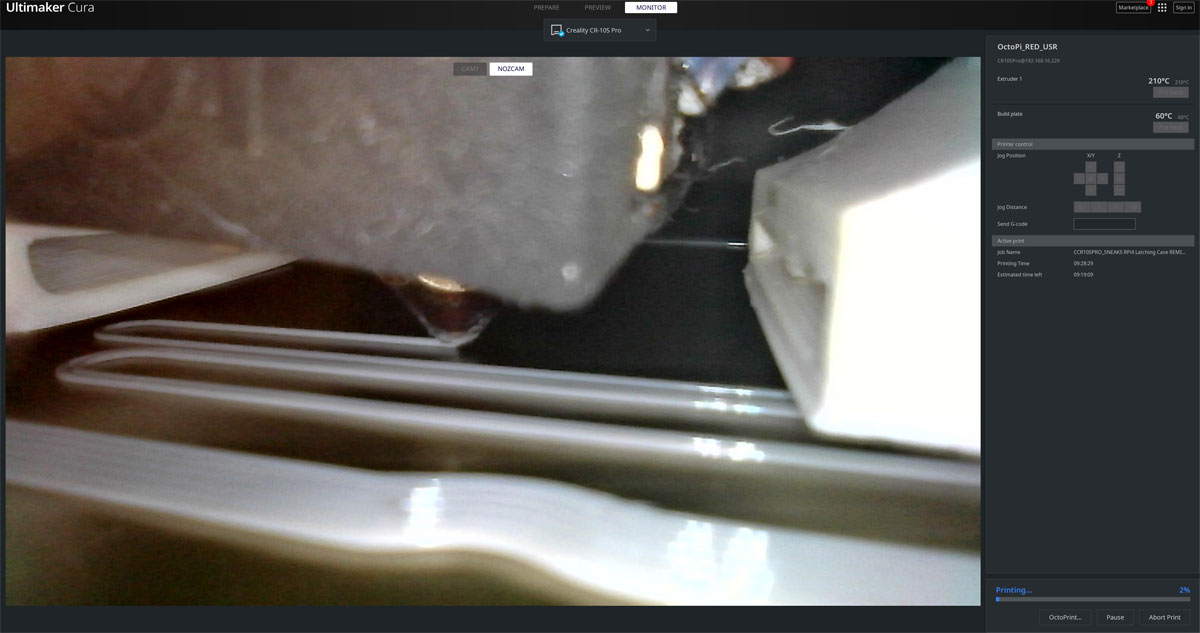
This is about the coolest upgrade to my printer, aside from the touch probe. It's amazing to see how the first layer goes down and be able to make adjustments to it on the fly.
(EDIT: Removed the link for the camera mount, I am gonna re-work the design since my camera has rotated during printing. I do not recommend using the design since the camera could slip in the mount which could pose a risk if it got too close to the nozzle somehow.)
UPDATE 1/22/2022 - If you find that the buttons stop working, that is an issue with the plugin. Somehow the URL for the first cam gets auto-changed so both cams use the same URL and the first one cannot be edited via the plugin interface since it is grayed out.
There are two workarounds that I am aware of. The first is mentioned here (https://github.com/mikedmor/OctoPrint_MultiCam/issues/8) and requires editing ~/.octoprint/config.yaml (it will be under the "plugins" > "multicam" section). Just change the "URL" to the correct one.
The second one is a bit clumsy but easier. Just add another cam with the correct URL. It will leave the first one there but at least you can toggle cameras.


 RSS Feed
