
Screen files are loaded when it says "SD Card Process... END!"
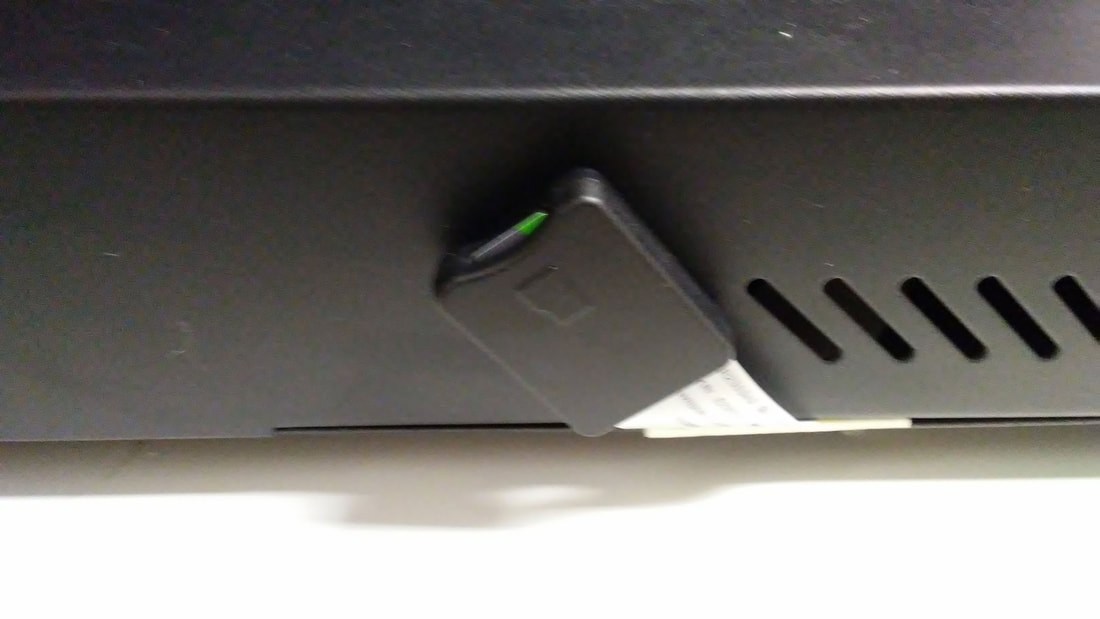 MicroSD card extension from the screen. |  This is the DGUS-reloaded screen files installed. |
The CR10S Pro has some quirks when updating firmware due to the graphic LCD. The LCD gets commands from the board and then displays the info or sends info back to the board. The screen also has it's own firmware and processor to help make this communication happen. So the screen is not like a monitor is to a PC, just displaying what the graphics card sends it, but rather the screen keeps image files (in BMP format) and knows which commands from the board they correspond with. So for example, when the printer boots up, it tells the screen to display an image of the boot screen. The screen just keeps these images locally and knows which one to throw on the display when the board asks for it, and can send data back to the board if the user makes a change, like updating the hot end temperature.
This makes updating Marlin a bit trickier since both the firmware on the 3D printer's main board, and the graphic LCD both need to get updates. The Marlin update is done the same way as always (and I use the Octoprint Firmware Updater plugin for this), but the screen requires a bit more work. Additionally the firmware and screen files need to play nice together, so unless you want to build it from scratch, finding some fork of marlin specific to the printer is an easier way to go.
So now you are probably asking, "where do I get the code to upgrade Marlin or the screen?". The answer is a couple places that I am aware of currently. The first is TinyMachines which has been supporting the CR10S Pro and other machines with a fork of Marlin that is customized to work with the screen files they provide. Their firmware and great instructions can be found here:
https://tiny-machines-3d.myshopify.com/pages/10spro
(click the link which says "Tiny Machines 3D Printer Firmware" and links to their google Doc with links and instructions.
UPDATE - I had a problem with the TinyMachines DW7.4 firmware which would take 15-20 minutes to do an ABL, since the probe will pause if the bed temp fluctuates by even a fraction of a degree between probes. I had previously recommended not using TinyMachines for that reason and instead I tried Desuuuu's firmware (which did not have that problem). However I have read that the latest version of TinyMachines (DW7.4.3 I think) does not have the problem of pausing at every probe point during the ABL so I would again recommend it, and plan to try it again when I have some more time.
I recently found another project on GitHub with recompiled firmware and screen files for the CR10S Pro and a few other models (CR10 Pro V2 and Ender5Plus) here:
Marlin FW (precompiled binaries):
github.com/Desuuuu/Marlin/releases
DWIN Screen Files:
github.com/Desuuuu/DGUS-reloaded/releases
Screen Instructions:
github.com/Desuuuu/DGUS-reloaded/wiki/Flashing-the-firmware
There are also config files if you want to compile that fork of Marlin:
github.com/Desuuuu/Marlin
It's not required but you can check the SHA256 checksums on the files if you wish using windows and the process explained here.
I have just installed this version and have not yet tested it out, but will update here when I do. If there is a problem, the next plan is to roll back to an earlier version of TinyMachines firmware.
Before updating firmware, it's a good idea to either copy the output of M503 to a notepad, or if you can't access the printer's terminal, write down the z-offset so you can re-enter that after the upgrade. Also if you calibrated the e-steps, that should be copied so it can be re-entered post upgrade.
Once the firmware and screen files are obtained, the next hurdle, for the CR10S Pro at least, is that to access the screen's SD card slot, the entire bottom cover of the printer must be removed, and that means removing at least a dozen screws. To make this process simpler, I installed a microSD card extension on my printer so I can access the screen SD slot without removing the cover, and for about $6-8 it's not that expensive to do. I added some double sided foam tape between the flat ribbon for the extension and the case, to help protect it, which can be seen in the pic at the top. Edit 10-18-2021: I don't think it would fit through the vents.
The screen updates via a microSD card which needs to be formatted with FAT32 and 4096 byte clusters. The cluster size can be a bit of a "cluster", pardon the pun, since windows does not show that option on my install, but you can get a free program like MiniTool Partition Wizard which can easily format it with the correct cluster size. Then a directory containing the files the screen will need, is simply copied to the formatted MicroSD card. The directory is always named "DWIN_SET" and if you look inside you will find the images, WAV files and other cfg and bin files the screen will use to update itself. Updating just requires turning off the printer, plugging in the MicroSD with the "DWIN_SET" directory onboard, and then powering up the printer. The screen will go blue with some text showing it is loading files and then it will flash images of all the BMP files in the DWIN_SET directory across the screen, and then it goes back to the blue screen with the text where I usually give it a minute to make sure nothing changes, before powering the printer off, removing the microSD and then powering it back on. The new screen files should then show up. As an aside, it's possible to edit the boot up screen in the DWIN_SET (called "000_boot.bmp" in my version), with a custom printer name or whatever. I added the printer name and some other info to the boot screen. It can be handy to see some printer info during bootup, and I would add the version number so it's easy to know what it's running. If changes are made to the boot screen, it has to retain the same pixel dimensions and format (.BMP).
Installing the firmware and screen files is well documented but in a nutshell, I upload the firmware using the OctoPrint Firmware Updater plugin, and then, when that is completed, I just install the screen files as described previously.
Update 10/4/2021: I have been using Desuuuu's fork of Marlin for the CR10S Pro V1 and it does not have the same problem with ABL as Tinymachines DW7.4 does (that is taking 15-20 minutes to peform an ABL mesh). It however did not work perfect for me, and I have had a few annoyances with it (some of which could have been due to not clearing the settings out prior) - and none of these are still present now after many prints (see updates). The most serious problem I had after install was that the z-offset seemed to get lost after setting (and saving it using M500) one time, which caused the printer to try and bury the nozzle in the bed, but since resetting it, it has been OK. When I say bury the nozzle, it was only off by a mm so no damage was done. Oddly, when the printer got it's stuff back together (after several rounds of re-adjusting the z-offset), I ended up just about where it should have been to begin with, but I was seeing inconsistent offsets several times before getting it back to just right. It has since been stable with no further z-offset issues for 3 prints since this happened. Temperature stability of the hot end is also not great, I can see waves on the temp/time graph in Octoprint, even after running 2 cycles of PID tuning at the same target temp as I use. Previously the temp/time graph was rock solid. I also noticed this to a worse degree with TinyMachines DW7.4, but it cleared up after the first dozen or so minutes with DW7.4, whereas with Desuuuu's fork of Marlin, I see slight wavyness through the print (not on the print but on the temp graph). The fact that this temperature instability is a problem with both firmwares, but was not a problem previously, and does not clear up with multiple PID tunes, makes me question if it is due to some change with Marlin itself, or possibly more interrupts going on within the code or something like that. I did not see any issues with the hot end itself so will try another PID run on the hot end to see if that helps.
There was also an error about bed timeout, which I haven't received on my old TinyMachines DW6 firmware (I did run 2 PID tuning cycle of the bed several prints prior to that occurring). The only other downside for me is the very small buttons, and at least one which is mislabeled, but those are minor, and it does work, and most of my prints seem mostly OK. I am still testing, and though initially I was bummed out that I had problems, they have not been a problem since the initial install. With both the TinyMachines DW7.4 and the Desuuuu updated versions of Marlin, there were some issues which either have not affected prints (like the slight wavyness in the temp graph or the initial problems of bed timeouts), but these have not been ongoing.
Update 11/24/2021: I am still running Desuuuu's firmware and have not had similar problems for many prints now. I still think the display files are not as nice to use as the Tinymachine files since the buttons are much smaller, and I will be trying TinyMachines DW7.4.3 as soon as I get some downtime on the printer to test it out (since that should have the the fix for the slow ABL problem in DW7.4).
Update 12/13/2021: Updated this post to better reflect how things are going (which is well). I am still running Desuuuu and have not had many issues aside from the small buttons since the initial problems during install.


 RSS Feed
