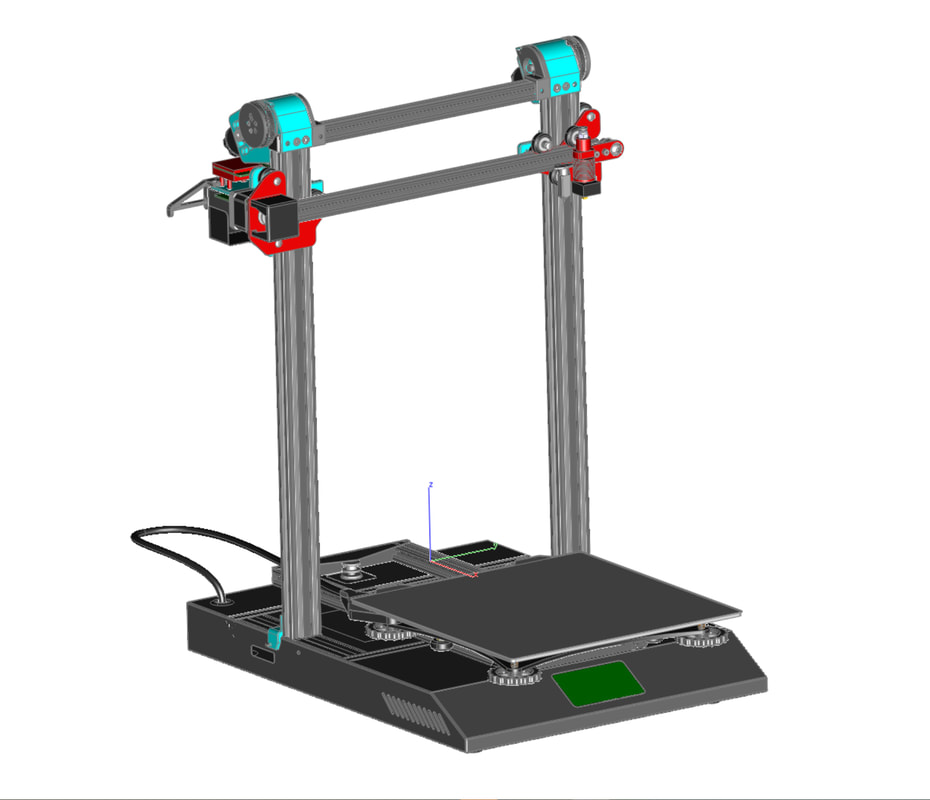
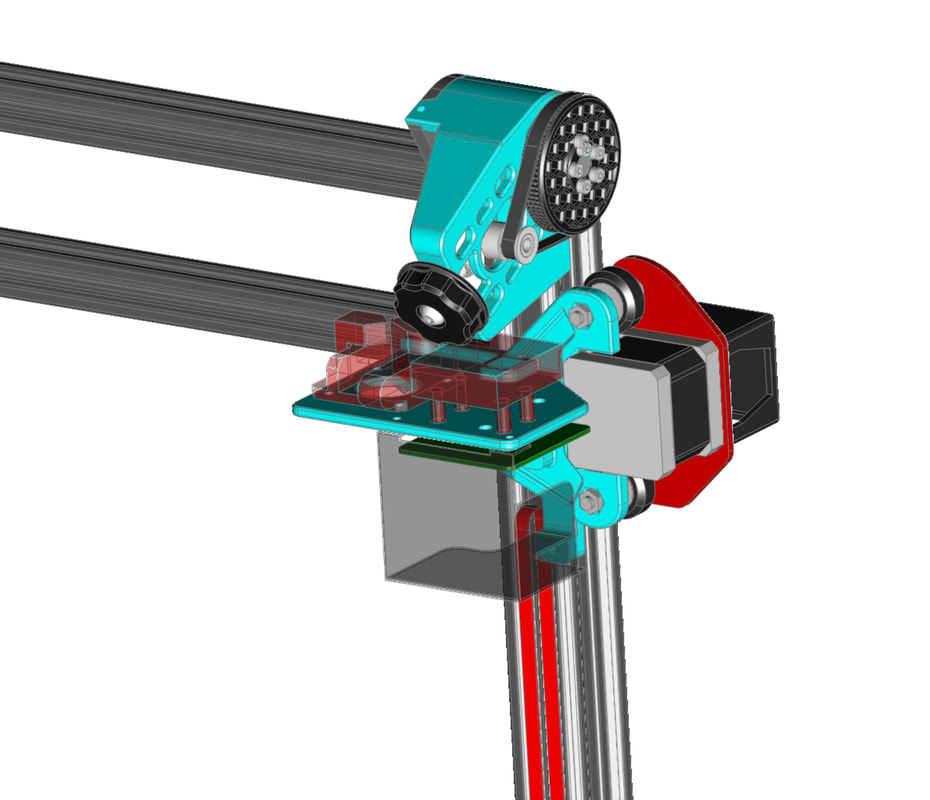
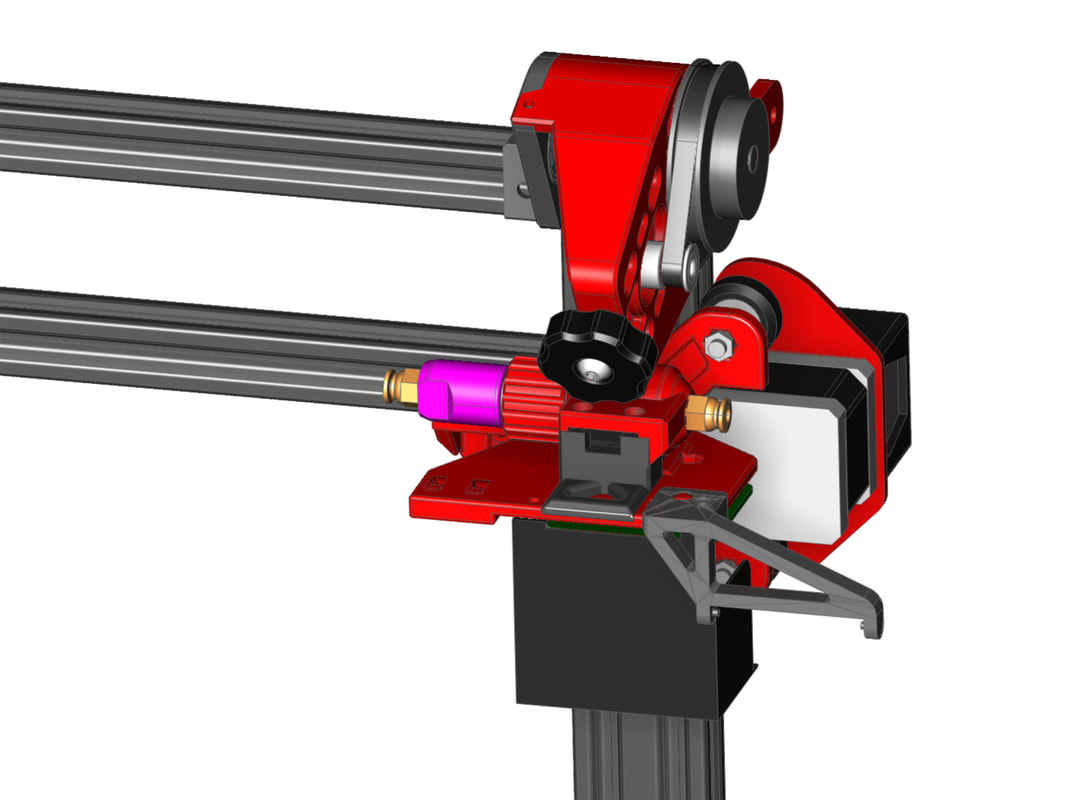
I ordered a kit to allow me to remove the z leadscrews on my CR10S Pro and swap them for belts. There are a number of reasons to do this and a number of reasons not to, but I'm gonna give it a try. The design is a remix of Kevinakasam's Belt Driven Ender 3/Pro/V2 and CR10 which is posted to Thingiverse and his Github. I am specifically using the UltraLow Profile version 3.6 as a basis for this remix. I also used Captain_Falafel's detailed CR10S Pro model to help remix the parts (also pictured), which was a great help. The parts should be 99% done, but I have to print and test it before I can post it (which will be as a remix on Thingiverse). I should be getting the hardware in a day or two as well. I only need to see what the hole spacing will be from a support rod kit, which I also am waiting on for the same printer, since that will sandwich over the mounts for the transmission (and the holes will need to line up).
I went a bit overboard though and added a few extra things to the existing models and made some slight changes to help them print with fewer supports. The largest part of the modification though was the left side carriage which required moving the stepper and filament sensor down a bit, in order to accommodate the transmission parts. I should have retained the full 400mm height with this, but I will have to see. I also designed this to still work with my cable chain remix which is unfortunately only for the CR10S Pro V1.
I went a bit overboard though and added a few extra things to the existing models and made some slight changes to help them print with fewer supports. The largest part of the modification though was the left side carriage which required moving the stepper and filament sensor down a bit, in order to accommodate the transmission parts. I should have retained the full 400mm height with this, but I will have to see. I also designed this to still work with my cable chain remix which is unfortunately only for the CR10S Pro V1.
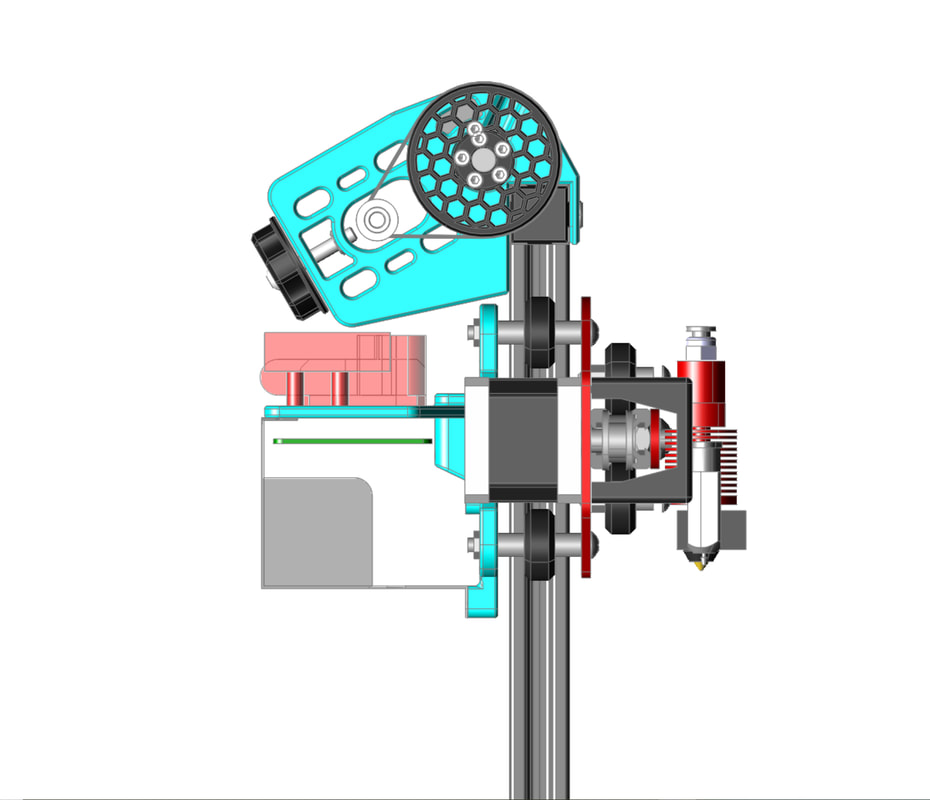
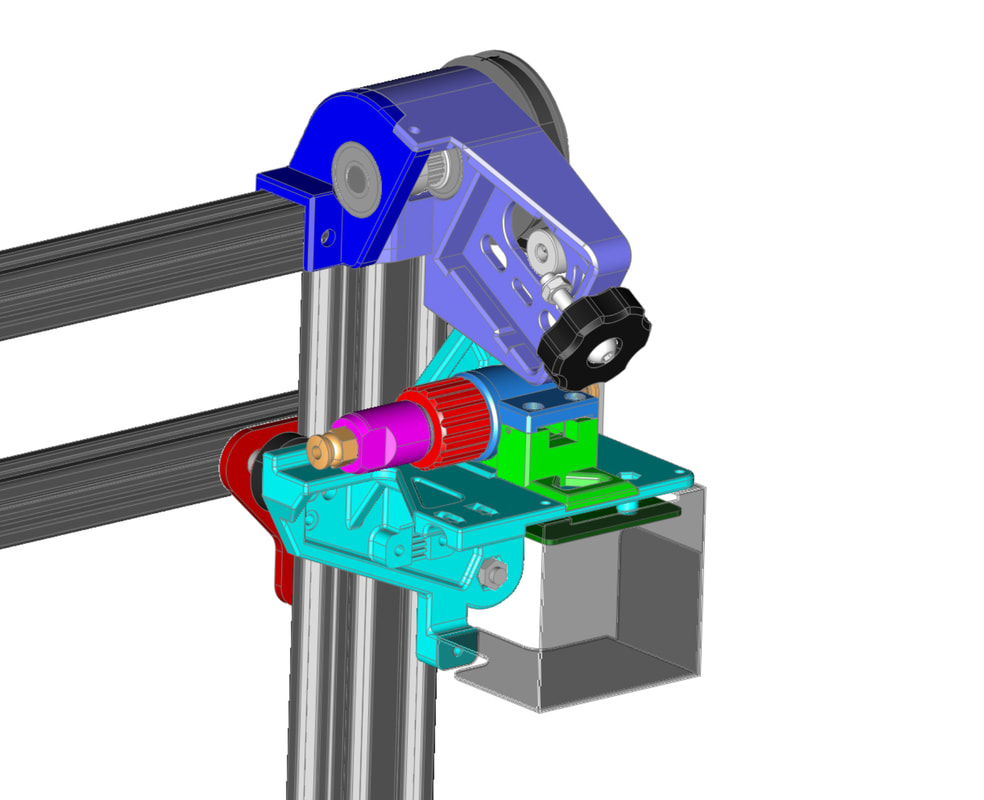
Update 9/11/2022: There is a bit more progress and some changes to the design. I decided that since I don't use the stock extruder, I would make a version for a direct drive, and since the stock filament runout sensor does not allow for using a Bowden connector, I used the "Creality CR-10S Ultimate Filament Run Out censor With Z Axis Cable Guide" by 3Deddy at Thingiverse, along with my Bowden coupler, to make a filament sensor housing for the CR10S Pro which would allow me to quickly disconnect the Bowden tube from the filament sensor in the event of a break, or to remove the filament quicker during unloading. A bit of cable management was also added to replace the stock cable management on the CR10S Pro which uses the left carriage which is getting replaced.
There are a few changes to the transmission housing as well, with it being narrowed down by a bit which will allow me to better use the 65mm rods I will get in the kit, with some aluminum 80 tooth gears (since with the stock design it's a bit tight on the length when using the aluminum gears). I also removed a pocket which was meant for the printed 80 tooth gear and some other minor things. I have printed a few parts already to test things and am really impressed with the fit of Kevinakasam's original design, it's really good and the parts work very well.
There are a few changes to the transmission housing as well, with it being narrowed down by a bit which will allow me to better use the 65mm rods I will get in the kit, with some aluminum 80 tooth gears (since with the stock design it's a bit tight on the length when using the aluminum gears). I also removed a pocket which was meant for the printed 80 tooth gear and some other minor things. I have printed a few parts already to test things and am really impressed with the fit of Kevinakasam's original design, it's really good and the parts work very well.
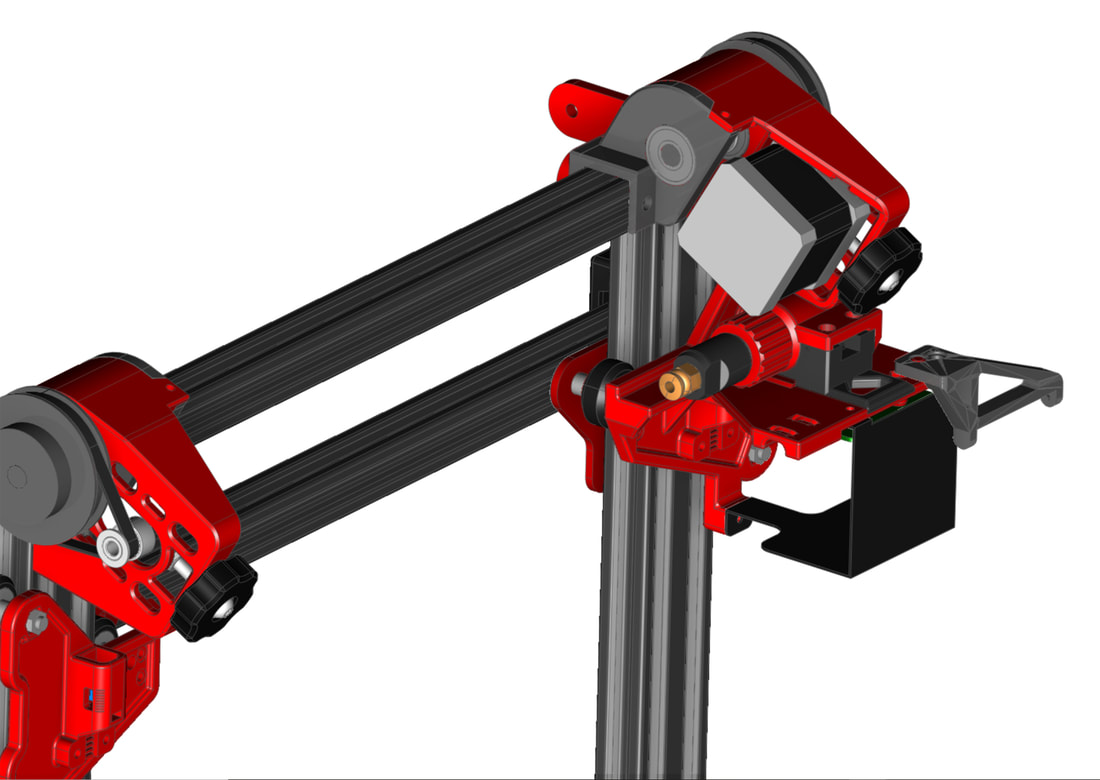
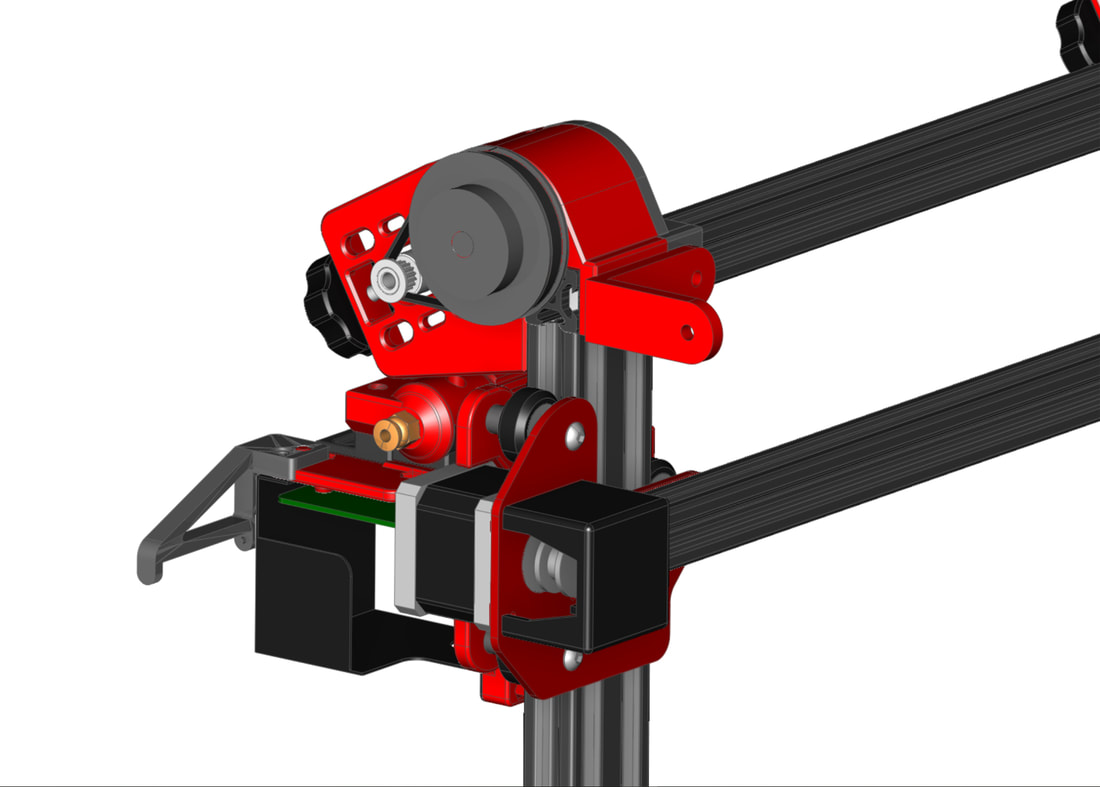
Update 9/13/2022: There have been a few changes, and the design is now ready to print. The changes are primarily to help with printability, or to add some strengthening to the modified parts for the CR10S Pro, but also to allow the use of a bracing kit on the CR10S Pro. There is at least a few other usability changes which may or may not work out, such as a view port on the belt tension adjuster (with some markings at 1mm intervals), an update to the ribbon cable management attachment and modifying the lower belt idler holders to make use of the threaded holes in the 2040 extrusions, whcih may help with mounting (they will also have some T-nuts though). I picked up some "Fire Engine Red" e-Sun Red PETG, which prints nicely and is a deep red which almost matches the anodized parts on the printer (edit: depends on the lighting), so I will be printing most of the parts in that (I plan to use it to make some parts for the Voron as well). Because PETG is not as strong as PLA I plan to print these with at least 3-4 walls and 60% infill on structural parts, with a 0.6mm nozzle. Ideally I would use ABS or ASA, but I don't run those materials much due to the smell and these parts should be beefy enough that PETG will work OK.
 |  |  |
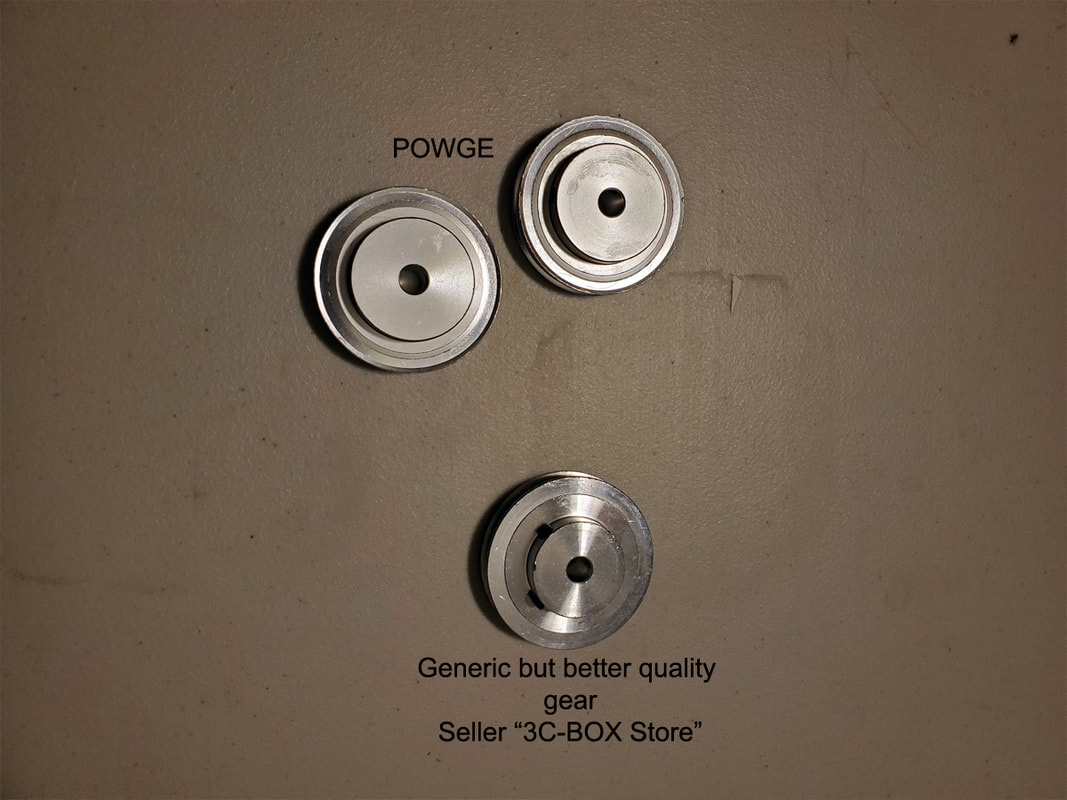
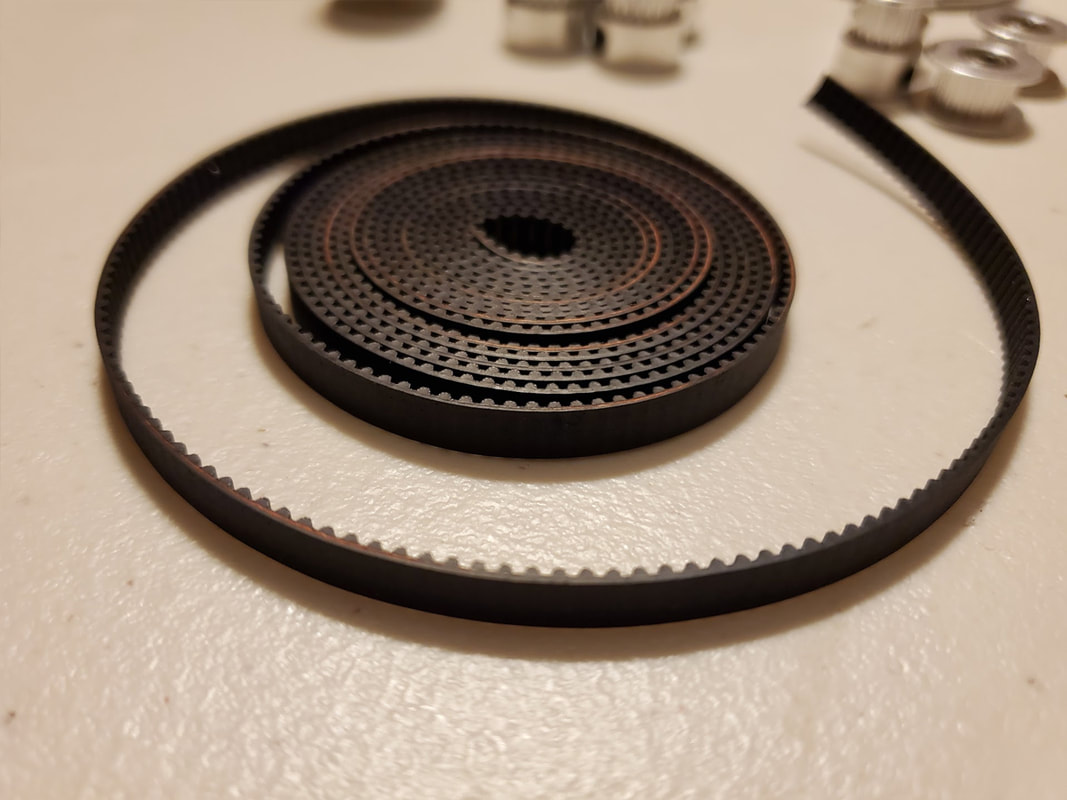
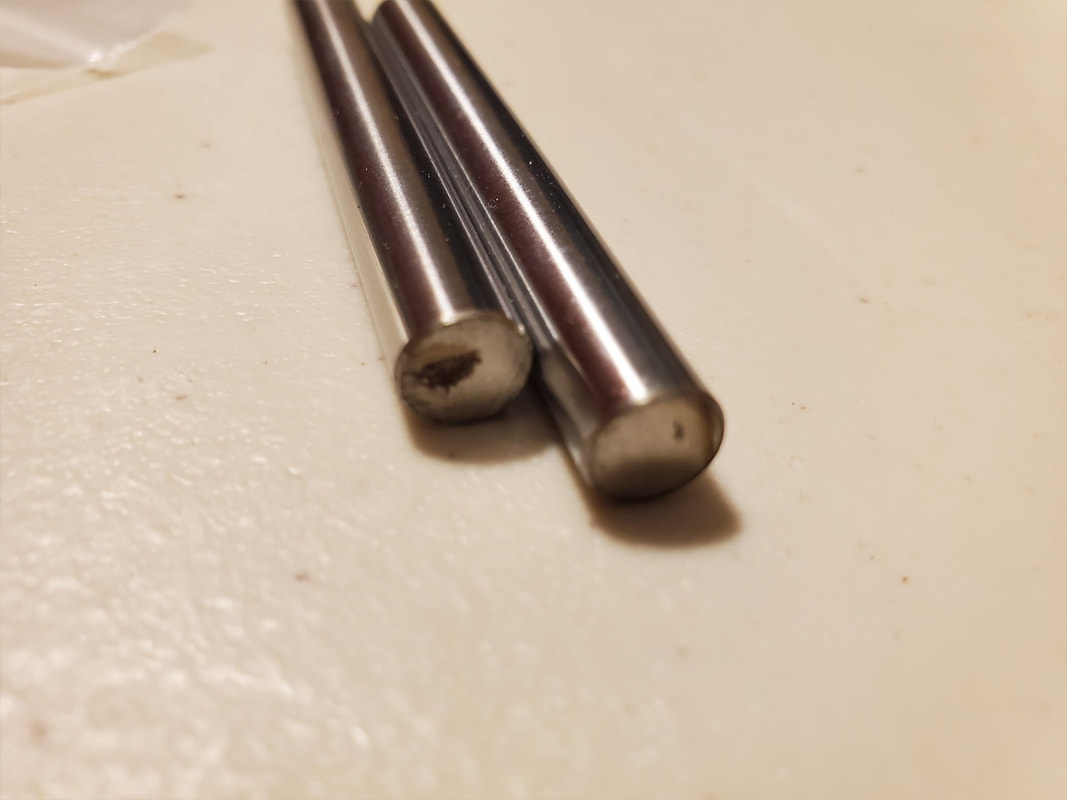
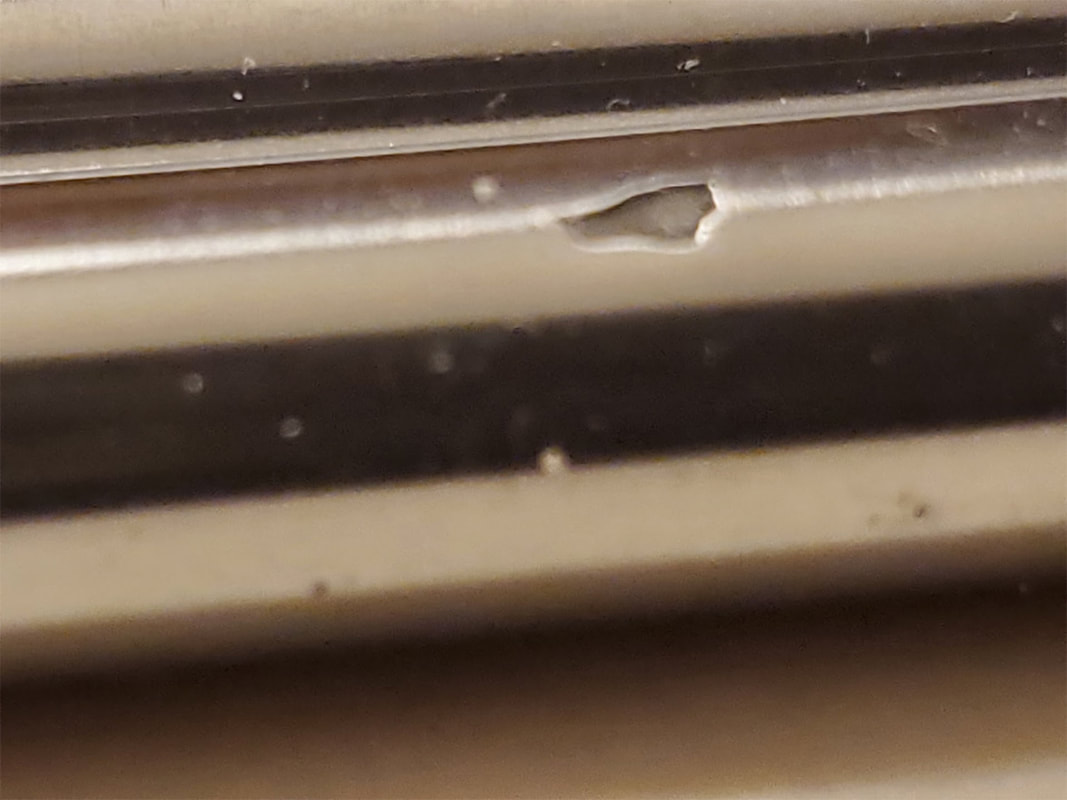
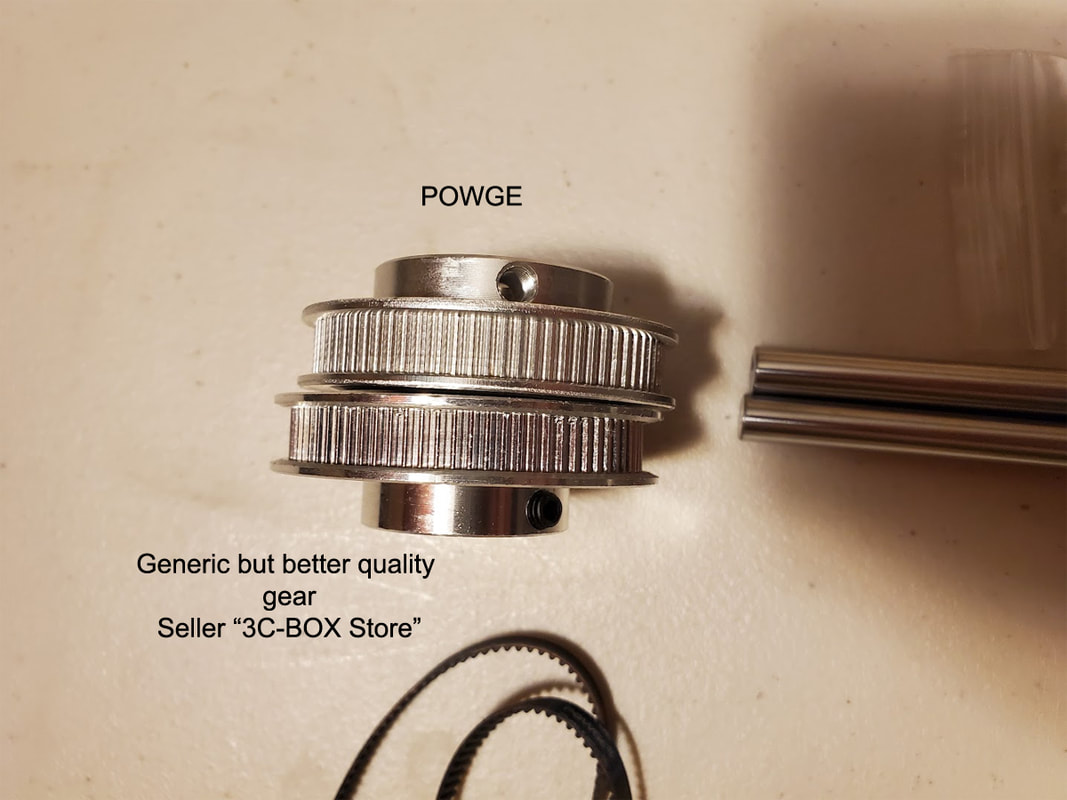
Update 9/14/2022: I was happy to find that the kit I ordered from AliExpress with the parts for Kevinakasam's belt driven Ender3 design had arrived (I ordered the kit from Powge on AliExpress which is just a seller who compiled the parts for the design, but AFAIK has no affiliation with the designer). Unfortunately, when I opened the package and examined the parts, what I found was a disappointment. I purchased some aluminum 80 tooth GT2 gears (with 8mm holes) along with the kit (also from Powge), and they had sharp edges which required about 10 minutes to deburr (and I did it poorly since I only have a cheap tool). I will probably need to chuck them in a drill and sand the edges to clean it up. That was not the worst however, the 65mm dowel pins have rust and one has a large pit in the surface. Rounding out the kit was the more generic stuff which is hard to mess up, and that was mostly OK. The 608 bearings are usually cheap, but I have my doubts about these since the metal looks darker than most of the ones I have bought in the past, but will need to take a closer look before I decide if they will be used for this project or not. Update - I checked the bearings and compared them to some which I already have. The Powge supplied bearings are noticeably less smooth than other cheap bearings I already have, so I will not be using the ones from the kit. I checked the idler pulleys and they are OK. The included belts are no-name, with literally no markings on the main drive GT2 belt. The loop belts are branded as "Powge", which was expected, but seeing the quality of the other parts makes these questionable as well. For the price, I would recommend sourcing the parts separately. I bought one extra 80 tooth GT2 gear from another seller, and the gear I received was much better quality and a bit cheaper too. I think I can probably still use the dowel pins but will need to remove the rust and probably paint the ends so they don't corrode further.
Update 9/14/2022: To their credit, Powge said they would send me some new 8x65mm pins to replace the rusted and pitted pins they sent me with the kit (Edit - communication with the seller was challenging, they asked me to pay a buck to get the replacement rods sent, which I refused, so they said they will ship them but it will be slow :D). I also let them know about the sharp edges on the 80 tooth gears, and told them that I deburred them myself, so I won't be asking for a replacement on that item. I also ordered some M8x65 stainless pins just in case there is a problem. I'm not gonna let the rusty pins stop the build, but will replace them when I get the new ones.
Update 9/14/2022: To their credit, Powge said they would send me some new 8x65mm pins to replace the rusted and pitted pins they sent me with the kit (Edit - communication with the seller was challenging, they asked me to pay a buck to get the replacement rods sent, which I refused, so they said they will ship them but it will be slow :D). I also let them know about the sharp edges on the 80 tooth gears, and told them that I deburred them myself, so I won't be asking for a replacement on that item. I also ordered some M8x65 stainless pins just in case there is a problem. I'm not gonna let the rusty pins stop the build, but will replace them when I get the new ones.


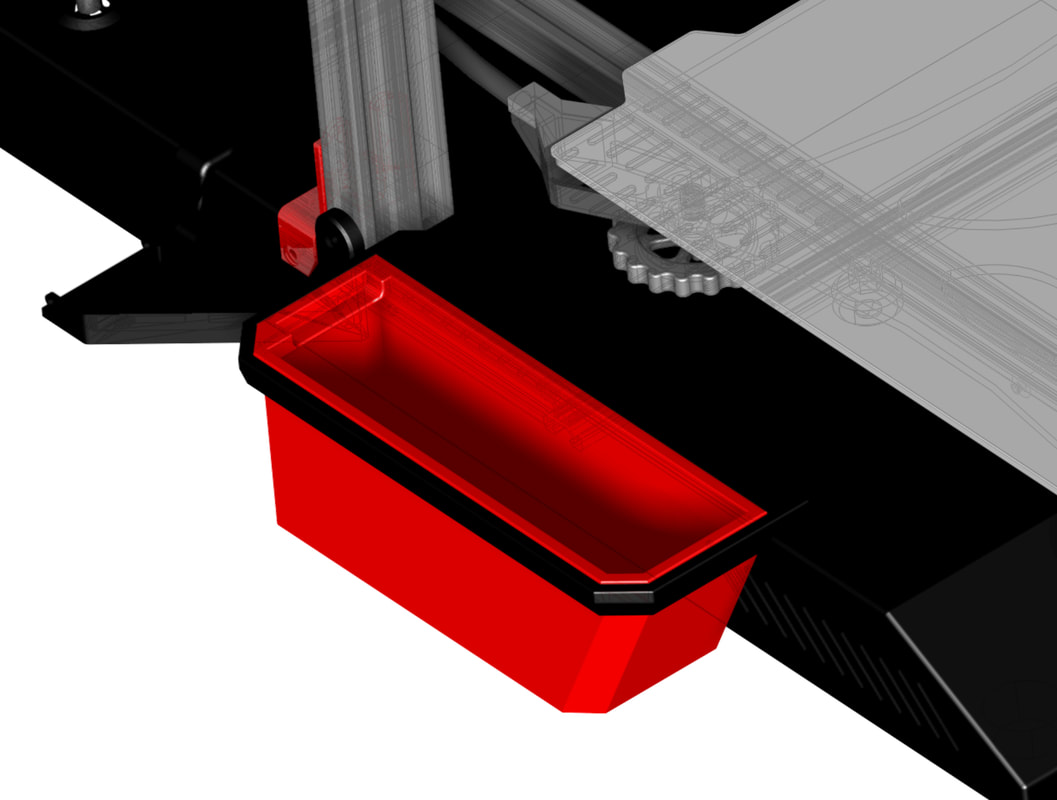
Update 9/15/2022: Just a quick update. I'm printing parts and so far things are working. I'm planning to print all the parts in the "Fire Engine Red" PETG first and then will do the rest in black PETG. Since the parts take hours to print, I took some time to design a bin for the scraps that always accumulate around the printer. It is designed to print in 2 parts to avoid any supports, and uses five 12x3mm cylinder magnets to hold it on the base of the CR10S Pro.
 |  |
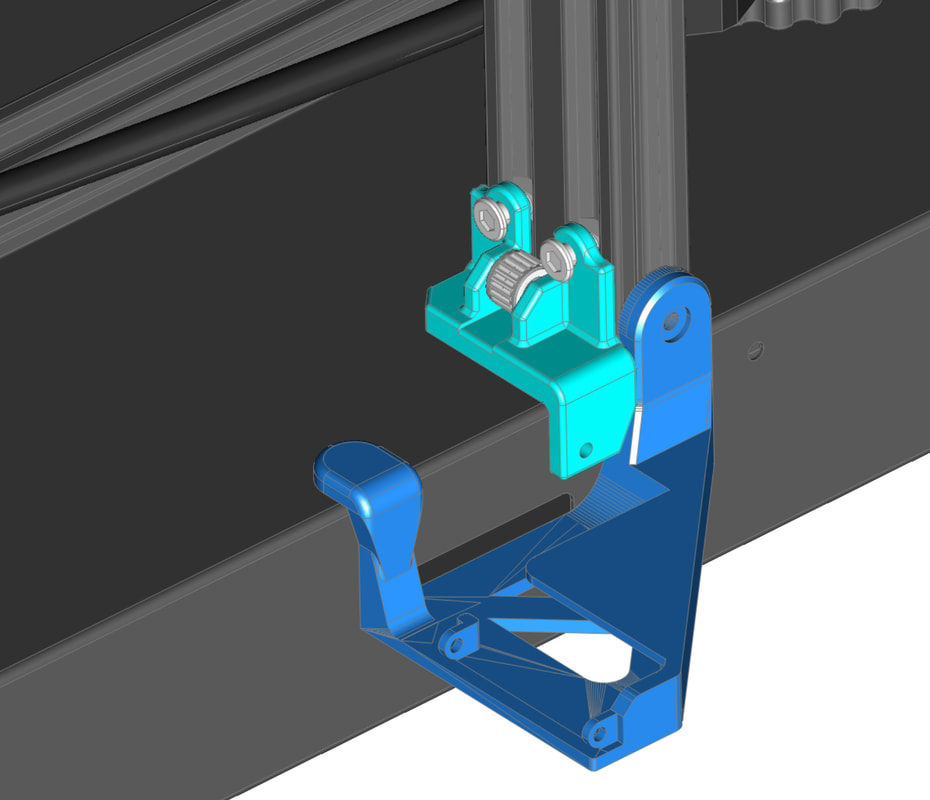
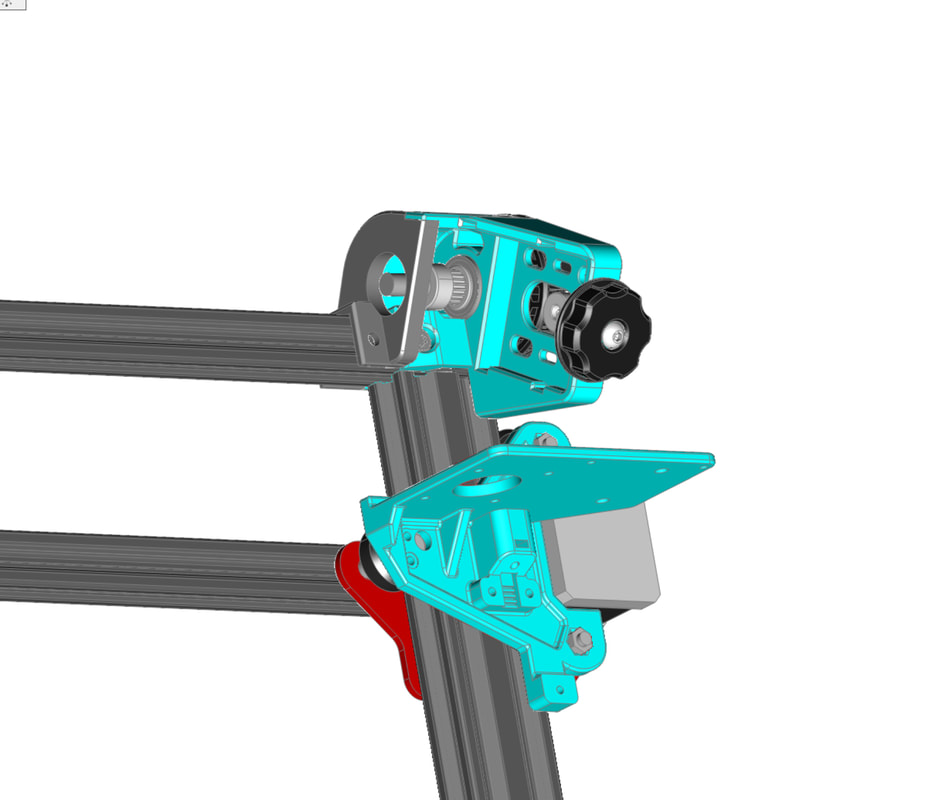
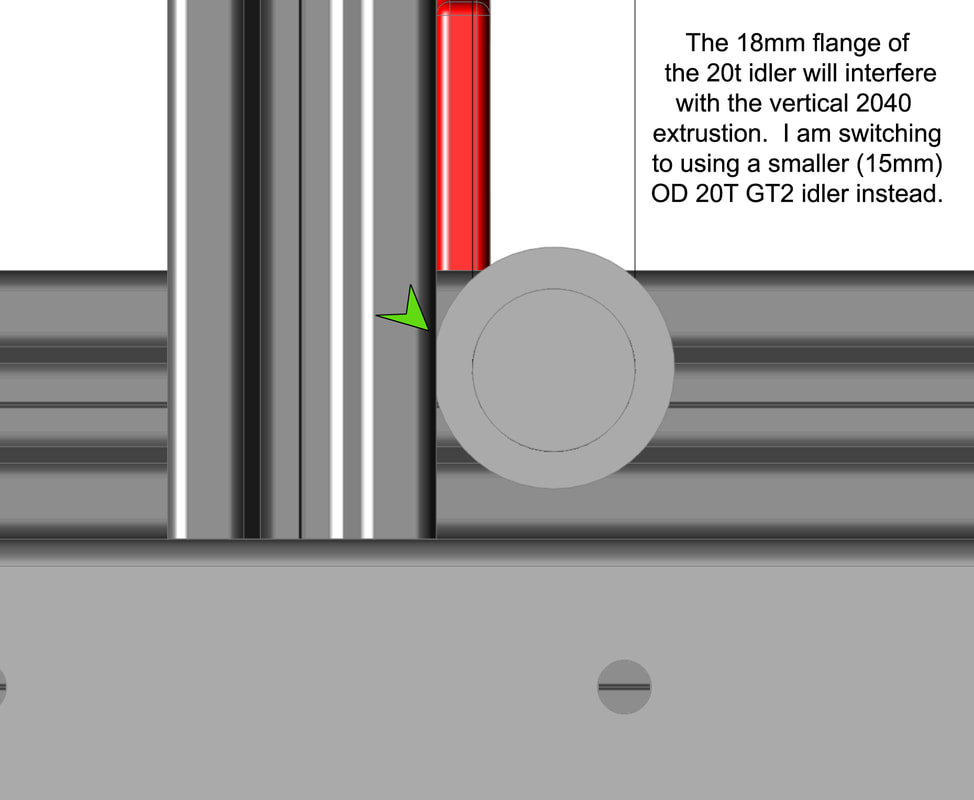
Update 9/16/2022: After printing off some parts it was clear I screwed up. The lower GT2 20 tooth idlers are 18mm in diameter which was too large and would have hit the 2040 extrusion, or I could have moved it slightly but that would screw up the "parallelness" of the belts. I had earlier decided to use the F623 flange bearings as the idlers however I flip flopped back and am planning to use these GT2 20 tooth idlers with a 5mm bore, since they have a smaller outside diameter of 15mm and will allow me to keep the belts as close to perfectly parallel as I can. The different idlers (which now require 5mmx16mm pins) required a re-design of the lower idler holders. I also had to make some changes to the carriages to keep the belts parallel and still have room to adjust the belt tension. But I think its now (really) done, and the belt path looks perfectly parallel in CAD. So now I will be back to re-printing a few parts, and waiting on the idlers to arrive, which fortunately will not take weeks on a boat from China.
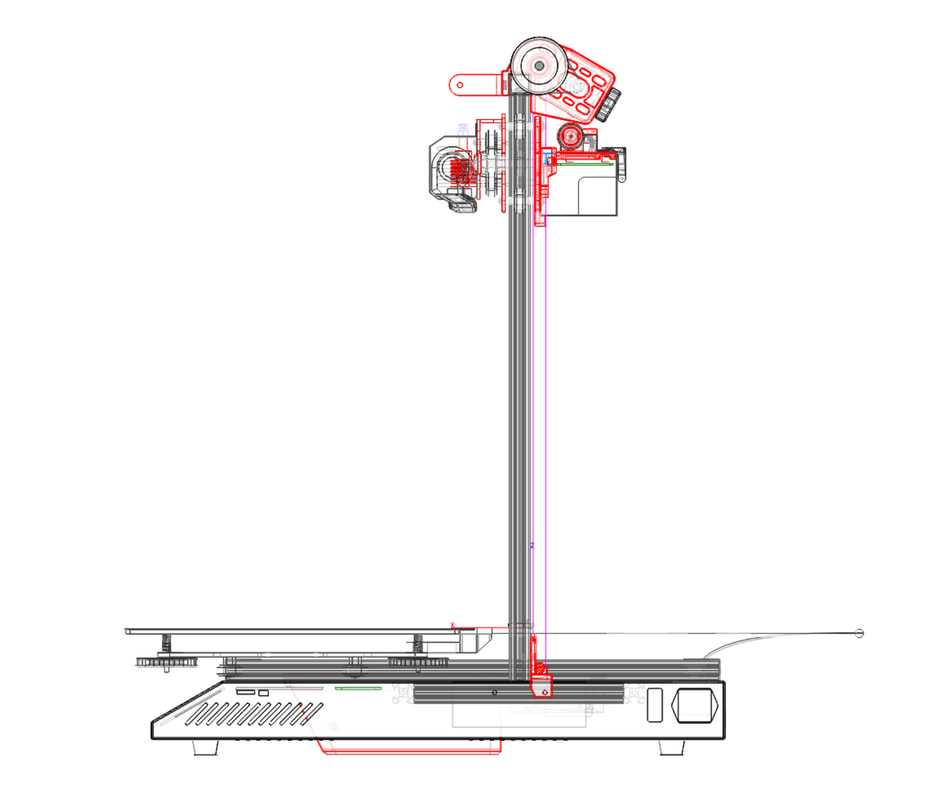
The pic below shows the issue with the GT2 20t idler with an 18mm flange (which I received as part of the kit). I think, though I am not certain why it is, that this problem is only with my modified design. I don't think it affects the original design, but since I was re-working many of the parts, I just went back and set the belts to parallel and made adjustments where needed to make all the parts line up with the belts. The purple/magenta lines in the 2nd pic represent the center of the belts (where the teeth start), and both the up and down runs of the belts are now parallel, which is helped by using a GT2 20t pulley at the top transmission, and an GT2 20t idler at the bottom. The difference in diameter between the GT2 20t idler/pulley (12mm) and the FT623 flange bearings (10mm but effectively 11.5mm) is only about 0.5mm, so it would not have mattered in the grand scheme of things if I went with the FT623, but using the GT2 20t gears just seems like a nicer way to go (at least right in this design phase :D).
The pic below shows the issue with the GT2 20t idler with an 18mm flange (which I received as part of the kit). I think, though I am not certain why it is, that this problem is only with my modified design. I don't think it affects the original design, but since I was re-working many of the parts, I just went back and set the belts to parallel and made adjustments where needed to make all the parts line up with the belts. The purple/magenta lines in the 2nd pic represent the center of the belts (where the teeth start), and both the up and down runs of the belts are now parallel, which is helped by using a GT2 20t pulley at the top transmission, and an GT2 20t idler at the bottom. The difference in diameter between the GT2 20t idler/pulley (12mm) and the FT623 flange bearings (10mm but effectively 11.5mm) is only about 0.5mm, so it would not have mattered in the grand scheme of things if I went with the FT623, but using the GT2 20t gears just seems like a nicer way to go (at least right in this design phase :D).
 |  |
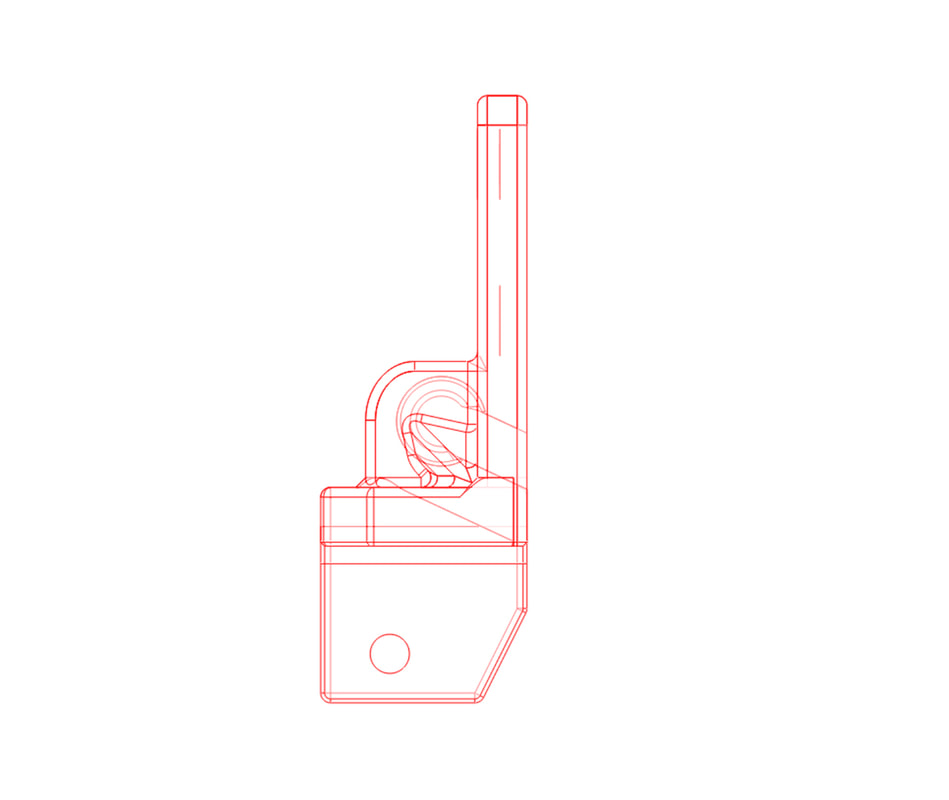
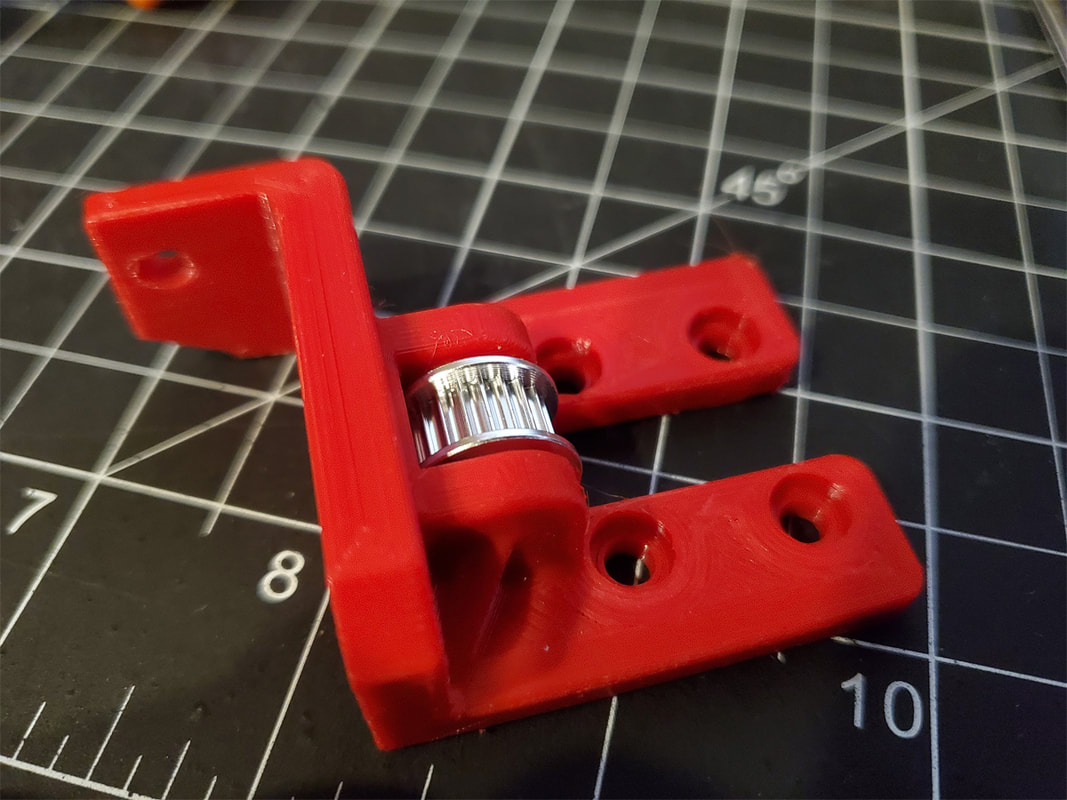
Update 9/18/2022: This took way too long but the lower idler is finally finished, the final design will use an M5x16mm pin with a GT2 20 tooth idler (with a 5mm bore and bearing and 15mm OD). The pin required some force to snap in which I'm fine with, since I want it to be secure (getting this part of the design right took a few tries). I used the handle of a long nose pliers to push the pin in place against a table top. The narrower 15mm OD on the idler fixed multiple issues I had earlier with the alignment on the remix, and there are no interference issues I can see. I'm printing up the left side idler now and then will do the carriages which were also revised previously. I pretty much need to print about every part to do the modification, which is probably for the best since I have too many projects and not enough time as usual.

Update 10/1/2022: This project is all printed, but installing and testing is on hold while I print some parts for the voron (on the CR10S Pro). I don't really want to have it apart while I'm still needing parts for other projects. However, I will update here when it is tested and then when the files are posted.
Update 10/8/2022: Just a minor note I forgot to mention about the design. I added some spacers to the 8mm shaft to keep everything in place, I added 2x1mm spacers (8x11 1mm) and a 6mm spacer (M8x16 6mm) on the 8mm shaft, which on this remixed transmission, holds the gear in position on the shaft, and keeps anything from moving side to side. The 6mm spacer is not really necessary, as it sits on the side opposite the large gear (between the belt gear and inboard bearing). I could have also just stacked 6x1mm spacers and skipped buying the 6mm spacers altogether. With the spacers installed, it feels like nothing will move side to side.
Update 4/2/2023: Well damn, six months already since the last post, and this project is still on the back burner... Well sort'a. The parts are all printed, but I just have not wanted to tear down my CR10S Pro, which has been a workhorse, to upgrade it with this setup. It will happen, but my primary project is getting my Voron 2.4 built. So this project will be on hold until the Voron is in operation. I'd not mind posting the models to this point as a work in progress if there is any interest. Just know that I cannot test the parts at this time, and would need to have feedback on the design, in exchange for taking the time to post it (as a work in progress). Otherwise it will be posted when I can test it out on my printer.


 RSS Feed
